Advertisement
User Guide for Ollee Mini PC MAPMG
Ollee Ultra Mini PC, a Mini PC with 32GB eMMC and Windows® 10 Pro –
MAPMG
Ollee Ultra Mini PC, a Mini PC with 120GB SSD and Windows® 10 Pro –
MAPMG1
User Guide
Before You Begin
CAUTIONS
The procedures in this guide assume familiarity with the general terminology associated with personal
computers and with the safety practices and regulatory compliance required for using and modifying
electronic equipment.
1
Advertisement
Table of Contents

Related Manuals for Ollee MINI Series

Summary of Contents for Ollee MINI Series
- Page 1 User Guide for Ollee Mini PC MAPMG Ollee Ultra Mini PC, a Mini PC with 32GB eMMC and Windows® 10 Pro – MAPMG Ollee Ultra Mini PC, a Mini PC with 120GB SSD and Windows® 10 Pro – MAPMG1 User Guide...
-
Page 2: Installation Precautions
ESD protection by wearing an antistatic wrist strap and attaching it to a metal part of the computer chassis. Installation Precautions When you install and test the Ollee Mini PC, observe all warnings and cautions in the installation instructions. To avoid injury, be careful of: •... - Page 3 User Guide for Ollee Mini PC MAPMG Open the Ollee Mini PC Chassis To open the Ollee Mini PC chassis, follow these steps: With a plastic removal tool (or similar tool) remove the front plastic cover. With a screwdriver unscrew the five front panel screws. Then slide the front cover and PCB from the...
- Page 4 User Guide for Ollee Mini PC MAPMG Changing an M.2 SSD The Ollee Mini PC MAPMG supports a 42mm M.2 SSD (M.2-2242). To Change an M.2 SSD: 1. Remove the small screw from the 42mm metal standoff on the board.
- Page 5 User Guide for Ollee Mini PC MAPMG Changing a 2.5” SSD or Hard Drive The Ollee Mini PC MAPMG supports an additional 2.5” Solid State Drive (SSD) or Hard Disk Drive (HDD). To add a 2.5” SSD or HDD: 1. Unscrew the 4 screws attaching the drive bay to the PCB.
- Page 6 User Guide for Ollee Mini PC MAPMG 3. Slide the drive bay and attached 2.5” disk into the SATA connector on the Mini PC ensuring the disk is fully seated into the SATA connector. 4. Secure the storage bracket onto the PCB with the four screws that were used in step 1).
-
Page 7: Close The Chassis
User Guide for Ollee Mini PC MAPMG Close the Chassis 1. After all components have been installed, slide the Ollee Mini PC assembly into the aluminium chassis and screw in the 5 retaining screws. 2. Attach the new face plate using the included adhesive tape. -
Page 8: Specifications
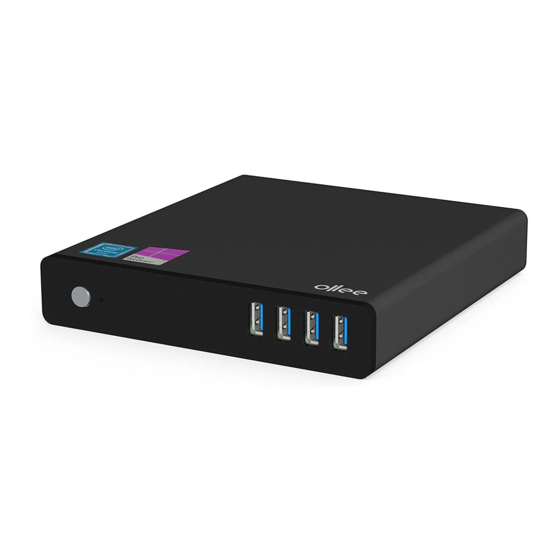
User Guide for Ollee Mini PC MAPMG Specifications Carton Barcode 9421029871050 Barcode 9421029871029 Model No MAPMG Ollee Ultra Mini Smart Cloud PC (Win10 Pro) Description 4GB/32GB General Brand Ollee Series Ultra MINI Range Model MAPMG CPU Supported 7th Generation Intel Celeron N3350 1.1 GHz to 2.4 GHz Turbo, Dual Core... - Page 9 User Guide for Ollee Mini PC MAPMG Extension Bays 2.5" Internal Bays 9.5mm Front Panel Ports 2 x USB3.0 2 x USB2.0 Back Panel Ports HDMI Type A, V1.4, 4K @30Hz 15 pin VGA connector Ethernet RJ45 Audio input 3.5mm TRS Audio output 3.5mm TRS...
Need help?
Do you have a question about the MINI Series and is the answer not in the manual?
Questions and answers