Advertisement
Advertisement
Table of Contents

Related Manuals for Scanreco HANDY

Summary of Contents for Scanreco HANDY
- Page 1 Operational specification of Scanreco HANDY handheld transmitter Page 1 of 7...
- Page 2 Pushbuttons ........................3 1.1. Transmitter start up ......................3 Mode description ....................... 4 2.1. Operational mode ......................... 4 2.2. Operational mode 2 ......................4 2.3. Test mode ..........................4 2.4. Assign mode .......................... 4 2.5. Calibrate mode ........................5 2.6.
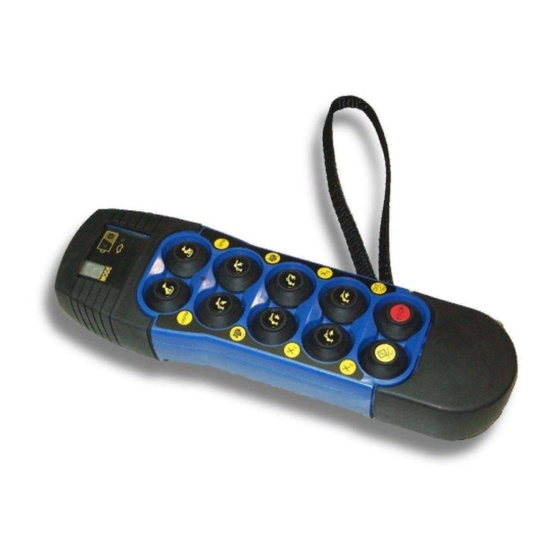
- Page 3 1. Pushbuttons Push buttons 1 – 8 are proportional push buttons. Push buttons 9 is a one step push button used as function switch. Pushbutton 10 is a two steps push button. 1.1. Transmitter start up Set the transmitter into operational mode 1 from switched off Press and keep pressed the button #10 •...
- Page 4 2. Mode description 2.1. Operational mode Push buttons 1 – 8 controls pre defined motions of the crane (mapping set in the • receiver) Push button 9 changes into operational mode 2 • Every time push button 9 is toggled, the display shows the operative mode “1” or "2" •...
- Page 5 2.5. Calibrate mode Push button 9 is used to switch between the various calibration steps, a single press • will increase the calibration step by one Push button 10 (any step) will switch the transmitter completely off, this will also •...
- Page 6 Step 8 – setting of A / B start speed crane drive 3 Push buttons 1 and 2 are used to activate the crane motion on which to perform the speed change Push buttons 3 and 4 are used as – and + to decrease or increase the start speed on the selected direction Step 9 –...
- Page 7 2.6. Information mode The 7-segment display will show the following information about the transmitter: • Software version Serial number Type of transmitter / Customer Selected transmitter timeout Number of operated hours Locking frequency configuration Push button 9 (both steps) is used to switch between the various information steps, a •...
- Page 8 Pairing procedure for HANDY radio remote control 1) Get started with the receiver and the transmitter both off. 2) Remove the protective cap and screw on the connector the special yellow plug supplied with the remote control (Pairing Plug p/n: 48118).
Need help?
Do you have a question about the HANDY and is the answer not in the manual?
Questions and answers