Advertisement
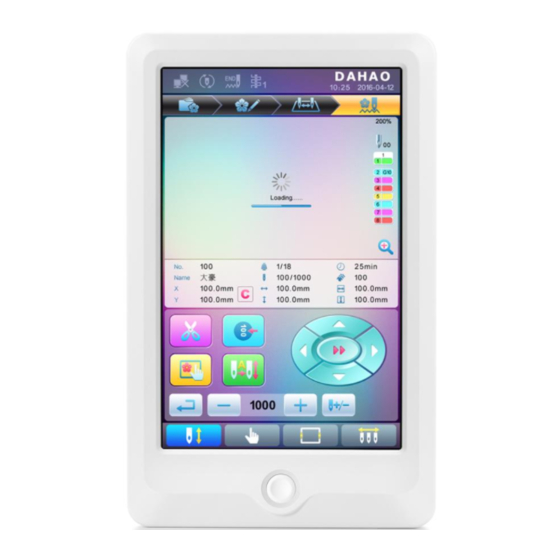
1. Touch Screen
LCD screen of high brightness is used as the touch screen of man-machine interface.
2. Operation Button
It is used to start or stop embroidery.
3. USB Main Interface
2 USB disks can be connected for data input and output.
A15 Controller Operation Quick Guide
Structure of Operation Panel
1
Advertisement

Subscribe to Our Youtube Channel
Related Manuals for DAHAO A15

Summary of Contents for DAHAO A15
- Page 1 LCD screen of high brightness is used as the touch screen of man-machine interface. 2. Operation Button It is used to start or stop embroidery. 3. USB Main Interface 2 USB disks can be connected for data input and output. A15 Controller Operation Quick Guide...
- Page 2 Main Interface Pattern Management Embroidery Parameters Color-changing Sequence Icon Name Icon Name "Pattern Management" Network Disconnection Interface "Parameter Setting" Cyclic Embroidery Hint Interface "Color-changing Sequence Thread Breakage Hint Setting" Interface Pattern Display Area Main Interface A15 Controller Operation Quick Guide...
-
Page 3: Frame
Scale up pattern, holding pressing for 2s to Move Down change into (scale down pattern) Needle Bar Number Color Manual Frame-moving Selection Area Memory Pattern List Repeat Page Up/Page Down Appliqué 、 Needle Bar Color A15 Controller Operation Quick Guide... -
Page 4: Frame
Pattern Range Display Frame Type Selection Position Pattern Center of the Frame Frame Parameter Setting Move Frame along Pattern Outside Move Frame along Pattern Outline Memory of Pattern Origin Recovery of Pattern Origin Manual Pattern Movement Exit A15 Controller Operation Quick Guide... -
Page 5: Size
Select "⑨ Automatic Origin Search", to enter the interface to search origin automatically; the frame will search and determine the origin automatically; press " " key to quit. A15 Controller Operation Quick Guide... - Page 6 In the main interface, press " " key to clear the XY displacement displayed here. Manual Frame-moving In the main interface, click the frame-moving key to move the frame to overlap its center with the needle hole. A15 Controller Operation Quick Guide...
-
Page 7: Size
Y direction between the frame center and Y+ direction position limitation optical coupler. "X direction frame size" means the embroidery range of the frame at X direction; "Y direction frame size" means the embroidery range of the frame at Y direction. A15 Controller Operation Quick Guide... -
Page 8: Frame
C. Cancel Position Limitation Set "Frame Selection" as "No Frame", the position limitation function will be canceled and the software protection for the frame of flat embroidery will also become invalid. A15 Controller Operation Quick Guide... -
Page 9: Table Of Contents
Size: 290×290 Embroidery Range: 430×260 Embroidery Range: 230×230 Frame 3: Frame 4: Size: 200 Size: 150 Embroidery Range: 150 Embroidery Range: 100 Frame 5: Frame 6: Size: 120 Size: 90 Embroidery Range: 90 Embroidery Range: 40 A15 Controller Operation Quick Guide... -
Page 10: Frame
G. Start Embroidery H. Release Embroidery Confirmation → Start Confirm Release Confirmation → → If user, after releasing embroidery confirmation, wants to embroidery the pattern again, user need operate from step B "Select Pattern for Embroidery" again. A15 Controller Operation Quick Guide... - Page 11 5. Empty Feed and Return at High Speed 7. Return to Embroidery Start Point → → → Locate the Next Color-changing Code 6. Empty Feed and Advance at High Speed 8. Return to Embroidery Stop Point → → → A15 Controller Operation Quick Guide...
Need help?
Do you have a question about the A15 and is the answer not in the manual?
Questions and answers