Table of Contents
Advertisement
Quick Links
Owner's Manual & Installation Instructions
Vented Range Hoods
Models: CVW9301 and CVW9361
Contents
Safety Information . . . . . . . . . . . . . . . . . . . . . . . . . . . . . . .3
Using the Hood
Controls . . . . . . . . . . . . . . . . . . . . . . . . . . . . . . . . . . . . . .5
Care And Cleaning
Filter . . . . . . . . . . . . . . . . . . . . . . . . . . . . . . . . . . . . . . . . .6
Surfaces . . . . . . . . . . . . . . . . . . . . . . . . . . . . . . . . . . . . . .6
Lights . . . . . . . . . . . . . . . . . . . . . . . . . . . . . . . . . . . . . . . .7
Para consultar una version en español de este manual de instrucciones,
Write the model and serial numbers here:
Model # _______________________________
Serial # _______________________________
You can find them on a label on the inside of the hood.
Español
visite nuestro sitio de internet cafeappliances.com.
Installation Instructions . . . . . . . . . . . . . . . . . . . . . . . . . .8
Troubleshooting Tips . . . . . . . . . . . . . . . . . . . . . . . . . . .20
Limited Warranty . . . . . . . . . . . . . . . . . . . . . . . . . . . . . . .22
Accessories . . . . . . . . . . . . . . . . . . . . . . . . . . . . . . . . . . .23
Consumer Support . . . . . . . . . . . . . . . . . . . . . . . . . . . . .24
49-2000061 05-18 GEA
Advertisement
Table of Contents

Related Manuals for Cafe CVW9301


Summary of Contents for Cafe CVW9301
-
Page 1: Table Of Contents
Owner’s Manual & Installation Instructions Vented Range Hoods Models: CVW9301 and CVW9361 Contents Safety Information .......3 Installation Instructions . - Page 2 THANK YOU FOR MAKING CAFÉ A PART OF YOUR HOME. We take pride in the craftsmanship, innovation and design that goes into every CAFÉ product, and we think you will too. Among other things, registration of your appliance ensures that we can deliver important product information and warranty details when you need them.
-
Page 3: Safety Information
IMPORTANT SAFETY INFORMATION READ ALL INSTRUCTIONS BEFORE USING WARNING WARNING TO REDUCE THE RISK OF FIRE, TO REDUCE THE RISK OF INJURY ELECTRIC SHOCK OR INJURY TO PERSONS, TO PERSONS IN THE EVENT OF A RANGE TOP OBSERVE THE FOLLOWING: GREASE FIRE, OBSERVE THE FOLLOWING*: A. - Page 4 IMPORTANT SAFETY INFORMATION READ ALL INSTRUCTIONS BEFORE USING WARNING WARNING TO REDUCE THE RISK OF FIRE, TO REDUCE THE RISK OF FIRE, ELECTRIC SHOCK OR INJURY TO PERSONS, USE ONLY METAL DUCTWORK. OBSERVE THE FOLLOWING: Do not attempt to repair or replace any part of your A.
-
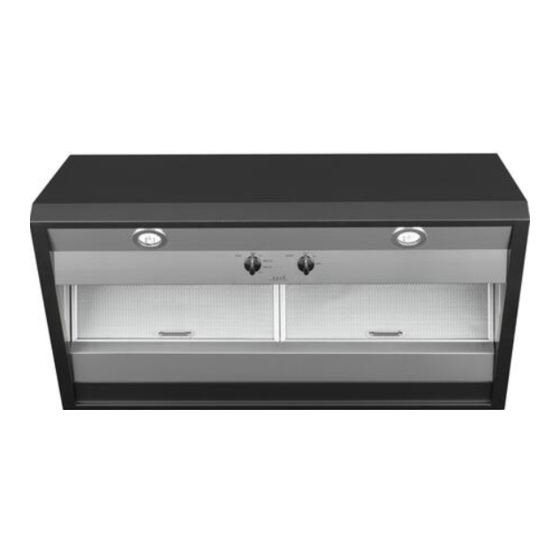
Page 5: Controls
Controls Throughout this manual, features and appearance may vary from your model. 1. FAN Control: 2. LIGHT Control: Turn the FAN speed control to LO, Turn the LIGHT control to HI for MED LO, MED HI or HI, as needed. Continuous bright light while cooking. -
Page 6: Filter
Filter Be sure the circuit breaker is off and all surfaces are cool before cleaning or servicing any part of the vent hood. Reusable Metal Grease Filters The hood has 2 metal reusable grease filters. To remove: The metal filters trap grease released by foods on the Grasp the filter handle and pull it up, forward and out. -
Page 7: Lights
Lights Be sure electrical power is off and all surfaces are cool before cleaning or servicing any part of the vent hood. NOTE: The glass cover should be removed only when To replace: cold. Wearing latex gloves may offer a better grip. 1. -
Page 8: Installation Instructions
Installation Range Hoods Instructions If you have questions, visit our website at: cafeappliances.com BEFORE YOU BEGIN WARNING TO REDUCE THE RISK OF FIRE, Read these instructions completely and ELECTRIC SHOCK OR INJURY TO PERSONS, carefully. OBSERVE THE FOLLOWING: IMPORTANT A. Installation work and electrical wiring must be •... - Page 9 Installation Preparation PRODUCT DIMENSIONS INSTALLATION CLEARANCES These vent hoods are designed to be installed onto 12” a wall. They may be installed beneath a soffit or cabinet. • The hoods are designed to fit 12” deep cabinets. When installed onto 15” deep cabinets, a filler panel accessory is available: Order JXS50SS for 18”...
- Page 10 Installation Preparation OPTIONAL ACCESSORIES ADVANCE PLANNING Duct Cover Duct Install Planning A decorative duct cover is available to • This hood may be vented vertically through upper accommodate 8 to 10 ft. ceiling heights. The duct cabinets, soffit or ceiling. A duct transition piece is cover will expand from 12”...
- Page 11 Installation Preparation DECORATIVE DUCT COVERS This Hood Must Use 7” Round Duct. It Can Transition To 3-1/4” x 12” Duct. A decorative duct cover is available to fit both model widths. The duct cover conceals the Do NOT use flexible plastic ducting. ductwork running from the top of the hood to the ceiling or soffit.
- Page 12 Installation Preparation TOOLS AND MATERIALS REQUIRED REMOVE THE PACKAGING (NOT SUPPLIED) Phillips and Flat blade Duct tape Hood screwdrivers Pencil and tape measure Wood Mounting Motor Parts Support Package 1/4” pivoting hex socket Shipping Carton Electric drill with 1/8” and 3/8” bits •...
- Page 13 Installation Preparation PARTS PROVIDED Locate the hardware accessory box packed with the hood and check contents. Screws, wall 2 Aluminum fasteners, washers Grease Filters Filter Duct Transition Support with Damper 761Dia65 DUCT COVER REQUIREMENTS Review the following examples to ensure a trouble free installation using the duct cover accessory.
- Page 14 Installation Preparation DETERMINE HOOD, DUCTWORK AND WIRING LOCATIONS • Keep the wood support piece and its screws for later FOR CEILING VENT installation. Do not discard. DUCTING 6-7/8” Centerline to Wall • Measure desired distance from the bottom of the hood to the cooking surface, 24”...
- Page 15 Installation Instructions INSTALL HOOD SUPPORT INSTALL TRANSITION IMPORTANT: Framing must be capable of IMPORTANT: Remove Shipping supporting 100 lbs. Remove shipping Tape on tape from damper and Damper • Locate at least 2 vertical studs at the wood check that damper mounting location by tapping drywall with a Duct Top of...
- Page 16 Installation Instructions IMPORTANT: For additional support and to minimize 4 (Alternate Mounting Method) vibration during operation, we strongly recommend INSTALL HOOD TO SOFFIT OR that the hood also be secured to the back wall with BENEATH CABINETS wall fasteners. SKIP THIS STEP IF USING WALL MOUNTING 30”...
- Page 17 Installation Instructions 5 INSTALL CEILING BRACKET 6 CONNECT DUCTWORK The ceiling bracket must be installed when the duct • Push duct over the end of the transition until it cover is used to span 24” or more height above reaches the stop tabs. the hood.
- Page 18 Installation Instructions 7 INSTALL MOTOR 9 INSTALL DUCT COVERS Motor Attachment • Align and engage the To install the 12” duct cover alone: Bracket slots in the blower • Place the 12” section of the decorative duct cover assembly to the 3 on top of the hood.
- Page 19 Installation Instructions 11 INSTALL FILTERS 12 FINALIZE INSTALLATION • Remove protective film covering the filters. • Refer to the operating instructions to test all controls. • Insert the filter into the “C” clips mounted to the top of the vertical front panel. •...
-
Page 20: Troubleshooting Tips
Troubleshooting tips ... Before you schedule service Save time and money! Review the charts on the following pages first and you may not need to schedule service. Problem Possible Cause What To Do Fan does not operate when A fuse may be blown or a circuit Replace fuse or reset circuit breaker. - Page 21 Notes 49-2000061...
-
Page 22: Limited Warranty
CAFÉ Vented Range Hood Limited Warranty cafeappliances.com All warranty service is provided by our Factory Service Centers, or an authorized service technician. To schedule service online, visit us at cafeappliances.com/service. Please have your serial number and your model number available when scheduling service. -
Page 23: Accessories
Accessories Looking For Something More? CAFÉ offers a variety of accessories to improve your cooking and maintenance experiences! Refer to the Consumer Support page for website information. The following products and more are available: Parts Duct Cover Kit Replacement Lights 15”... -
Page 24: Consumer Support
Consumer Support CAFÉ Website Have a question or need assistance with your appliance? Try the CAFÉ website 24 hours a day, any day of the year! You can also shop for more great CAFÉ products and take advantage of all our on-line support services designed for your convenience.
Need help?
Do you have a question about the CVW9301 and is the answer not in the manual?
Questions and answers