
Related Manuals for LG F7250


Summary of Contents for LG F7250
- Page 1 ENGLISH GPRS Phone USER’S MANUAL MODEL: F7250 Please read this manual carefully before operating your mobile phone. Retain it for future reference.
- Page 2 Introduction Congratulations on your purchase of the advanced and compact F7250 mobile phone, designed to operate with the latest digital mobile communication technology. This user’s guide contains important information on the use and operation of this phone. Please read all the information carefully for optimal performance and to prevent any damage to or misuse of the phone.
- Page 3 Exposure to radio frequency energy Radio wave exposure and Specific Absorption Rate (SAR) information This mobile phone model F7250 has been designed to comply with applicable safety requirement for exposure to radio waves. This requirement is based on scientific guidelines that include safety margins designed to assure this safety of all persons, regardless of age and health.
- Page 4 Guidelines for safe and efficient use Product care and maintenance Warning: Use only batteries, charger and accessories approved for use with this particular phone model. The use of any other types may invalidate any approval or warranty applying to the phone, and may be dangerous. •...
- Page 5 Efficient phone operation To enjoy optimum performance with minimum power consumption please: • Hold the phone as you speak to any other telephone. While speaking directly into the microphone, angle the antenna in a direction up and over your shoulder. If the antenna is extendable/ retractable, it should be extended during a call.
- Page 6 Guidelines for safe and efficient use Road safety Check the laws and regulations on the use of mobile phones in the areas when you drive. • Do not use a hand-held phone while driving. • Give full attention to driving. •...
- Page 7 Unlike other battery systems, there is no memory effect that could compromise the battery’s performance. • Use only LG batteries and chargers. LG chargers are designed to maximize the battery life. • Do not disassemble or short-circuit the battery pack.
-
Page 8: Table Of Contents
Contents ................Your phone • Phone components ............... 12 • Your phone’s features ............13 • Side of the Key ..............14 • Display information ............... 14 ................ Getting started • Installing the SIM card and the handset battery ....16 •... - Page 9 ............. Call register [Menu 2] • Missed calls [Menu 2-1] ............37 • Received calls [Menu 2-2] ............. 38 • Dialled calls [Menu 2-3] ............39 • Delete recent calls [Menu 2-4] ..........39 • Call durations [Menu 2-5] ............40 •...
- Page 10 Contents • Templates [Menu 5-5] ............70 • Memory status [Menu 5-6] ............ 72 ..............Camera [Menu 6] • Take picture [Menu 6-1] ............73 • Gallery [Menu 6-2] ..............75 ............Games & Apps [Menu 7] • Games [Menu 7-1] ..............77 •...
- Page 11 • Network settings [Menu 9-5] ..........95 • GPRS settings [Menu 9-6] ............ 96 • Reset settings [Menu 9-7] ............. 97 ..................Q&A ................Accessories ............... Technical Data...
-
Page 12: Your Phone
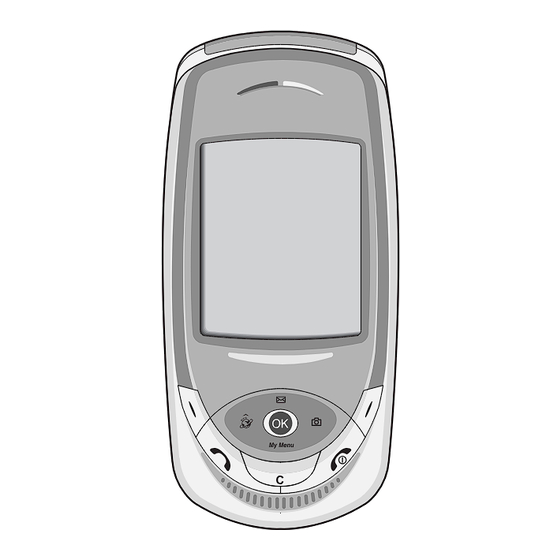
Your phone Phone components Earpiece LCD Screen Navigation keys Confirm key Camera key Left soft Key Right soft Key End/Power Key Send Key Clear Key Alphanumeric keys Hash Key Star Key... -
Page 13: Your Phone's Features
Your phone’s features Description Left soft key / Right soft key < > Each of these keys performs the function indicated by the text on the screen immediately above it. Navigation keys Use for quick access to phone functions. • Up navigation key By pressing this key in standby mode, you can search the phonebook by name. -
Page 14: Side Of The Key
Your phone Description Clear key Deletes a character by each press. Hold the key down to clear all input all input. Also use this key to go back to the previous screen. Camera key Press this key to use the camera feature. Directly goes to the camera mode. - Page 15 Icon Description Indicates that GPRS service is available. Indicates that you are roaming on another network. Indicates the alarm has been set and is on. Indicates the status of the battery charge. Indicates the receipt of a text message. Indicates the receipt of a voice message. Indicates the receipt of a MMS message.
-
Page 16: Getting Started
Getting started Installing the SIM card and the handset battery 1. Make sure the power is off before you remove the battery. Press the battery release latch up and remove the battery from the phone at a 45 degree angle. Note •... -
Page 17: Charging The Battery
3. Position the lugs on the bottom of the battery into the retaining holder. Then, push the top half of the battery into position until the latch clicks Charging the battery Only use the mains adapter supplied with your phone. 1. -
Page 18: Disconnecting The Adapter
Getting started Disconnecting the adapter 1. When charging is finished, the moving bars of the battery icon stop and ‘Full’ is displayed on the screen. 2. Unplug the adapter from the power outlet. Disconnect the adapter from the phone by pressing the grey tabs on both sides of the connector and pull the connector out. -
Page 19: Turning Your Phone On And Off
Turning your phone on and off Turning your phone ON 1. Install a battery to the handset and connect the phone to an external power source such as the travel adapter, cigarette lighter adapter or hands-free car kit. Or install a charged battery pack to the handset. -
Page 20: Access Codes
Getting started Access codes You can use the access codes described in this section to avoid unauthorised use of your phone. The access codes (except PUK and PUK2 codes) can be changed by using the Change codes feature [Menu 9-4-5]. PIN code (4 to 8 digits) The PIN (Personal Identification Number) code protects your SIM card against unauthorised use. - Page 21 Security code (4 to 8 digits) The security code protects the unauthorised use of your phone. The default security code is set to ‘0000’ and the security code is required to delete all phone entries and to activate the Reset settings menu.
-
Page 22: General Functions
General functions Making and answering calls Making a call 1. Make sure your phone is switched on. 2. Enter a phone number, including the area code. To edit a number on the LCD screen, press the right/left navigation keys to move the cursor to the desired position or simply press the clear key (C) to erase one digit at a time. - Page 23 Making a call from the phonebook You can save the names and phone numbers dialled regularly in the SIM card and/or phone memory, which is phonebook. You can dial a number by simply looking up the desired name in the phonebook. For further details on the phonebook feature, please refer to page 39-40.
-
Page 24: Entering Text
General functions Signal strength You can check the strength of your signal by the signal indicator ) on the LCD screen of your phone. Signal strength can vary, particularly inside buildings. Moving near to a window may improve reception. Entering text You can enter alphanumeric characters by using the phone’s keypad. - Page 25 Changing the text input mode 1. When you are in a field that allows characters to be entered, you will notice the text input mode indicator in the lower right corner of the LCD screen. 2. Change the text input mode by pressing #. You can check the current text input mode in the lower right corner of the LCD screen.
- Page 26 General functions – If the desired word is missing from the word choice list, add it using the ABC mode. – You can select the language of the T9 mode. Press the left soft key [Option], then select T9 languages or press the "*"...
- Page 27 Note • Refer to the table below for more information on the characters available using the alphanumeric keys. Characters in the order display Upper case Lower case . , - ? ! ' @ : 1 . , - ? ! ' @ : 1 A B C 2 a b c 2 D E F 3...
-
Page 28: Phonebook
General functions Phonebook You can store phone numbers and their corresponding names in the memory of your SIM card. In addition, you can store up to 255 numbers and names in the phone memory. The SIM card and phone are both used in the same way in the Phonebook menu. - Page 29 Answering an incoming call To answer an incoming call when the handset is ringing, simply press the S key. The handset is also able to warn you of an incoming call while you are already on a call. A tone sounds in the earpiece, and the display will show that a second call is waiting.
-
Page 30: Multiparty Or Conference Calls
General functions Multiparty or conference calls The multiparty or conference service provides you with the ability to have a simultaneous conversation with more than one caller, if your network operator supports this feature. A multiparty call can only be set up when you have one active call and one call on hold, both calls having been answered. - Page 31 Adding calls to the conference call To add a call to an existing conference call, press the left soft key, then select the Conference / Join all. Displaying callers in a conference call To scroll through the numbers of the callers who make up a conference call on the handset screen, use the up/down navigation keys.
-
Page 32: Menu Tree
Menu tree 1 Profiles 3 Fun & Tools 1 Vibrate only 1 Alarm clock 2 Silent 2 Calculator 3 General 3 My folder 4 Loud 4 Unit converter 5 Headset 5 World time 6 Car 6 Voice recorder 7 Infrared 2 Call register 4 Organizer 1 Missed calls... - Page 33 6 Camera 9 Settings 1 Take picture 1 Date & Time 2 Gallery 2 Phone settings 3 Call settings 4 Security settings 5 Network settings 6 GPRS settings 7 Games & Apps 7 Reset settings 1 Games 2 Applications 3 Download 4 Information 0 SIM Service This menu depends on SIM...
-
Page 34: Selecting Functions And Options
Selecting functions and options Your phone offers a set of functions that allow you to customise the phone. These functions are arranged in menus and sub-menus, accessed via the two soft keys marked < and >. Each menu and sub-menu lets you view and alter the settings of a particular function. -
Page 35: Profiles [Menu 1]
Profiles [Menu 1] In Profiles, you can adjust and customise the phone tones for different events, environments, or caller groups. There are six preset profiles: Vibrate only, Silent, General, Loud, Headset and Car. Each profile can be personalised except Vibrate only and Silent. - Page 36 Profiles [Menu 1] Automatic answer: (only in Car profile) You can activate the automatic answer feature. Select the time before answering automatically. Customising profiles – Rename [Menu 1-x-3] You can rename a profile and give it any name you want. Vibrate only, Headset and Car profiles cannot be renamed.
-
Page 37: Call Register [Menu 2]
Call register [Menu 2] You can check the record of missed, received, and dialled calls only if the network supports Calling Line Identification (CLI) within the service area. The number, the name (if available), and the picture (if available) are displayed together with the date and time at which the call was made. -
Page 38: Received Calls [Menu 2-2]
Call register [Menu 2] Received calls [Menu 2-2] This option lets you view the last 10 incoming calls. After pressing the left soft key [Option], you can also: • View the number if available and call it or save it in the phonebook. •... -
Page 39: Dialled Calls [Menu 2-3]
Dialed calls [Menu 2-3] This option lets you view the last 10 outgoing calls (called or attempted). Using the [Option] key, you can also: • View the number if available and call it or save it in the phonebook. • Enter a new name for the number and save in the phonebook. •... -
Page 40: Call Durations [Menu 2-5]
Call register [Menu 2] Call durations [Menu 2-5] Use this to view the duration of your incoming and outgoing calls. You can check each call duration at the bottom of screen while scrolling using the up/down navigation keys. Pressing the [OK] key or the left soft key [Reset] resets the call timer of selected call. -
Page 41: Cost Settings [Menu 2-7]
Cost settings [Menu 2-7] • Call cost’s limit: This network service allows you to limit the cost of your calls to the number of charging units or units of currency. You can make or receive a call up to the specified cost limit. You can change the call cost’s limit after entering the PIN2 code. - Page 42 Call register [Menu 2] • External device You can check the data volume and the time spent using GPRS with an external device such as a serial port. • Total data You can check the total amount of data through WAP and the external device.
-
Page 43: Fun & Tools [Menu 3]
Fun & Tools [Menu 3] Press the Menu key (<) and select Fun & Tools using navigation keys. Alarm clock [Menu 3-1] Set the alarm to ring at a specific time. In the Alarm Clock menu, the following options are available. Set the alarm time. -
Page 44: My Folder [Menu 3-3]
Fun & Tools [Menu 3] Using the calculator 1. Enter the first number using the numeric keys. 2. Press the corresponding navigation key to select a mathematical function. 3. To calculate the result, press the left soft key [Result] or OK key. 4. -
Page 45: Unit Converter [Menu 3-4]
Unit converter [Menu 3-4] This converts any measurement from one unit to another. There are 4 types that can be converted into units: Length, Surface, Weight and Volume. 1. Select one of four unit types by pressing the left soft key [Unit]. 2. -
Page 46: Voice Recorder [Menu 3-6]
Fun & Tools [Menu 3] Note • The time zone setting of each city in World time menu may be affected by network condition. Voice recorder [Menu 3-6] You can record a memo. You can record up to 3 voice memos up to a maximum of 30 seconds each. -
Page 47: Infrared [Menu 3-7]
Note • In standby mode, you can go directly to the Voice recorder menu by pressing the down navigation key. • If all memo locations are full, you must delete an old memo before recording a new one. Infrared [Menu 3-7] This feature allows you to send or receive data/fax through the infrared port. -
Page 48: Organizer [Menu 4]
Organizer [Menu 4] < Press the Menu key ( ) and select Organizer using navigation keys. Schedule [Menu 4-1] When you enter this menu, a calendar appears. A square cursor is located on the current date. You can move to another date using navigation keys. -
Page 49: Memo [Menu 4-2]
View all schedules [Menu 4-1-7] Shows the notes that are set for all days. Use the up/down navigation keys to browse through the note lists. Go to date [Menu 4-1-8] Use this to jump to a specific date. Enter the date using the numeric keys and the left/right navigation keys. -
Page 50: Phonebook [Menu 4-3]
Organizer [Menu 4] The following options are available. • Edit: You can edit the selected memo. • Delete: Deletes the selected memo. • Add new: You can add new memo. • Delete all: Deletes all meno. Phone book [Menu 4-3] You can save phone numbers and their corresponding names in the memory of your SIM card. - Page 51 • Copy: Use this to copy the Phonebook entry from SIM to the phone memory or vice versa. • Voice: Records the name of the selected Phonebook entry for voice-activated dialling. • Main number: To show all number lists which are saved if more than 2 numbers saved.
- Page 52 Organizer [Menu 4] Speed dials [Menu 4-3-3] You can assign any of the keys 2 to 9 with a name list entry. You can make a call to the number by pressing the [Send] key in the Speed dial list, or press the left key [Options] and select Call. Or, you can call directly by pressing the assigned key (2-9) for 2-3 seconds in standby mode.
- Page 53 Voice list [Menu 4-3-4] You can assign a voice with a name list entry for voice-activated dialling. You can make a call to the number by pressing the [Send] key, or press the left key [Options] and select Call. 1. In menu mode, Select an Organizer ➝ Phonebook, or in standby mode, press right soft key [Names].
- Page 54 Organizer [Menu 4] Caller groups [Menu 4-3-5] There are 6 pre-defined groups, as well as one additional group labelled Others, where you can create lists. 1. In menu mode, select an Organizer ➝ Phonebook, or in standby mode, press right soft key [Names]. 2.
- Page 55 The following options are available. – Keep original : When copying, the original dial numbers are kept. – Delete original: When copying, the original dial numbers will be erased. Delete all [Menu 4-3-7] You can delete all entries in SIM, Phone, and Voice list. Except for Voice list, this function requires the security code.
- Page 56 Organizer [Menu 4] • Memory status You can check the current memory status of the SIM card and phone memory. • Own number (SIM dependent) Use this to display your phone number in the SIM card.
-
Page 57: Messages [Menu 5]
Messages [Menu 5] < Press the Menu key ( ) and select Messages using navigation keys. Text messages [Menu 5-1] Your phone receives voice mail notification messages and Short Message Service (SMS) messages. Voice mail and SMS are network services. Please contact your network operator for more information. - Page 58 Messages [Menu 5] • Save to draft: Allows you to save the message so that it can be sent later. • T9 languages: Select the desired language of T9 mode. • Clear text: Erases the whole text. • Exit: Allows you to exit from the Write message menu. 3.
- Page 59 Icon Description Read SIM message Unread SIM message Read message Unread message Read delivery report Unread delivery report Note • SIM message refers the message saved in the SIM memory. And the network distinguishes an incoming message into the SIM message or just message. Each received message has the following options available.
- Page 60 Messages [Menu 5] • Extract Extracts a picture, animation, sound, phone number, text web page or email address from the message. These will be saved in My folder, Phonebook, or bookmarks. • Delete Deletes the selected message from the Inbox. •...
- Page 61 Draft [Menu 5-1-4] In this menu, you can see the message list saved as draft. Scroll through the list using the up/down navigation keys. Each draft has the following options. • Send Sends the selected message to other recipients. • Delete Deletes the selected message.
-
Page 62: Multimedia Messages [Menu 5-2]
Messages [Menu 5] • Reply with same service centre Allows the recipient of your SMS message to send you a reply via your message centre, if the service is provided by the network. • SMS centre Saves or changes the number of your SMS centre when sending text messages. - Page 63 4. You can add a slide by moving the cursor on , then pressing the OK key or the left soft key [Select]. You can also add a slide using the right soft key [Menu]. 5. Press the right soft key [Menu]. The following options are available.
- Page 64 Messages [Menu 5] • Timer stop The Timer stop menu is displayed when you receive a message including various pictures. Usually, the pictures are sequentially displayed automatically. However, if you select this menu, you can see the next picture by pressing the left soft key [Next] manually. •...
- Page 65 Outbox [Menu 5-2-3] Use this to see sent messages. For each sent message, you can see the delivery status. Icon Description Sent • Timer stop Usually, the pictures are in the form of an automatic slide show. However, if you select this menu, you can see the next picture by pressing the left soft key [Next] manually.
- Page 66 Messages [Menu 5] • Detail Displays information about the outbox messages: Subject (only for Multimedia message), Message date & time, Message type, Message size. • Reply Replies to the current message. • Reply all Replies to all recipients of the selected message. Draft [Menu 5-2-4] Using this menu, you can preset up to five multimedia messages that you use most frequently.
- Page 67 • Add slide Adds a slide before or after the current slide. • Remove slide Removes the highlighted slide. Settings [Menu 5-2-5] Via this menu, you can set up the default multimedia message information. The following options are available. • Slide duration Set the duration of each slide.
-
Page 68: Voice Messages [Menu 5-3]
Messages [Menu 5] • Profiles See page 78 for further information. Voice messages [Menu 5-3] This menu provides you with a quick way of accessing your voice mailbox (if provided by your network). Before using this feature, you must enter the voice server number obtained from your network operator. - Page 69 Read [Menu 5-4-1] The list of received broadcast messages can be searched and the contents viewed. Receive [Menu 5-4-2] Use this to enable or disable the reception of broadcast messages. Alert [Menu 5-4-3] Set alert on or off for a new broadcast message. Auto display [Menu 5-4-4] If you select this option On, all received broadcast messages will be automatically displayed.
-
Page 70: Templates [Menu 5-5]
Messages [Menu 5] Templates [Menu 5-5] There are pre-defined messages in the list. You can view and edit the template messages or create new messages. Three types of templates are available: Text, Multimedia and Signature. Text [Menu 5-5-1] • Edit Use this to write a new message or edit the selected template message from the text template list. - Page 71 • Save Saves multimedia messages in draft form or as templates. • Delete Deletes the multimedia template. • Slide duration Set the slide show duration. • Slide format Align the message contents right, left, top or bottom. • Add Slide Adds a slide before or after the current slide.
-
Page 72: Memory Status [Menu 5-6]
Messages [Menu 5] • Send text message Use this to send the selected signature by SMS. • Send multimedia message Sends the selected signature by MMS. Memory status [Menu 5-6] You can check the current memory status for SMS and MMS. -
Page 73: Camera [Menu 6]
Camera [Menu 6] The F7250 has a built-in camera. It supports Zoom, White balance, Colour/Sepia/Grey settings, and Multi burst functions. Take picture [Menu 6-1] < ) and select Camera ➝ Take picture. Press the Menu key ( Or, press the camera key ( ) in standby mode. - Page 74 Camera [Menu 6] < Options before taking a picture > Press the left soft key [Options] to set the options in the preview mode. You can select the desired option by pressing the [OK]. And you will see the current option setting value in the top of the preview screen.
-
Page 75: Gallery [Menu 6-2]
Gallery [Menu 6-2] Then select image category. [All pictures / General pictures / Phonebook pictures] You can view, organise and send pictures saved in your phone. 1. Use the navigation keys to select the picture you want a full screen view of. 2. -
Page 76: Games & Apps [Menu 7]
Games & Apps [Menu 7] Java is a technology developed by Sun Microsystems. Similar to the way you would download the Java Applet using the standard Netscape or MS Internet Explorer browsers, Java MIDlet can be downloaded using the WAP enabled phone. Depending on the service provider, all Java based programs such as Java games can be downloaded and run on a phone. -
Page 77: Games [Menu 7-1]
Games [Menu 7-1] The phone offers you the games to play with. Note • The control keys are different depending on a game. However, each one has an introduction to explain the main control keys. [ Common key function ] <... -
Page 78: Download [Menu 7-3]
Games & Apps [Menu 7] • Connect options: Some Java applications may require data connection to be mode. Select one of the following options. 1. Ask first: You will be asked before the application makes the connection. 2. Allowed: The connection is created immediately without a notification. -
Page 79: Information [Menu 7-4]
Note • After selecting the Connect function to access the Java MIDlet Provider’s server, you may choose one of many Java programs to download and install into your phone. Once connected to the server, the Go button can be pressed to view the JAD information on a desired program. -
Page 80: Internet [Menu 8]
Internet [Menu 8] < Press the Menu key and select Internet using navigation keys. You can access various WAP (Wireless Application Protocol) services such as banking, news, weather reports and flight information. These services are specially designed for mobile phones and they are maintained by WAP service providers. Check the availability of WAP services, pricing and tariffs with your network operator and/or the service provider whose service you wish to use. -
Page 81: Home [Menu 8-1]
Set the current page as a new bookmark or move an established bookmark. Your phone may have some pre-installed bookmarks for sites not affiliated with LG. LG does not warrant or endorse these sites. If you choose to access them, you should use the same security or content precautions as you would with any site. -
Page 82: Push Messages [Menu 8-3]
Internet [Menu 8] Push messages [Menu 8-3] Inbox [Menu 8-3-1] You can order Push messages from WAP service providers. Push messages are notifications of, for example, news headlines and they can contain a text message or the address of a WAP service. For availability and subscription, contact your WAP service provider. -
Page 83: Go To Url [Menu 8-5]
• Delete: Deletes the selected profile from the list. • New profile: You can add a new profile. Note • The changes using these options may affect the MMS function. Go to URL [Menu 8-5] You can connect directly to the site you want. To do this, you need to enter a specific URL. -
Page 84: Security Certificates [Menu 8-7]
Internet [Menu 8] Security certificates [Menu 8-7] A list of the available certificates is shown. Reset profiles [Menu 8-8] You can reset profiles to return to original settings. WAP information [Menu 8-9] The WAP browser version is displayed. -
Page 85: Settings [Menu 9]
Settings [Menu 9] Press the Menu key (<) and select Settings using navigation keys. Date & Time [Menu 9-1] This option lets you change the current time and date displayed. The following options are available. Set date [Menu 9-1-1] Use this to enter the day, month and year. You can change the date format via the Date format menu option. - Page 86 Settings [Menu 9] Greeting note [Menu 9-2-2] Use this to show the greeting note on the internal LCD screen in the standby mode and external LCD. Menu colour [Menu 9-2-3] Your phone provides you with 4 menu colour themes. Set the menu colour by scrolling and pressing the Select key.
-
Page 87: Call Settings [Menu 9-3]
Call settings [Menu 9-3] To change the settings for call diverting. Call divert [Menu 9-3-1] When this network service is activated, you can direct your incoming calls to another number, for example, to your voice mailbox number. For details, contact your network operator. Select one of the divert options, for example, select If busy to divert voice calls when your number is busy or when you reject incoming calls. - Page 88 Settings [Menu 9] • To voice mail Forwards to message centre. This function does not apply to All data calls and All fax calls menus. • To other number Input the number for call diverting. - Cancel Cancels the selected call divert. - View status You can check the status of the service.
- Page 89 Call waiting [Menu 9-3-4] (Network Service) The network will notify you of a new incoming call while you have a call in progress. Select Activate to request the network to activate call waiting, Cancel to request the network to deactivate call waiting, or View status, to check if the function is active or not.
- Page 90 Settings [Menu 9] Note • You must say the name exactly as you said when you recorded it. This may be difficult, for example, in a noisy environment or during an emergency, so you should not rely solely upon voice-activated dialling in all circumstances.
-
Page 91: Security Settings [Menu 9-4]
Security settings [Menu 9-4] Various passwords are used to protect certain features of your phone. PIN code request [Menu 9-4-1] When the PIN code request feature is enabled, you must enter your PIN each time you switch the phone on. Consequently, any person who does not have your PIN cannot use your phone without your approval. - Page 92 Settings [Menu 9] The following options are available: • Power On - Enable You are required to enter the phone password when you switch the phone on. - Disable You do not need to enter the phone password when you switch the phone on.
- Page 93 • Outgoing international International calls cannot be made. • Outgoing international except home country When abroad, calls can be made only to numbers within the current country and to your home country, No call can the country where your home network provider is located. •...
- Page 94 Settings [Menu 9] Fixed dial number (FDN) [Menu 9-4-4] (SIM dependent) You can restrict outgoing calls to selected phone numbers if supported by your SIM card. The FDN capacity to add depends on the SIM card. When you enter the FDN, the PIN2 code is required. This Function enables patial numbers (e.g.
-
Page 95: Network Settings [Menu 9-5]
Change codes [Menu 9-4-5] The Change codes feature lets you change your current password to a new one. You must enter the current password before you can specify a new one. Use this to change the access codes: Security code, PIN code, PIN2 code Note •... -
Page 96: Gprs Settings [Menu 9-6]
Settings [Menu 9] Preferred [Menu 9-5-3] You can set a list of preferred networks the handset should attempt to register with first, before attempting to register to any other networks. This list is created from the handset’s predefined list of known networks. -
Page 97: Reset Settings [Menu 9-7]
Note • If there is no GPRS coverage and you have chosen Automatic, the phone will periodically try to establish a connection. External device [Menu 9-6-2] When you use Internet via GPRS by using external device, you can set the following six profiles: Rename, APN, IP address, DNS, User ID, and Password. -
Page 98: Q&A
Q&A Please check to see if any problem which you may have with your phone is described here before taking it for service or calling a service engineer. How do I view the list of outgoing calls, incoming calls and missed calls? Press How do I clear all call history? - Page 99 LCD does not turn on. Remove and replace the battery and turn on the power. If the phone still does not turn on, charge the battery and try again. An echo can be heard during connection with a certain telephone in a certain area. It is called ‘Echo Phenomenon’.
- Page 100 Q&A No number is dialled when you recall a phonebook entry. Check that the numbers have been saved correctly, by using the phonebook Search feature. Resave them, if necessary. You cannot be contacted. Is your phone switched on ( pressed for more than three seconds)? Are you accessing the right cellular network? Have you set an incoming call barring option? I cannot find the lock, PIN, or PUK code, or password?
-
Page 101: Accessories
Data cable kit Connects your phone to a PC. Note • Always use genuine LG accessories. Failure to do this may invalidate your warranty. • Accessories may be different in different regions; please check with our regional service company or... -
Page 102: Technical Data
Technical Data General Product name : F7250 System : GSM 900/DCS 1800 Ambient temperatures Max : +55°C Min : -10°C... - Page 103 Memo...
Need help?
Do you have a question about the F7250 and is the answer not in the manual?
Questions and answers