Kyocera 7135 User Manual
Hide thumbs
Also See for 7135:
- Reference manual (224 pages) ,
- User manual (112 pages) ,
- Enterprise resource manual (18 pages)
Advertisement
Quick Links
Advertisement

Related Manuals for Kyocera 7135

Summary of Contents for Kyocera 7135
- Page 1 Cover KYOCERA 7135 SMARTPHONE USER’S GUIDE...
- Page 3 User Guide for the 7135 smartphone by Kyocera hvl`bo^=tfobibpp=`lom K NMPMM=`~ãéìë=mçáåí=aêáîÉ p~å=aáÉÖçI=`~äáÑçêåá~=VONON=rKpK^K sáëáí=ìë=~í=ïïïKâóçÅÉê~JïáêÉäÉëëKÅçã cçê=~ÅÅÉëëçêáÉëI=îáëáí=ïïïKâóçÅÉê~JïáêÉäÉëëKÅçãLëíçêÉ UOJ_TVOSJPbkI=oÉîK=MMN...
- Page 4 c``Lf`=kçíáÅÉ qÜáë=ÇÉîáÅÉ=ÅçãéäáÉë=ïáíÜ=é~êí=NR=çÑ=íÜÉ=c``=êìäÉëK=léÉê~íáçå=áë=ëìÄàÉÅí=íç=íÜÉ=ÑçääçïáåÖ=íïç= ÅçåÇáíáçåëW=ENF=qÜáë=ÇÉîáÅÉ=ã~ó=åçí=Å~ìëÉ=Ü~êãÑìä=áåíÉêÑÉêÉåÅÉI=~åÇ=EOF=íÜáë=ÇÉîáÅÉ=ãìëí= ~ÅÅÉéí=~åó=áåíÉêÑÉêÉåÅÉ=êÉÅÉáîÉÇI=áåÅäìÇáåÖ=áåíÉêÑÉêÉåÅÉ=íÜ~í=ã~ó=Å~ìëÉ=ìåÇÉëáêÉÇ= çéÉê~íáçåK= qÜÉ=ÉñéçëìêÉ=ëí~åÇ~êÇ=Ñçê=ïáêÉäÉëë=ãçÄáäÉ=éÜçåÉë=Éãéäçóë=~=ìåáí=çÑ=ãÉ~ëìêÉãÉåí=âåçïå= ~ë=íÜÉ=péÉÅáÑáÅ=^Äëçêéíáçå=o~íÉI=çê=p^oK=qÜÉ=p^o=äáãáí=ëÉí=Äó=íÜÉ=c``=áë=NKSt~ííë=éÉê= âáäçÖê~ã=EtLâÖFK=qÉëíë=Ñçê=p^o=~êÉ=ÅçåÇìÅíÉÇ=ìëáåÖ=ëí~åÇ~êÇ=çéÉê~íáåÖ=éçëáíáçåë=ëéÉÅáÑáÉÇ= Äó=íÜÉ=c``=ïáíÜ=íÜÉ=éÜçåÉ=íê~åëãáííáåÖ=~í=áíë=ÜáÖÜÉëí=ÅÉêíáÑáÉÇ=éçïÉê=äÉîÉä=áå=~ää=íÉëíÉÇ= ÑêÉèìÉåÅó=Ä~åÇëK=^äíÜçìÖÜ=íÜÉ=p^o=áë=ÇÉíÉêãáåÉÇ=~í=íÜÉ=ÜáÖÜÉëí=ÅÉêíáÑáÉÇ=éçïÉê=äÉîÉäI=íÜÉ= ~Åíì~ä=p^o=äÉîÉä=çÑ=íÜÉ=éÜçåÉ=ïÜáäÉ=çéÉê~íáåÖ=Å~å=ÄÉ=ïÉää=ÄÉäçï=íÜÉ=ã~ñáãìã=î~äìÉK=qÜáë= áë=ÄÉÅ~ìëÉ=íÜÉ=éÜçåÉ=áë=ÇÉëáÖåÉÇ=íç=çéÉê~íÉ=~í=ãìäíáéäÉ=éçïÉê=äÉîÉäë=ëç=~ë=íç=ìëÉ=çåäó=íÜÉ= éçïÉê=êÉèìáêÉÇ=íç=êÉ~ÅÜ=íÜÉ=åÉíïçêâK=få=ÖÉåÉê~äI=íÜÉ=ÅäçëÉê=óçì=~êÉ=íç=~=ïáêÉäÉëë=Ä~ëÉ= ëí~íáçå=~åíÉåå~I=íÜÉ=äçïÉê=íÜÉ=éçïÉê=çìíéìíK= _ÉÑçêÉ=~=éÜçåÉ=ãçÇÉä=áë=~î~áä~ÄäÉ=Ñçê=ë~äÉ=íç=íÜÉ=éìÄäáÅI=áí=ãìëí=ÄÉ=íÉëíÉÇ=~åÇ=ÅÉêíáÑáÉÇ=íç= íÜÉ=c``=íÜ~í=áí=ÇçÉë=åçí=ÉñÅÉÉÇ=íÜÉ=äáãáí=Éëí~ÄäáëÜÉÇ=Äó=íÜÉ=ÖçîÉêåãÉåíJ~ÇçéíÉÇ= êÉèìáêÉãÉåí=Ñçê=ë~ÑÉ=ÉñéçëìêÉK=qÜÉ=íÉëíë=~êÉ=éÉêÑçêãÉÇ=áå=éçëáíáçåë=~åÇ=äçÅ~íáçåë=EÉKÖKI=~í= íÜÉ=É~ê=~åÇ=ïçêå=çå=íÜÉ=ÄçÇóF=~ë=êÉèìáêÉÇ=Äó=íÜÉ=c``=Ñçê=É~ÅÜ=ãçÇÉäK=qÜÉ=ÜáÖÜÉëí=p^o= î~äìÉ=Ñçê=íÜáë=ãçÇÉä=éÜçåÉ=ïÜÉå=íÉëíÉÇ=Ñçê=ìëÉ=~í=íÜÉ=É~ê=áë=MKUV=tLâÖ=~åÇ=ïÜÉå=ïçêå=çå= íÜÉ=ÄçÇó=~í=íÜÉ=ï~áëí=áë=MKPQ=tLâÖK=E_çÇóJïçêå=ãÉ~ëìêÉãÉåíë=ÇáÑÑÉê=~ãçåÖ=éÜçåÉ=ãçÇÉäëI= ÇÉéÉåÇáåÖ=ìéçå=~î~áä~ÄäÉ=~ÅÅÉëëçêáÉë=~åÇ=c``=êÉèìáêÉãÉåíëFK=tÜáäÉ=íÜÉêÉ=ã~ó=ÄÉ= ÇáÑÑÉêÉåÅÉë=ÄÉíïÉÉå=íÜÉ=p^o=äÉîÉäë=çÑ=î~êáçìë=éÜçåÉë=~åÇ=~í=î~êáçìë=éçëáíáçåëI=íÜÉó=~ää= ãÉÉí=íÜÉ=ÖçîÉêåãÉåí=êÉèìáêÉãÉåí=Ñçê=ë~ÑÉ=ÉñéçëìêÉK= t~êåáåÖ rëÉ=çåäó=hóçÅÉê~=táêÉäÉëë=`çêéK=~ééêçîÉÇ=~ÅÅÉëëçêáÉë=ïáíÜ=hóçÅÉê~=táêÉäÉëë=`çêéK= éÜçåÉëK=rëÉ=çÑ=~åó=ìå~ìíÜçêáòÉÇ=~ÅÅÉëëçêáÉë=ã~ó=ÄÉ=Ç~åÖÉêçìë=~åÇ=ïáää=áåî~äáÇ~íÉ=íÜÉ= éÜçåÉ=ï~êê~åíó=áÑ=ë~áÇ=~ÅÅÉëëçêáÉë=Å~ìëÉ=Ç~ã~ÖÉ=çê=~=ÇÉÑÉÅí=íç=íÜÉ=éÜçåÉK qç=Åçãéäó=ïáíÜ=c``=ê~Çá~íáçå=ÉñéçëìêÉ=êÉèìáêÉãÉåíëI=ìëÉ=çÑ=íÜáë=ÇÉîáÅÉ=Ñçê=ÄçÇóJïçêå= çéÉê~íáçå~ä=ÅçåÑáÖìê~íáçåë=áë=äáãáíÉÇ=íç=~ÅÅÉëëçêáÉë=íÉëíÉÇ=~åÇ=~ééêçîÉÇ=Äó=hóçÅÉê~= táêÉäÉëë=`çêéK=líÜÉê=~ÅÅÉëëçêáÉë=ìëÉÇ=ïáíÜ=íÜáë=ÇÉîáÅÉ=Ñçê=ÄçÇóJïçêå=çéÉê~íáçåë=ãìëí=åçí= Åçåí~áå=~åó=ãÉí~ääáÅ=ÅçãéçåÉåíë=~åÇ=ãìëí=éêçîáÇÉ=~í=äÉ~ëí=OOKTRãã=ëÉé~ê~íáçå=Çáëí~åÅÉ=...
- Page 5 áåÅäìÇáåÖ=íÜÉ=~åíÉåå~=~åÇ=íÜÉ=ìëÉêÛë=ÄçÇóK=líÜÉê=ÄÉäíJÅäáéëI=ÜçäëíÉêë=çê=ëáãáä~ê=~ÅÅÉëëçêáÉë= íÜ~í=Ü~îÉ=åçí=ÄÉÉå=íÉëíÉÇ=Ñçê=ÄçÇóJïçêå=p^o=ã~ó=åçí=Åçãéäó=ïáíÜ=c``=oc=ÉñéçëìêÉ=äáãáí= ~åÇ=ëÜçìäÇ=ÄÉ=~îçáÇÉÇK `~ìíáçå qÜÉ=ìëÉê=áë=Å~ìíáçåÉÇ=íÜ~í=ÅÜ~åÖÉë=çê=ãçÇáÑáÅ~íáçåë=åçí=ÉñéêÉëëäó=~ééêçîÉÇ=Äó=íÜÉ=é~êíó= êÉëéçåëáÄäÉ=Ñçê=Åçãéäá~åÅÉ=ÅçìäÇ=îçáÇ=íÜÉ=ï~êê~åíó=~åÇ=ìëÉêÛë=~ìíÜçêáíó=íç=çéÉê~íÉ=íÜÉ= ÉèìáéãÉåíK mÜçåÉ=ë~ÑÉíó o~Çáç=ÑêÉèìÉåÅó=EocF=ÉåÉêÖó vçìê=hóçÅÉê~=TNPR=ëã~êíéÜçåÉ=áë=~=ê~Çáç=íê~åëãáííÉê=~åÇ=êÉÅÉáîÉêK=tÜÉå=áí=áë=çåI=áí=êÉÅÉáîÉë= ~åÇ=~äëç=ëÉåÇë=çìí=oc=ÉåÉêÖóK=vçìê=ëÉêîáÅÉ=éêçîáÇÉêÛë=éÜçåÉ=åÉíïçêâ=Åçåíêçäë=íÜÉ=éçïÉê= äÉîÉä=çÑ=íÜÉ=oc=ëáÖå~äK=qÜáë=éçïÉê=äÉîÉä=Å~å=ê~åÖÉ=Ñêçã=MKMMS=ï~ííë=íç=MKS=ï~ííëK qÜÉêÉ=~êÉ=ëáíì~íáçåë=áå=ïÜáÅÜ=ïáêÉäÉëë=éÜçåÉë=ãìëí=ÄÉ=íìêåÉÇ=çÑÑ=Ñçê=êÉ~ëçåë=çÑ=ë~ÑÉíóK=vçì= Å~å=èìáÅâäó=íìêå=çÑÑ=íÜÉ=hóçÅÉê~=TNPR=ëã~êíéÜçåÉ=ëáãéäó=Äó=ÜçäÇáåÖ=Ççïå= =Ñçê=~= ÑÉï=ëÉÅçåÇëK bñéçëìêÉ=íç=oc=ÉåÉêÖó få=^ìÖìëí=NVVSI=íÜÉ=rKpK=cÉÇÉê~ä=`çããìåáÅ~íáçåë=`çããáëëáçå=Ec``F=~ÇçéíÉÇ=oc=ÉñéçëìêÉ= ÖìáÇÉäáåÉë=ïáíÜ=ë~ÑÉíó=äÉîÉäë=Ñçê=Ü~åÇJÜÉäÇ=ïáêÉäÉëë=éÜçåÉëK=qÜÉëÉ=ÖìáÇÉäáåÉë=~êÉ= ÅçåëáëíÉåí=ïáíÜ=íÜÉ=ë~ÑÉíó=ëí~åÇ~êÇë=éêÉîáçìëäó=ëÉí=Äó=ÄçíÜ=rKpK=~åÇ=áåíÉêå~íáçå~ä= ëí~åÇ~êÇë=ÄçÇáÉë=áå=íÜÉ=ÑçääçïáåÖ=êÉéçêíëW √ ^kpf=`VRKN=E^ãÉêáÅ~å=k~íáçå~ä=pí~åÇ~êÇë=fåëíáíìíÉI=NVVOF √ k`om=oÉéçêí=US=Ek~íáçå~ä=`çìåÅáä=çå=o~Çá~íáçå=mêçíÉÅíáçå=~åÇ=jÉ~ëìêÉãÉåíëI=NVUSF √ f`kfom EfåíÉêå~íáçå~ä=`çããáëëáçå=çå=kçåJfçåáòáåÖ=o~Çá~íáçå=mêçíÉÅíáçåI=NVVSF...
- Page 6 jÉÇáÅ~ä=ÇÉîáÅÉë m~ÅÉã~âÉêëÔfÑ=óçìê=éçêí~ÄäÉ=ïáêÉäÉëë=éÜçåÉ=áë=íçç=ÅäçëÉ=íç=~=é~ÅÉã~âÉêI=íÜÉ=éÜçåÉÛë=oc= ÉåÉêÖó=ã~ó=áåíÉêÑÉêÉ=ïáíÜ=íÜÉ=é~ÅÉã~âÉêÛë=çéÉê~íáçåK=qÜÉ=eÉ~äíÜ=fåÇìëíêó=j~åìÑ~ÅíìêÉêë= ^ëëçÅá~íáçå=~åÇ=íÜÉ=ïáêÉäÉëë=íÉÅÜåçäçÖó=êÉëÉ~êÅÜ=Åçããìåáíó=êÉÅçããÉåÇ=íÜ~í=óçì=Ñçääçï= íÜÉëÉ=ÖìáÇÉäáåÉë=íç=ãáåáãáòÉ=íÜÉ=éçíÉåíá~ä=Ñçê=áåíÉêÑÉêÉåÅÉK √ ^äï~óë=âÉÉé=íÜÉ=éÜçåÉ=~í=äÉ~ëí=ëáñ=áåÅÜÉë=ENR=ÅÉåíáãÉíÉêëF=~ï~ó=Ñêçã=óçìê=é~ÅÉã~âÉê= ïÜÉå=íÜÉ=éÜçåÉ=áë=íìêåÉÇ=çåK= √ aç=åçí=Å~êêó=óçìê=éÜçåÉ=åÉ~ê=óçìê=ÜÉ~êíK √ rëÉ=íÜÉ=É~ê=çééçëáíÉ=íÜÉ=é~ÅÉã~âÉêK √ fÑ=óçì=Ü~îÉ=~åó=êÉ~ëçå=íç=ëìëéÉÅí=íÜ~í=áåíÉêÑÉêÉåÅÉ=áë=í~âáåÖ=éä~ÅÉI=íìêå=çÑÑ=óçìê=éÜçåÉ= áããÉÇá~íÉäóK eÉ~êáåÖ=~áÇëÔpçãÉ=ÇáÖáí~ä=ïáêÉäÉëë=éÜçåÉë=ã~ó=áåíÉêÑÉêÉ=ïáíÜ=ÜÉ~êáåÖ=~áÇëK=få=íÜÉ=ÉîÉåí= çÑ=ëìÅÜ=áåíÉêÑÉêÉåÅÉI=óçì=ã~ó=ï~åí=íç=Åçåëìäí=óçìê=ëÉêîáÅÉ=éêçîáÇÉê=çê=Å~ää=íÜÉ=ÅìëíçãÉê= ëÉêîáÅÉ=äáåÉ=íç=ÇáëÅìëë=~äíÉêå~íáîÉëK líÜÉê=ãÉÇáÅ~ä=ÇÉîáÅÉëÔfÑ=óçì=ìëÉ=~åó=çíÜÉê=éÉêëçå~ä=ãÉÇáÅ~ä=ÇÉîáÅÉI=Åçåëìäí=íÜÉ= ã~åìÑ~ÅíìêÉê=çÑ=íÜÉ=ÇÉîáÅÉ=íç=ÇÉíÉêãáåÉ=áÑ=áí=áë=~ÇÉèì~íÉäó=ëÜáÉäÇÉÇ=Ñêçã=ÉñíÉêå~ä=oc= ÉåÉêÖóK=vçìê=éÜóëáÅá~å=ã~ó=ÄÉ=~ÄäÉ=íç=ÜÉäé=óçì=çÄí~áå=íÜáë=áåÑçêã~íáçåK= få=ÜÉ~äíÜ=Å~êÉ=Ñ~ÅáäáíáÉëÔqìêå=óçìê=éÜçåÉ=çÑÑ=áå=ÜÉ~äíÜ=Å~êÉ=Ñ~ÅáäáíáÉë=ïÜÉå=áåëíêìÅíÉÇK= eçëéáí~äë=~åÇ=ÜÉ~äíÜ=Å~êÉ=Ñ~ÅáäáíáÉë=ã~ó=ÄÉ=ìëáåÖ=ÉèìáéãÉåí=íÜ~í=áë=ëÉåëáíáîÉ=íç=ÉñíÉêå~ä=oc= ÉåÉêÖóK ^îçáÇáåÖ=éçíÉåíá~ääó=ìåë~ÑÉ=~êÉ~ë mçëíÉÇ=Ñ~ÅáäáíáÉëÔqìêå=óçìê=éÜçåÉ=çÑÑ=áå=~åó=Ñ~Åáäáíó=ïÜÉå=éçëíÉÇ=åçíáÅÉë=êÉèìáêÉ=óçì=íç= Çç=ëçK ^áêÅê~ÑíÔc``=êÉÖìä~íáçåë=éêçÜáÄáí=ìëáåÖ=óçìê=éÜçåÉ=çå=~=éä~åÉ=íÜ~í=áë=áå=íÜÉ=~áêK=qìêå=óçìê= éÜçåÉ=çÑÑ=ÄÉÑçêÉ=Äç~êÇáåÖ=~áêÅê~ÑíK sÉÜáÅäÉëÔoc=ëáÖå~äë=ã~ó=~ÑÑÉÅí=áãéêçéÉêäó=áåëí~ääÉÇ=çê=áå~ÇÉèì~íÉäó=ëÜáÉäÇÉÇ=ÉäÉÅíêçåáÅ= ëóëíÉãë=áå=ãçíçê=îÉÜáÅäÉëK=`ÜÉÅâ=ïáíÜ=íÜÉ=ã~åìÑ~ÅíìêÉê=çê=áíë=êÉéêÉëÉåí~íáîÉ=êÉÖ~êÇáåÖ= óçìê=îÉÜáÅäÉK=vçì=ëÜçìäÇ=~äëç=Åçåëìäí=íÜÉ=ã~åìÑ~ÅíìêÉê=çÑ=~åó=ÉèìáéãÉåí=íÜ~í=Ü~ë=ÄÉÉå= ~ÇÇÉÇ=íç=óçìê=îÉÜáÅäÉK...
- Page 7 _ä~ëíáåÖ=~êÉ~ëÔqç=~îçáÇ=áåíÉêÑÉêáåÖ=ïáíÜ=Ää~ëíáåÖ=çéÉê~íáçåëI=íìêå=óçìê=éÜçåÉ=çÑÑ=ïÜÉå= óçì=~êÉ=áå=~=Ää~ëíáåÖ=~êÉ~=çê=áå=~êÉ~ë=éçëíÉÇ= qìêå=çÑÑ=íïçJï~ó=ê~ÇáçKÒ=lÄÉó=~ää=ëáÖåë=~åÇ= áåëíêìÅíáçåëK mçíÉåíá~ääó=ÉñéäçëáîÉ=~íãçëéÜÉêÉëÔqìêå=óçìê=éÜçåÉ=çÑÑ=ïÜÉå=óçì=~êÉ=áå=~åó=~êÉ~=ïáíÜ=~= éçíÉåíá~ääó=ÉñéäçëáîÉ=~íãçëéÜÉêÉK=lÄÉó=~ää=ëáÖåë=~åÇ=áåëíêìÅíáçåëK=pé~êâë=áå=ëìÅÜ=~êÉ~ë= ÅçìäÇ=Å~ìëÉ=~å=Éñéäçëáçå=çê=ÑáêÉ=êÉëìäíáåÖ=áå=ÄçÇáäó=áåàìêó=çê=ÉîÉå=ÇÉ~íÜK=^êÉ~ë=ïáíÜ= éçíÉåíá~ääó=ÉñéäçëáîÉ=~íãçëéÜÉêÉë=~êÉ=çÑíÉåI=Äìí=åçí=~äï~óëI=ÅäÉ~êäó=ã~êâÉÇK=qÜÉó=áåÅäìÇÉ √ cìÉäáåÖ=~êÉ~ë=ëìÅÜ=~ë=Ö~ë=ëí~íáçåë √ _Éäçï=ÇÉÅâ=çå=Äç~íë √ qê~åëÑÉê=çê=ëíçê~ÖÉ=Ñ~ÅáäáíáÉë=Ñçê=ÑìÉä=çê=ÅÜÉãáÅ~äë √ sÉÜáÅäÉë=ìëáåÖ=äáèìÉÑáÉÇ=éÉíêçäÉìã=Ö~ëI=ëìÅÜ=~ë=éêçé~åÉ=çê=Äìí~åÉ √ ^êÉ~ë=ïÜÉêÉ=íÜÉ=~áê=Åçåí~áåë=ÅÜÉãáÅ~äë=çê=é~êíáÅäÉë=ëìÅÜ=~ë=Öê~áåI=ÇìëíI=çê=ãÉí~ä= éçïÇÉêë √ ^åó=çíÜÉê=~êÉ~=ïÜÉêÉ=óçì=ïçìäÇ=åçêã~ääó=ÄÉ=~ÇîáëÉÇ=íç=íìêå=çÑÑ=óçìê=îÉÜáÅäÉ=ÉåÖáåÉ ^áê=Ä~Öë fÑ=óçì=Ü~îÉ=~å=~áê=Ä~ÖI=al=klq=éä~ÅÉ=áåëí~ääÉÇ=çê=éçêí~ÄäÉ=éÜçåÉ=ÉèìáéãÉåí=çê=çíÜÉê= çÄàÉÅíë=çîÉê=íÜÉ=~áê=Ä~Ö=çê=áå=íÜÉ=~áê=Ä~Ö=ÇÉéäçóãÉåí=~êÉ~K=^áê=Ä~Öë=áåÑä~íÉ=ïáíÜ=ÖêÉ~í=ÑçêÅÉK= fÑ=ÉèìáéãÉåí=áë=åçí=éêçéÉêäó=áåëí~ääÉÇI=óçì=~åÇ=óçìê=é~ëëÉåÖÉêë=êáëâ=ëÉêáçìë=áåàìêóK ^ÅÅÉëëçêáÉë ^ÅÅÉëëçêáÉë=Ñçê=óçìê=éÜçåÉ=ã~ó=áåÅäìÇÉ=~=éçêí~ÄäÉ=âÉóÄç~êÇI=ëíÉêÉç=ÜÉ~ÇëÉíI=éçêí~ÄäÉ= Ü~åÇëJÑêÉÉ=Å~ê=âáíI=Å~ê=éçïÉê=~Ç~éíÉêI=rp_=Å~ÄäÉI=äÉ~íÜÉê=éçìÅÜI=äÉ~íÜÉê=Å~ëÉI=~åÇ=ãçêÉK ïïïKâóçÅÉê~JïáêÉäÉëëKÅçãLëíçêÉK= qç=éìêÅÜ~ëÉ=~ÅÅÉëëçêáÉëI=îáëáí= vçì=ã~ó=~äëç=Å~ää= EUMMF=PQVJQNUU=ErKpK^K=~åÇ=`~å~Ç~F=çê=EURUF=UUOJNQNMK...
- Page 8 hóçÅÉê~=áë=~=êÉÖáëíÉêÉÇ=íê~ÇÉã~êâ=çÑ=hóçÅÉê~=`çêéçê~íáçåK=n`m=áë=~=íê~ÇÉã~êâ=çÑ=hóçÅÉê~= táêÉäÉëë=`çêéK=dê~ÑÑáíá=~åÇ=eçípóåÅ=~êÉ=êÉÖáëíÉêÉÇ=íê~ÇÉã~êâë=~åÇ=m~äã=~åÇ=íÜÉ=m~äã= `çãéìíáåÖ=éä~íÑçêã=äçÖç=~êÉ=íê~ÇÉã~êâë=çÑ=m~äãI=fåÅKI=P`çã=`çêéçê~íáçåI=çê=áíë= ëìÄëáÇá~êáÉëK=bìÇçê~=áë=~=êÉÖáëíÉêÉÇ=íê~ÇÉã~êâ=çÑ=íÜÉ=råáîÉêëáíó=çÑ=fääáåçáë=_ç~êÇ=çÑ= qêìëíÉÉëI=äáÅÉåëÉÇ=íç=nr^i`ljj=fåÅçêéçê~íÉÇK=^ééäÉ=~åÇ=j~ÅáåíçëÜ=~êÉ=êÉÖáëíÉêÉÇ= »= íê~ÇÉã~êâë=çÑ=^ééäÉ=`çãéìíÉêI=fåÅK=bìÇçê~=fåíÉêåÉí=pìáíÉ EbfpF=áë=~=íê~ÇÉã~êâ=çÑ= nì~äÅçãã=fåÅçêéçê~íÉÇK=líÜÉê=éêçÇìÅí=~åÇ=Äê~åÇ=å~ãÉë=ã~ó=ÄÉ=íê~ÇÉã~êâë=çê=êÉÖáëíÉêÉÇ= íê~ÇÉã~êâë=çÑ=íÜÉáê=êÉëéÉÅíáîÉ=çïåÉêëK `çéóêáÖÜí=«=OMMP=hóçÅÉê~=táêÉäÉëë=`çêéK=^ää=êáÖÜíë=êÉëÉêîÉÇK=mêáåíÉÇ=áå=íÜÉ=råáíÉÇ=pí~íÉë= çÑ=^ãÉêáÅ~K oáåÖÉê=qçåÉë=`çéóêáÖÜí=«=OMMMJOMMP=hóçÅÉê~=táêÉäÉëë=`çêéK mçêíáçåë=çÑ=íÜáë=ÇçÅìãÉåí=~êÉ=`çéóêáÖÜí=«=NVVU=P`çã=`çêéçê~íáçå=çê=áíë=ëìÄëáÇá~êáÉëK= oÉéêáåíÉÇ=ïáíÜ=éÉêãáëëáçåK UOJ_TVOSJPbkI=oÉîK=MMN...
- Page 9 `çåíÉåíë tÉäÅçãÉ==K=K=K=K=K=K=K=K=K=K=K=K=K=K=K=K=K=K=K=K=K=K=K=K=K=K=K=K=K=K=K=K=K=K=K=K=K=K=K=K=K=K=K=K=K=K=K=K=K=K=K=K=K=K=N fÑ=óçì=~äêÉ~Çó=ìëÉ=~=m~äã=Ü~åÇÜÉäÇ= K=K=K=K=K=K=K=K=K=K=K=K=K=K=K=K=K=K=K=K=K=K=K=K=K=K=K=K=K=K=K=O tÜ~í=íç=Çç=Ñáêëí= K=K=K=K=K=K=K=K=K=K=K=K=K=K=K=K=K=K=K=K=K=K=K=K=K=K=K=K=K=K=K=K=K=K=K=K=K=K=K=K=K=K=K=K=K=K=K=K=K=P To install the battery ..........3 To connect the cable for synchronizing and charging the battery .
- Page 10 To use the headset during a call ........15 Receiving calls .
- Page 11 rëáåÖ=íÜÉ=hóçÅÉê~=jmP=mä~óÉê= =K=K=K=K=K=K=K=K=K=K=K=K=K=K=K=K=K=K=K=K=K=K=K=K=K=K=K=K=K=K=K=K=K=K=PN Transferring audio files from your computer to your phone ... . . 31 Using your JukeBox ......... . . 33 Managing your playlist .
- Page 12 To adjust phone sounds ........47 pÉííáåÖ=ìé=éêÉÑÉêÉåÅÉë==K=K=K=K=K=K=K=K=K=K=K=K=K=K=K=K=K=K=K=K=K=K=K=K=K=K=K=K=K=K=K=K=K=K=K=K=K=K=K=K=K QU To set PDA preferences .
- Page 13 ïïïKâóçÅÉê~ëã~êíéÜçåÉKÅçãK `aJoljÔ On the CD-ROM, you’ll find the Kyocera 7135 desktop (to install it, see the Reference Guide on the CD-ROM). You’ll also find third-party software and user guides for sending email, browsing the Internet, using Web clipping services, using FileManager, and using your MP3 player.
- Page 14 If you already use a Palm handheld, you’ll find the Kyocera 7135 smartphone very familiar. Many Palm applications are the same; some have been enhanced to integrate with the telephone’s features. Most icons and buttons are identical to those on your Palm handheld. Only a few fÅçåëÔ...
- Page 15 Apply gentle pressure to the bottom of the battery cover to snap it closed. qç=ÅçååÉÅí=íÜÉ=Å~ÄäÉ=Ñçê=ëóåÅÜêçåáòáåÖ=~åÇ=ÅÜ~êÖáåÖ=íÜÉ=Ä~ííÉêó There are two types of cables for your Kyocera 7135 smartphone: A data cable for downloading data and a power cable for charging the phone. tÜ~í=íç=Çç=Ñáêëí...
- Page 16 Insert the small round plug of the power cable ( ) into the base of the sync cradle. Plug the other end of the power cable into a wall outlet. (b) serial (b) USB To connect the data cable to your computer, first turn off the computer. Plug the data cable from the phone ( Ä...
-
Page 17: To Recharge The Battery
The battery icon in the upper-right corner of the phone screen tells you whether the phone is: • Fully charged . All black bars are displayed. • Partially charged . Fewer black bars are displayed, indicating partial charge. • Charging . - Page 18 qç=ÅÜ~êÖÉ=~=Ä~ííÉêó=áå=íÜÉ=Åê~ÇäÉÛë=êÉ~ê=éçÅâÉí= Your smartphone’s sync cradle has a rear pocket that lets you charge a second battery. This way you have a fresh battery ready when you don’t have time to recharge your smartphone. Your primary battery (the one in your phone) can also be charged in the rear pocket, but there’s no need to do this.
- Page 19 qìêåáåÖ=óçìê=éÜçåÉ=çå=Ñçê=íÜÉ=Ñáêëí=íáãÉ Open the flip. Press and hold for a few seconds. The message “Powering on” appears on the screen. Follow the Setup procedures to calibrate the screen and Graffiti writing area. If the Setup screens do not appear, see Calibrating the screen on page 12. The first 2 of 4 screens are shown here.
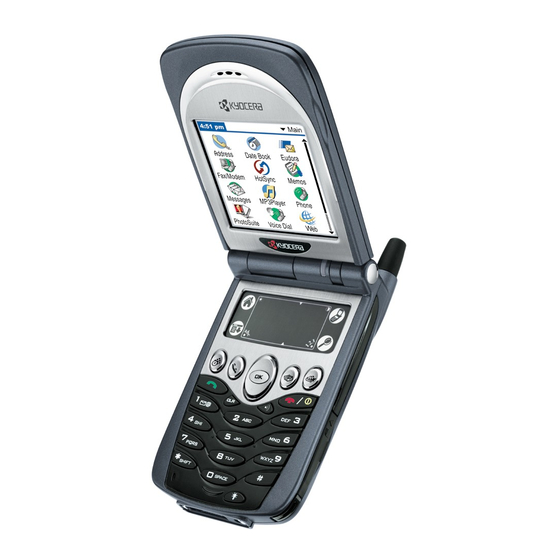
- Page 20 fåíêçÇìÅáåÖ=íÜÉ=hóçÅÉê~=TNPR=ëã~êíéÜçåÉ dÉííáåÖ=íç=âåçï=íÜÉ=ÑìåÅíáçå=âÉóë píóäìë - Hold it like a pen to write on the screen. fåÑê~êÉÇ=mçêí - Point at other devices for beaming data. bñíÉêå~ä=i`aL`~ääÉê=fa - View caller information without opening the phone. ^åíÉåå~ - Extend during calls. eÉ~ÇëÉí=g~Åâ - Pug the headset cable in here.
- Page 21 PDA key shows the applications screen of the PDA. Dialer key shows the main screen of the phone. Dropdown menu key allows you to perform selected functions in the application you are currently using. Find key allows you to search all files and applications on your smartphone for selected text. Date book key opens the date book to schedule appointments and view entries by hour, day, or month.
- Page 22 To turn your phone on or off, press and hold for a few seconds until “Powering On” or “Powering Off” appears on the screen. The Kyocera 7135 smartphone is designed to conserve battery power. When you are not actively using it, the screen “goes to sleep.”...
-
Page 23: Features
You may disable the power-save feature by tapping on your PDA applications screen. in the upper-right corner of the screen and use your stylus to select dÉåÉê~äK next to lÑÑ=^ÑíÉê and select kÉîÉê=ïÜÉå=çéÉåK See “Setting up Preferences” in the reference guide on your CD-ROM. `ÜÉÅâáåÖ=éÜçåÉ=ëí~íìë... - Page 24 `ÜÉÅâáåÖ=iba=ëí~íìë The LED indicates the following states: • dêÉÉåÔ Home. The phone is in its home area. The light flashes when a call is received, and it remains green during a call. • Roaming. The phone is in roaming mode. The light flashes when a call is ^ãÄÉêÔ...
- Page 25 j~âáåÖ=~åÇ=êÉÅÉáîáåÖ=Å~ääë qç=Çá~ä=~=Å~ää=çå=íÜÉ=âÉóé~Ç Extend the antenna. Check the signal strength icon Press the keys to enter the phone number. Then press If you make a mistake, press to remove the last digit you pressed. Hold down to clear all digits. To end your call, press qç=ã~âÉ=~=Å~ää=Ñêçã=íÜÉ=^ÇÇêÉëë=_ççâ= Press the Address Book key to open the...
- Page 26 in the Find window. If you press the 2 key twice, the letter B appears. Press keys rapidly. Wait a moment. The cursor moves one position to the right. Press the key for the second letter of the name you are searching for. Enter as many letters as you wish.
- Page 27 Plug the headset into your Kyocera 7135 smartphone headset jack. See “Introducing the Kyocera 7135 smartphone” on page 8. Press the button on the headset to answer or end a call. oÉÅÉáîáåÖ=Å~ääë qç=~åëïÉê=~=Å~ää= Open the flip. Press To end your call, press kçíÉW...
- Page 28 (the home screen shown here) and you are ready to make and receive calls. cçê=ãçêÉ=ÇÉí~áäÉÇ=áåÑçêã~íáçåI=Åçåëìäí=íÜÉ= oÉÑÉêÉåÅÉ=dìáÇÉ=çå=íÜÉ=ÉåÅäçëÉÇ=`aJoljK oÉÅÉáîáåÖ=~åÇ=ëÉåÇáåÖ=ãÉëë~ÖÉë oÉÅÉáîáåÖ=~=ãÉëë~ÖÉ When a message is received, your Kyocera 7135 smartphone will notify you. to view the message. dç=qç After viewing your message, tap açåÉ...
- Page 29 menu offers several choices, including: ^Åíáçå oÉéäóÔ lìíÖçáåÖ=jÉëë~ÖÉ screen is displayed with the address of the sender inserted =field. Enter your message text and tap in the qçW pÉåÇK cçêï~êÇÔ lìíÖçáåÖ=jÉëë~ÖÉ screen is displayed with the message text in the jÉëë~ÖÉ...
- Page 30 cêçã=íÜÉ=ma^=^ééäáÅ~íáçåë=ëÅêÉÉå Using the stylus, scroll down and tap jÉëë~ÖÉëK At the Messages screen, tap kÉïK Using the stylus, tap the q~é=íç=ÉåíÉê= êÉÅáéáÉåí box. Enter the phone number or email address of the person to whom you are sending the message. You can retrieve a number or email address in several ways.
- Page 31 Use the Graffiti® writing area to rapidly enter text and symbols. See “Entering information” on page 21 for information on forming letters and numbers using your stylus and using the keyboards. After you have prepared your message, tap pÉåÇK pÉåÇáåÖ=~=éêÉÑçêã~ííÉÇ=íÉñí=ãÉëë~ÖÉ Using your stylus, tap fåëÉêí= at the...
- Page 32 rëáåÖ=j~áå=jÉåì=fíÉãë From the phone application screen, the menu you see depends on whether you are on a call or not. If you are not making a call, you see the following options: oÉÅÉåí=`~ääë See your recent incoming, outgoing, and missed calls mÜçåÉ=kìãÄÉê...
- Page 33 båíÉêáåÖ=áåÑçêã~íáçå qç=ìëÉ=íÜÉ=çåJëÅêÉÉå=âÉóÄç~êÇ= Use the Graffiti writing area to quickly enter text for messages, memos, and other applications. To enter information using Graffiti, you must be in one of the PDA applications. When you are ready to enter text: ~ÄÅ to open the letters or numbers keyboard. Graffiti Writing Area Tap here for the letters keyboard Tap here for the numbers keyboard...
- Page 34 _~ëáÅ=dê~ÑÑáíá=ÅÜ~ê~ÅíÉêë To enter... To enter... Draw Draw To enter... Draw Space Back Space Next Line =vçìê=éÜçåÉ=~ìíçã~íáÅ~ääó=ë~îÉë=óçìê=ïçêâ=ïÜÉå=óçì=ÅÜ~åÖÉ=Ñêçã=çåÉ= kçíÉW ~ééäáÅ~íáçå=íç=~åçíÜÉêI=ëç=óçì=ÇçåÛí=åÉÉÇ=íç=ïçêêó=~Äçìí=äçëáåÖ=áåÑçêã~íáçåK hóçÅÉê~=TNPR=rëÉê=dìáÇÉ...
- Page 35 rëáåÖ=íÜÉ=^ÇÇêÉëë=_ççâ= Press the Address Book key. To place a call, tap the number (not the name). If there is more than one number, tap and select the number you want to call. That number is moved into the Address list. Tap to select it.
- Page 36 rëáåÖ=`~ää=eáëíçêó Call History records the last 99 incoming, outgoing, and missed calls. The icons show the call type: Incoming Outgoing Missed Data (for example, a call to a Web site) to view the PDA Applications screen. to open Call History. To place a call, tap the phone icon to the right of the number you want to call.
- Page 37 Week Daily To Do rëáåÖ=jÉãçë== You can use your Kyocera 7135 smartphone to create several types of memos. A memo can contain up to 4,000 characters; the number of memos you can store depends on how much free memory you have.
- Page 38 From the Applications screen, tap to open Memos. Text Doodle Voice Select the type of memo you would like to create from the three options located on the bottom-right corner of the screen. – qÉñíK Use the stylus to write your message in the Graffiti writing area. When you have finished, tap açåÉK =Your=...
- Page 39 Tap any existing memo to open it or tap kÉï to create a new memo. Enter the memo text using Graffiti or the on-screen keyboard. When you have finished, tap açåÉK oÉÅÉáîáåÖ=îçáÅÉ=ãÉëë~ÖÉë=~åÇ=îçáÅÉ=ã~áä When you receive a page or voice mail message, the LED on the top of the phone will tell you that you have missed a call.
- Page 40 To check new text or filed messages, use the navigator key to select jÉëë~ÖÉë from the phone screen or press the messages button. See “Getting to know the function keys” on page 8. Press Use the navigator key to select the message you want to check. Then press rëáåÖ=péÉÉÇ=aá~ä...
- Page 41 You are asked if you want to look up the phone number in your Address Book or create a new entry. If the contact is not in your Address Book, tap= kÉï=båíêó= and follow the on-screen instructions. If the contact is listed in your Address Book, proceed with step 4. iççâìéK =If the entry has more Tap the entry you want to add to the Speed Dial list.
- Page 42 Tap the selected speed dial number and press To end your call, press rëáåÖ=ma^=^ééäáÅ~íáçåë= to view the PDA Applications screen. Tap the icon for the application you want to launch. If the icon doesn’t appear on the screen, tap the scroll bar on the right side of the screen to scroll down or press the navigator key down to see more...
-
Page 43: Transferring Audio Files From Your Computer To Your Phone
The Kyocera MP3 Player allows you to play audio files on your Kyocera 7135 smartphone. You will need Kyocera Loader Windows application for transferring audio files from your computer to your phone, and a secure digital card or a multimedia card (card sold separately.) - Page 44 Explorer-style region to the lower pane. Copy and Paste may also be used. Once you have added all of the files you wish to transfer to your Kyocera 7135, set the order the songs are to be played on the phone by using the navigator key When you are ready to transfer your files to your Kyocera 7135 smartphone, click the =button.
- Page 45 rëáåÖ=óçìê=gìâÉ_çñ The JukeBox screen controls the MP3 Player. • pçåÖ=qáíäÉÔ Shows the current song’s title. • Shows how much bä~éëÉÇLoÉã~áåáåÖÔ time has elapsed for the current song. Tap on the number field to show the remaining time of the current song. •...
-
Page 46: Using Your Jukebox
j~å~ÖáåÖ=óçìê=éä~óäáëí The PlayList screen lists all of the MP3 songs on your media card. You can activate or deactivate songs and view additional song information. cçê=ãçêÉ=ÇÉí~áäÉÇ=áåÑçêã~íáçåI=ëÉÉ=íÜÉ=jmP= mä~óÉê=ìëÉê=ÖìáÇÉ=çå=íÜÉ=`aJoljK bÇáí=jÉåì • pÉäÉÅí=^ääÔ Activates all songs in the PlayList. • pÉäÉÅí=kçåÉÔ Deactivates all songs in the PlayList. - Page 47 qç=~Çàìëí=îçäìãÉI=Ä~ä~åÅÉI=íêÉÄäÉI=~åÇ=Ä~ëë= With your stylus, tap in the upper-left corner of the screen. gìâÉÄçñ pçìåÇK Adjust settings for by tapping on the horizontal sçäìãÉI=_~ä~åÅÉI=qêÉÄäÉI= =_~ëë bar for each category. When you have finished adjusting your settings, tap =açåÉK rëáåÖ=cáäÉj~å~ÖÉê FileManager will allow you to manage the files on your expansion card the same way that you manage your files on your computer.
- Page 48 qç=ìëÉ=cáäÉj~å~ÖÉê to view the applications on the PDA screen. to open FileManager. Use your stylus to select items on the FileManager screen. `çéóáåÖ=Ç~í~=Ñêçã=óçìê=ëã~êíéÜçåÉ=íç= óçìê=Éñé~åëáçå=Å~êÇ Insert an expansion card into your phone’s expansion slot. Use your stylus to tap the FileManager icon. In the upper-right corner of the screen, to select is displayed.
- Page 49 `çéóáåÖ=Ç~í~=Ñêçã=íÜÉ=Éñé~åëáçå=Å~êÇ=íç=íÜÉ=ëã~êíéÜçåÉ Insert an expansion card into your phone’s expansion slot. Use your stylus to tap the FileManager icon. In the upper-right corner of the screen, to select `~êÇ= fåíÉêå~ä= is displayed. Select the database you would like to copy by tapping it with your stylus. To deselect an item, tap it once more.
- Page 50 CD-ROM. rëáåÖ=mÜçíçpìáíÉ MGI PhotoSuite Mobile Edition for your Kyocera 7135 smartphone is an easy to use program that allows you to transfer photos and videos from your computer to your Kyocera 7135 smartphone for viewing. MGI PhotoSuite Mobile Edition consists of two parts: •...
- Page 51 Apple QuickTime 4 to be installed. ASF and WMV video files require DirectX 8 to be installed. kçíÉW= cçê=áåëíêìÅíáçåë=çå=ìëáåÖ=mÜçíçpìáíÉI=ëÉÉ=íÜÉ=ìëÉê=ÖìáÇÉ=äçÅ~íÉÇ=áå=íÜÉ=rëÉê= dìáÇÉë=äáÄê~êó=çå=íÜÉ=`aJoljK rëáåÖ=bfp=tÉÄ The Kyocera 7135 smartphone offers the EIS Browser for your Internet connection. To launch the EIS Browser: Press on the keypad to open EIS Web. sáëáí=tÉÄK EIS Web connects you to the Internet.
- Page 52 Menus are accessed by tapping on the home screen. The four main menus are: • nìáÅâ=iáåâëÔ Takes you to a list of Palm-friendly websites related to travel, sports, finance, shopping, entertainment, news, and internet searching. • sáëáí=tÉÄÔ Use your stylus to enter a specific Web address. Tap ÜííéWLLI=ïïïKI= KÅçã= to rapidly enter prefixes and suffixes.
-
Page 53: Eudora Email
Éã~áä=ëçÑíï~êÉ=Å~å=ÄÉ=éìêÅÜ~ëÉÇ=áÑ=óçì=êÉèìáêÉ=íÜáë=Å~é~ÄáäáíóK=`ÜÉÅâ=ïáíÜ=óçìê= ëÉêîáÅÉ=êÉéêÉëÉåí~íáîÉ=Ñçê=ÇÉí~áäëK For complete information on Eudora Email, see the Eudora User Guide available on your Kyocera Smartphone CD-ROM. You can also find Eudora’s website at ïïïKbìÇçê~KÅçãK m~äã=j~áä Palm Mail allows you to create emails. You can prepare messages with customized fonts and signatures to be sent later. -
Page 54: Phone
kçíÉW =m~äã=j~áä=áë=~=ëçÑíï~êÉ=íÜ~í=~ääçïë=óçì=íç=ÅêÉ~íÉ=Éã~áäëK=vçì=Å~ååçí=ëÉåÇ= Éã~áäë=ìëáåÖ=m~äã=j~áäK líÜÉê=^ééäáÅ~íáçåë Other email applications are available. See the CD-ROM that came in your phone package to download other email applications and user guides. rëáåÖ=íÜÉ=qç=aç=iáëí Use the To Do List to keep track of things you need to accomplish. to open your To Do list.