Dri-Eaz LGR 7000XLi Owner's Manual
Hide thumbs
Also See for LGR 7000XLi:
- Owner's manual (63 pages) ,
- Operating instructions (2 pages) ,
- Owner's manual (11 pages)
Table of Contents
Advertisement
Available languages
Available languages
Quick Links
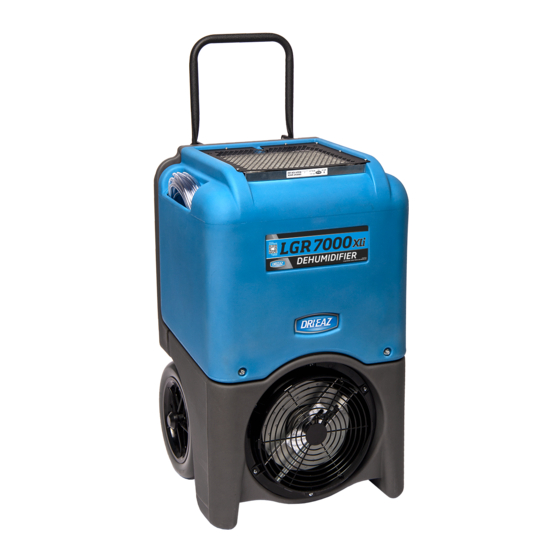
LGR 7000XLi Portable Dehumidifier
The Dri-Eaz® LGR 7000XLi dehumidifier reduces humidity in enclosed environments by
removing water vapor from the air. The 7000XLi is rugged, durable and highly portable, making
it ideal for water damage restoration, structural drying, construction, and other applications
requiring temporary, high-performance dehumidification.
WARNING
ADVERTENCI
WARNING! Do not alter or modify your unit in any
way. Use only replacement parts authorized by Dri-
Eaz. Modifications or use of unapproved parts could
create a hazard and will void your warranty. Contact
your local distributor for assistance.
WARNING! Electric shock hazard, rotating fan, hot
surface hazards. Unplug unit before opening cover
for cleaning or servicing. Unit must be grounded.
CORRECT PLUG REMOVAL
Grasp IEC plug and pull straight out
IMPORTANT: Damage to IEC receptacle or
dehumidifier resulting from improper removal
of the power cord is not covered by warranty.
The IEC power cord is a wear item and is not
covered by warranty.
07-01776M F412
Owner's Manual
DRI-EAZ PRODUCTS, INC.
15180 Josh Wilson Road, Burlington, WA 98233
Phone: 800-932-3030 Fax: 360-757-7950 www.dri-eaz.com
Patents: http://www.LBpatents.com
S A V E T H E S E I N S T R U C T I O N S
Model F412
Inspect the power cord before use. If cord is
damaged, do not use. Always grasp the plug (not
the cord) to unplug.
Insert three-prong plug on power cord into a
matching electrically grounded outlet. Do not use
adapter. Never cut off third prong. Do not use an
extension cord.
The unit must be operated on a 120V/60Hz circuit
protected by a Ground Fault Circuit Interrupter
(GFCI) device.
Keep motor and wiring dry.
Do not attempt to repair the unit. For Authorized
Service Centers, contact Dri-Eaz.
INTRODUCTION
LGR (low-grain refrigerant) dehumidifiers utilize an
internal pre-cooling system to boost water removal
efficiency. LGR units can continue to remove moisture in
drier environments where conventional refrigerants
cannot.
OPERATING YOUR DEHUMIDIFIER
Set unit upright
NOTICE: Transporting or storing the unit in a
horizontal position is not recommended. When the
machine is placed in a horizontal position, the oil
from the compressor can flow into the refrigerant
coils and reduce the ability of the dehumidifier to
function and possibly damage the unit. If the unit
has been placed in a horizontal position, set it
upright and let it stand for at least 30 minutes before
turning it on.
Positioning a Dehumidifier
For best results, operate your dehumidifiers in an
enclosed area. Close all doors and windows that
open to the outside to maximize the unit's water
removal efficiency. Place your dehumidifier away
from obstructions, and keep it away from anything
1
Legend Brands
Advertisement
Table of Contents

Related Manuals for Dri-Eaz LGR 7000XLi


Summary of Contents for Dri-Eaz LGR 7000XLi
-
Page 1: Operating Your Dehumidifier
15180 Josh Wilson Road, Burlington, WA 98233 Phone: 800-932-3030 Fax: 360-757-7950 www.dri-eaz.com The Dri-Eaz® LGR 7000XLi dehumidifier reduces humidity in enclosed environments by removing water vapor from the air. The 7000XLi is rugged, durable and highly portable, making it ideal for water damage restoration, structural drying, construction, and other applications requiring temporary, high-performance dehumidification. -
Page 2: Set Up Drain Hose
Drain plug. that could block airflow into and out of the unit. For other obstructions that might restrict the flow of water. more information, contact your Dri-Eaz distributor. Obstructions may cause a water backup and result in overflows. Set up drain hose... -
Page 3: Control Panel Guide
Startup display and normal display modes ON/OFF. Press to turn the unit on or off. When the machine is turned on, the display normally reads When unit is first plugged in to AC power, the control PLEASE WAIT COMP. DELAY and performs a numeral panel display will briefly cycle through a series of countdown from a maximum of 60 seconds to 0. -
Page 4: User Settings
USER SETTINGS Only menu items followed by a greater-than symbol (>) can be adjusted. If no keys are selected for 5 minutes on screens: INLET OUTLET, GRAIN DPR, the display will return to normal display mode. In all the other menu items, the display with return to the normal display mode after 20 seconds. -
Page 5: Transportation And Storage
2. Gently rock the machine to ensure any water AT THE END OF THE JOB remaining on interior surfaces falls into the sump To reduce the possibility of drips when moving the area. unit, follow these additional steps to ensure that all 3. - Page 6 FIG. D: PARTS DIAGRAM Air filter Sensor chip. Lead cable (not shown) is attached to back of control panel. FRONT Heat exchange COVER block. Control panel Condenser (hot) coil REAR PANEL Evaporator (cold) coil Rear panel fasteners (×6) Rear panel base plate Electrical box.
-
Page 7: Maintenance Schedule
NOTICE: Replace used filters only with a new HAF contaminants, clean thoroughly and sanitize before filter (Dri-Eaz part no. F368). Other filter types do not reuse. provide adequate filtration or airflow. Be sure to install the new filter in the correct orientation. -
Page 8: System Messages
Installing the HAF filter To protect your HAF Filter from damage, make sure you insert the filter in the correct orientation. CORRECT. INCORRECT. Filter plies are in Filter plies are set line with direction at a right angle to of insertion. direction of insertion. -
Page 9: Error Messages
ER6 CONTACT Current sensor failure. If error persists, contact service. SERVICE CENTER ER7 INVALID Incorrect or unsupported DIP switch settings. Contact Dri-Eaz service department for MODEL SETTING correct DIP switch settings. ER8 BUTTON STUCK Key is stuck or has been held down too long. Contact service. -
Page 10: Troubleshooting
Check filter. Clean or replace as necessary. coils are clogged. Check heat exchange block and coils. Clean as necessary. If the problem you are experiencing is not listed here, contact your Dri-Eaz location for further assistance. SPECIFICATIONS Warranty information is available at www.dri-eaz.com. -
Page 11: Importantes Instrucciones De Seguridad
15180 Josh Wilson Road, Burlington, WA 98233 Teléfono: 800-932-3030 Fax: 360-757-7950 www.dri-eaz.com ® El deshumidificador LGR 7000XLi de Dri-Eaz reduce la humedad en ambientes cerrados eliminando el vapor de agua que se encuentra en el aire. El modelo 7000XLi es resistente, duradero y fácil de transportar, características que lo convierten en un elemento ideal para la reparación de daños... -
Page 12: Identificación De Las Partes
IDENTIFICACIÓN DE LAS PARTES IMAGEN A : FRENTE IMAGEN B : ATRÁS Entrada de aire Asa integrada. Se Compartimento de húmedo. Filtro dobla para la manguera de 3M™ HAF. guardar la unidad. drenaje. Compartimento Panel de moldeado para control. guardar el cable. Salida de aire Enchufe del Ubicación de la... -
Page 13: Panel De Control
óptimo de secado, comuníquese con su AVISO: Desenrolle y estire toda la manguera de sucursal de Dri-Eaz. drenaje. No deje ninguna parte de la manguera enrollada en la unidad y no coloque el extremo de la manguera a más de 20 pies (6 m) por encima de la Extienda el mango parte inferior de la unidad. -
Page 14: Ajustes De Usuario
Tome en cuenta que sólo los elementos del menú que están acompañados de un símbolo de mayor que (>) pueden ajustarse. Todos los ajustes y modos se describen a detalle en la AJUSTES DE USUARIO. Mensajes de error Si el diagnóstico interno del Unit descubre un problema, la unidad mostrará... -
Page 15: Al Final De Trabajo
AJUSTES DE USUARIO Solo se pueden ajustar los elementos del menú que estén seguidos de un símbolo de «mayor que» (>). Si no se selecciona ninguna tecla en las siguientes pantallas en un lapso de 5 minutos: INLET OUTLET (ENTRADA SALIDA), DPR GRAIN (GRANO DE DPR), la pantalla volverá al modo de visualización normal. -
Page 16: Transporte Y Almacenamiento
1. No apague ni mueva la unidad hasta que regrese TRANSPORTE Y ALMACENAMIENTO al modo normal de funcionamiento. Para corroborar AVISO: Maneje la unidad con cuidado. No la deje caer, el estado de la unidad, examine el panel de control: ni la aviente, ni la coloque en un lugar en que pueda Descongelamiento en progreso: caerse. -
Page 17: Panel Posterior
IMAGEN D: DIAGRAMA DE LAS PIEZAS Filtro HAF Chip sensor. El cable de plomo (no se muestra) está unido a la parte posterior del panel de control. PANEL Bloque de intercambio de CUBIERTA calor. Panel de control PANEL Bobina (caliente) del POSTERIOR condensador Tornillos del... -
Page 18: Programa De Mantenimiento
PROGRAMA DE MANTENIMIENTO residuos. No exponga el filtro a ningún líquido, ya que podría dañarlo. ¡ADVERTENCIA! PELIGRO DE DESCARGA AVISO: Reemplace los filtros usados únicamente con ELÉCTRICA. Desconecte el deshumidificador antes de filtros HAF. Los demás filtros no proporcionan la darle mantenimiento. - Page 19 Instalación del filtro HAF Para evitar que se dañe el filtro HAF, asegúrese de colocarlo con la orientación correcta. CORRECTO INCORRECTO Las capas del Las capas del filtro filtro están en la se encuentran en misma dirección dirección que la de perpendicular a la inserción.
-
Page 20: Mensajes Del Sistema
MENSAJES DEL SISTEMA El panel de control mostrará los mensajes siguientes de acuerdo con el rendimiento del sistema y las condiciones ambientales. Si se necesita alguna acción por parte del usuario, se indicará en la tercera columna. MENSAJE DEL PANEL DE EXPLICACIÓN ACCIÓN DEL USUARIO CONTROL... -
Page 21: Mensajes De Error
Falla en el sensor de corriente. Si el error persiste, comuníquese al centro de servicio. CENTRO DE SERV Configuración incorrecta o incompatible de los interruptores DIP. Comuníquese al ER7 INVAL centro de servicio de Dri-Eaz para obtener la configuración correcta de los interruptores AJUSTE DIP. ER8 BOTON La tecla se ha atascado o se ha oprimido por demasiado tiempo. -
Page 22: Resolución De Problemas
Servicio de Atención al Cliente al 800-932-3030 para obtener asistencia. ESPECIFICACIONES La información sobre la garantía está disponible en www.dri-eaz.com. Modelo LGR 7000XLi (F412) Eliminación de agua según No olvide visitar warranty.drieaz.com y registrar su AHAM (80 °F [27 ºC]/60% de 130 pt | 61,5 L por día compra. -
Page 23: Instructions De Sécurité Importantes
Déshumidificateur portable LGR 7000XLi Modèle F412-115V DRI-EAZ PRODUCTS, INC. 15180 Josh Wilson Road, Burlington, WA 98233 – États-Unis Téléphone : 800-932-3030 Télécopie : 360-757-7950 www.dri-eaz.com réduit l’humidité dans les environnements ® Le déshumidificateur LGR 7000XLi de Dri-Eaz structuraux fermés en éliminant la vapeur d’eau de l’air. Le 7000XLi est robuste, durable et facilement transportable;... - Page 24 Si vous optimal, appelez votre distributeur local Dri-Eaz. avez couché l’appareil, redressez-le et attendez au moins 30 minutes avant de le mettre en marche.
-
Page 25: Panneau De Commande
Branchement du cordon d’alimentation Le déshumidificateur Unit doit être branché sur une prise de 120 V, protégée par un disjoncteur de fuite à la PANNEAU DE COMMANDE POMPE DE terre, avec une intensité nominale de 15 ampères. PURGE Retirez le cordon de son réceptacle de rangement et déroulez-le. -
Page 26: Utilisation Du Panneau De Commande
Utilisation du panneau de commande Marche-Arrêt Appuyez sur la touche pour mettre en marche ou éteindre l’appareil. Lorsque vous allumez l’appareil, l’écran affiche normalement PATIENTER - TEMPORISATION, tandis qu’il exécute un compte à rebours (60 secondes maximum). Ce retard permet d’équilibrer la pression du frigorigène et facilite ainsi le démarrage. -
Page 27: Paramètres De L'utilisateur
Paramètres de l’utilisateur Seuls les éléments du menu suivis du symbole « supérieur à » (>) peuvent être réglés. Si aucune touche n’est sélectionnée pendant 5 minutes pour les écrans : ENTRÉE-SORTIE, GRAIN DPR, l’affichage reviendra au mode d’affichage normal. Pour tous les autres éléments du menu, l’affichage reviendra au mode d’affichage normal après 20 secondes. -
Page 28: À La Fin De La Tâche
À LA FIN DE LA TÂCHE 3. Appuyez sur la touche PURGE. Lorsque le cycle de purge est terminé, éteignez l’unité. Pour réduire la possibilité d’égouttement lors du 4. Retirez le tuyau de vidange externe, videz-le transport de l’unité, suivez ces étapes soigneusement, enroulez-le et maintenez-le en place supplémentaires pour s’assurer que toute l’eau est à... - Page 29 FIG. D : DIAGRAMME DES PIÈCES Filtre d’aire Puce du capteur. Le câble (non illustré) est fixé à l'arrière du panneau de commande Échangeur thermique PANNEAU BOÎTIER Panneau de commande PANNEAU ARRIÈRE Serpentin du condenseur (chaud) Boulons (6) du Serpentin panneau arrière d’évaporateur (froid) Coffret électrique...
-
Page 30: Programme D'entretien
AVIS : Remplacez un filtre usé uniquement par un filtre poussière et aux polluants. Il est conseillé de porter HAF neuf. ièce Dri-Eaz n°. F368). Les autres types de un masque respiratoire et des gants. Si l’appareil a été filtre ne fournissent pas une filtration ou un débit d’air exposé... - Page 31 Placement du filtre HAF Pour protéger votre filtre HAF contre tout dommage, veillez à insérer celui-ci dans le bon sens. BIEN. MAL. Les plis du filtre Les plis du filtre sont parallèles sont au sens perpendiculaires d’insertion. au sens d’insertion. L’enlèvement futur du filtre risque de...
-
Page 32: Messages Du Système
MESSAGES DU SYSTÈME Le panneau de commande affiche les messages suivants selon la performance du système et les conditions environnementales. Une intervention de l’utilisateur, si elle est requise, est indiquée dans la troisième colonne. MESSAGES DU INTERVENTION DE PANNEAU DE EXPLICATION L’UTILISATEUR COMMANDE... -
Page 33: Messages D'erreur
ER7 INVAL Paramètres des commutateurs DIP incorrects ou incompatibles. Contacter le service AJUSTE client de Dri-Eaz pour obtenir les bons paramètres des commutateurs DIP. ER8 BOTON Une touche est bloquée ou a été maintenue appuyée trop longtemps. Contacter le ATORADO fournisseur de services. -
Page 34: Dépannage
FICHE TECHNIQUE Les données de garantie sont disponibles sur le site www.dri-eaz.com. Modèle LGR 7000XLi (F412) AHAM de retrait d’eau (26,6 Pensez à visiter warranty.drieaz.com et à enregistrer 130 chopines | 61,5 litres / jour °C [80 °F]/60 % HR) votre achat. -
Page 35: Electrical Schematic
ELECTRICAL SCHEMATIC 07-01776M F412 Legend Brands...
Need help?
Do you have a question about the LGR 7000XLi and is the answer not in the manual?
Questions and answers
Pump part number for LGR7000Xli