Table of Contents
Advertisement
Quick Links
Advertisement
Table of Contents

Subscribe to Our Youtube Channel
Summary of Contents for LM-Dental LM-ProPower CombiLED
- Page 1 LMProPower CombiLED User Manual...
- Page 2 PL 88 (Norrbyn rantatie 8) FI-21601 Parainen, Finland Telephone: +358 2 4546 400 Fax: +358 2 4546 444 E-mail: info@lm-dental.com Internet: www.lm-dental.com Copyright Copyright 2015 LM-Instruments Oy. All rights reserved. The contents of this manual may be changed without notice. No part of this manual may be reproduced in any form or by any means without permission in writing...
-
Page 3: Table Of Contents
CONTENTS 1. Introduction.............................. 5 2. Safety instructions ..........................6 2.1. Safety notices ..........................6 2.2. Electro magnetic compatibility ..................... 7 2.3. Safety considerations to install, servicing and to repair the CombiLED unit ......7 2.4. Intended and prohibited use ......................7 2.5. - Page 4 10. Warranty ..............................40 10.1. Warranty terms ..........................40 10.2. Delivery Information ........................41 10.3. Installation check-list ........................42 10.4. Operational test ..........................43...
-
Page 5: Introduction
Introduction INTRODUCTION Foreword This is user manual for CombiLED product. Read and understand this manual before you use the product. If there are any questions regarding the contents of this manual, please contact LM-Instruments Oy. Keep User manual in place where it is easily available for all users. General Requirements Special precautions are necessary to this product regarding EMC (Electro Magnetic compatibility). -
Page 6: Safety Instructions
Safety instructions SAFETY INSTRUCTIONS 2.1. Safety notices The safety notices shown on this page are used to identify safety messages in these instructions: WARNING indicates a dangerous situation that, if not prevented, could cause death or injury. WARNING CAUTION indicates a dangerous situation that, if not prevented, could cause minor or moderate injury. -
Page 7: Electro Magnetic Compatibility
Do not use LM-ProPower CombiLED unit where it is not intended to. If you are unsure about your operation, please contact your local dealer or place of purchase. -
Page 8: Emc Guidance And Manufacturer's Declaration
Safety instructions 2.6. EMC Guidance and manufacturer’s declaration Guidance and manufacturer’s declaration - electromagnetic emissions The LM-ProPower is intended for use in the electromagnetic environment specified below. The customer or the user of the LM-ProPower should assure that it is used in such an environment. Emission test Compliance Electromagnetic environment - guidance... - Page 9 Safety instructions Guidance and manufacturer’s declaration - electromagnetic immunity The LM-ProPower is intended for use in the electromagnetic environment specified below. The customer or the user of the LM-ProPower should assure that it is used in such an environment. Immunity test IEC 60601 test level Compliance Electromagnetic environment -...
- Page 10 Safety instructions Recommended separation distances between portable and mobile RF communications equipment and the LM-ProPower The LM-ProPower is intended for use in an electromagnetic environment in which radiated RF disturbances are con- trolled. The customer or the user of the equipment can help prevent electromagnetic interference by maintaining a minimum distance between portable and mobile RF communications equipment (transmitters) and the LM-ProPower as recommended below, according to the maximum output power of the communications equipment.
-
Page 11: Content Of Delivery
Content of delivery CONTENT OF DELIVERY Carefully unpack your LM-ProPower CombiLED unit and verify all accessories and components are included to the content list below. If anything is missing contact your place of purchase. 3.1. Content of unit LM-ProPower CombiLED unit Air hose 6 mm (1/4”) -
Page 12: Combiled Unit
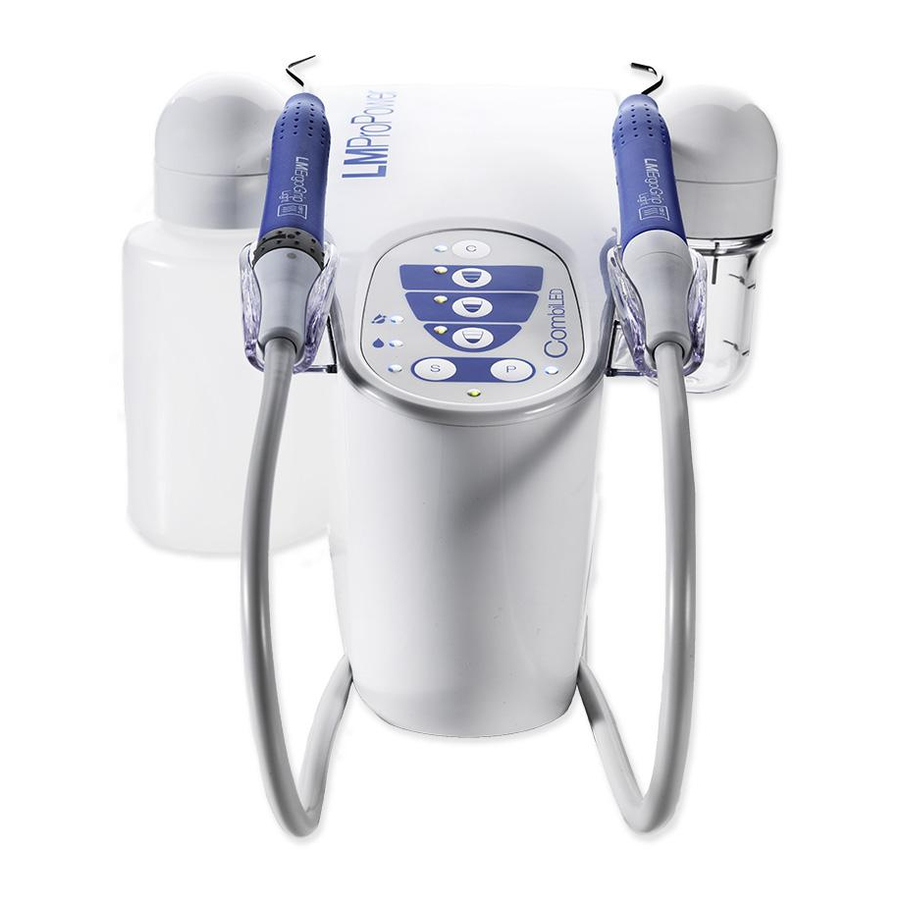
Content of delivery 3.3. CombiLED unit LM-ProPower CombiLED unit Powder container Depressurisation button Polisher handpiece incl. tubing (with an ErgoGrip and a nozzle mounted ) Medicament bottle Control panel Scaler Handpiece (with an ErgoGrip and a tip installed) Scaler water flow control ring... -
Page 13: Coupling And Type Plate
Content of delivery 3.4. Coupling and type plate Fuse holder Type plate Foot control connection AC power input Water hose coupling (optional) Air hose coupling 3.5. Control panel Cleaning key Working mode 3 key Working mode 2 key Working mode 1 key Polishing mode indicator Polishing mode key Standby indicator... -
Page 14: Medicament Bottle (Optional)
Content of delivery 3.6. Medicament bottle (optional) LM-ProPower has a medicament dispenser system, making the device independent of a fixed water supply connection. The medicament bottle can be used for either medicament solutions or ordinary clean water. Approved medicament solutions: •... -
Page 15: Foot Control Unit
Content of delivery 3.8. Foot Control unit Foot control unit body Foot control pedal Connector for foot control cable... -
Page 16: Symbols On The Equipment
Content of delivery 3.9. Symbols on the equipment Working mode 1 Working mode 2 Working mode 3 Irrigation/Water-Jet mode Dry/Air-Blow mode Automatic cleaning function Scaling function Polisher function Example of type plate. The type plate is placed on the back side of the unit. Medical electrical equipment classified by ETL with respect to electric shock, fire, mechanical, and other specified hazards in accordance with the Safety Standards ANSI/AAMI ES 60601-1 and CAN/CSA C22.2 No 60601-1:08... -
Page 17: Taking Combiled In To Use
Taking CombiLED in to use TAKING COMBILED IN TO USE The product should not be used adjacent to or stacked with other equipment. NOTICE! If adjacent or stacked use is necessary, the product must be observed to verify correct operation in the configuration in which it will be used. Special skills required. -
Page 18: How To Connect The Unit To The Air Supply
Taking CombiLED in to use 4.2. How to connect the unit to the air supply NOTICE! Use only dry and filtered compressed air. Special skills required. Consult an approved technician to connect the unit to NOTICE! the air supply. 1. Set the air supply OFF. 2. -
Page 19: How To Connect The Unit To The Supply Current
Taking CombiLED in to use 4.4. How to connect the unit to the supply current ELECTRICAL HAZARD! Connect the unit to an AC power outlet supplied with a protective ground. USA and Canada: The power cable and plug must be classified as “Hospital Grade”. -
Page 20: Operating Instructions Ultraled Scaler
Operating instructions UltraLED Scaler OPERATING INSTRUCTIONS ULTRALED SCALER PERSONAL INJURY HAZARD! Do not use the scaler on patients with cardiac pacemakers. The scaler may disturb the function of the pacemaker. WARNING PERSONAL INJURY HAZARD! New tips are not sterilized upon delivery. Sterilize tips before use. - Page 21 Operating instructions UltraLED Scaler UltraLED Scaler 1. Carefully move the LM-ErgoGrip on to the scaler handpiece (A). 2. Carefully put the tip in the torque wrench (B). 3. Use the torque wrench and turn the tip clockwise on to the scaler handpiece (C). Tighten until resistance and the torque wrench slides.
-
Page 22: Foot Control Functions For Scaler
Operating instructions UltraLED Scaler 5.2. Foot control functions for Scaler OFF position ON position Diagnostic function, set LED light ON or OFF by a single-click on the pedal Irrigation position Zero power position Maximum power position Power regulation 5.3. Power and working modes for Scaler Scaling power The power is controlled with the foot control from 0 to 100% in each working mode. -
Page 23: How To Operate With The Ultraled Scaler
Operating instructions UltraLED Scaler 5.4. How to operate with the UltraLED Scaler PERSONAL INJURY HAZARD! Keep patients lips, cheeks and tongue out of the way of the activated tip. Tip contact could cause burns because of the friction heat. CAUTION Do not use too much power when operating with ultrasonic instruments. -
Page 24: After Scaler Treatment
Operating instructions UltraLED Scaler 5.5. After Scaler treatment Immediately after using any type of medicament in the medicament bottle, run NOTICE! the automatic cleaning cycle with clean water in the medicament bottle for both the scaler and the polisher until clean water comes out of the handpieces. NOTICE! Set the water flow to fully open before running the cleaning cycle. -
Page 25: Operating Instructions Airled Polisher
Operating instructions AirLED Polisher OPERATING INSTRUCTIONS AIRLED POLISHER Indications for polishing: • Biofilm removal and dissolution. • To clean teeth prior to bleaching. • To clean pits and fissures prior to sealant placement. • To clean surfaces prior to any acid etch or bonding procedure. •... - Page 26 Operating instructions AirLED Polisher AirLED Polisher 1. Unscrew the powder container from the cap and fill the powder container with LM-ProPower powder until MAX (A). NOTE: With LM-Glycine powder fill the powder container only half of the maximum to prevent too much powder consumption and dispersion.
-
Page 27: Foot Control Functions For Polisher
Operating instructions AirLED Polisher 6.2. Foot control functions for Polisher OFF position ON position Diagnostic function, set LED light ON or OFF by a single-click on the pedal Water Jet position Polisher ON (Power controlled on control panel) 6.3. Power and working modes for Polisher Polishing power The user controls the polishing power from the control panel. -
Page 28: How To Operate With Airled Polisher
Operating instructions AirLED Polisher 6.5. How to operate with AirLED Polisher A short learning period is required by the user, as with any new technique, until the ideal angulations, soft tissue protection and an effective treatment can be achieved. PERSONAL INJURY HAZARD! Patients suffering from chronic respiratory disease like bronchitis or asthma must not, under any circumstances, be treated with an air polishing device. -
Page 29: Polishing For Supragingival Use
Operating instructions AirLED Polisher 6.5.1. Polishing for supragingival use: 1. Hold the nozzle approximately 3 mm (0.12 in.) from the operating surface. Keep the jet moving constantly in small circles. Do not point it at the same spot too long time. The polisher is most effective when you point the jet downright towards the tooth although the spray should be pointed away from the gingival onto the tooth. -
Page 30: Cleaning And Maintenance
Cleaning and maintenance CLEANING AND MAINTENANCE Immediately after using any type of medicament in the medicament bottle, run NOTICE! the automatic cleaning cycle with clean water in the medicament bottle for both the scaler and the polisher until clean water comes out of the handpieces. Before cleaning and sterilizing, open water flow fully open of the scaler handpiece and the polisher (see images). -
Page 31: How To Clean The Equipment And The Components
Cleaning and maintenance 7.3. How to clean the equipment and the components Autoclaving the handpiece regularly can decrease the life time of the scaler NOTICE! handpiece. Do not sterilize any scaler or polisher accessories using dry heat or chemical NOTICE! autoclaves. -
Page 32: Recommended Cleaning Procedure
Cleaning and maintenance Autoclave in steam at 134°C (max 135°C) for minimum 3 minutes Scaler tips Polisher nozzle Torque wrench LM-ErgoGrip Focus LED LM-ProPower Scaler handpiece 7.4. Recommended cleaning procedure Beginning of the day Run the automatic cleaning cycle with clean water for both scaler and polisher. See instructions chapter “7.2. Automatic cleaning function for the scaler and polisher”... - Page 33 Cleaning and maintenance End of the day • Run the automatic cleaning cycle with clean water for both the scaler and polisher handpiece. See instructions “7.2. Automatic cleaning function for the scaler and polisher” on page 30. • Remove and clean medicament bottle, bottle cap and powder container at a maximum temperature of 65 °C.
-
Page 34: Maintenance
Cleaning and maintenance 7.5. Maintenance NOTICE! A petroleum based lubricant on the O-rings can decrease their durability time. Power cable • Do an inspection of the power cable, cables and the handpiece hose daily to ensure that the equipment is in good condition without mechanical damage. O-rings (bottle and powder container connectors) •... -
Page 35: Troubleshooting Combiled
Troubleshooting CombiLED TROUBLESHOOTING COMBILED Type of problem Scaler Polisher See chapter Unit does not give a result and no lights are lit on the control panel Lights are flashing on the control panel Difficult to remove the LM-ErgoGrip Weak or no LED light No tip vibration Weak tip vibration Not sufficient or no water flow (Scaler) - Page 36 Troubleshooting CombiLED 8.4. Weak or no LED light 1. Examine that lens in the LM-ErgoGrip is clear and clean. Clean or replace if necessary. 2. If you have an additional scaler handpiece (or polisher tubing), try replacing the scaler handpiece (or polisher tubing).
- Page 37 Troubleshooting CombiLED 6. Use the LM-ProPower Fixer to examine that the water hose inside the handpiece has not stuck in the autoclave. Put the Fixer carefully into the handpiece from the hose connector side. (To prevent the hose getting stuck, the water adjustment on the handpiece should be set to fully open before sterilization in autoclave.) 7.
- Page 38 Troubleshooting CombiLED 8.12. Not sufficient or no powder flow 1. Make sure that there is powder in the powder container and that the O-ring in the cap is in correct position. 2. If you have an additional nozzle, replace the nozzle. A clogged nozzle can be cleaned in an ultrasonic bath or in citric acid.
-
Page 39: Technical Data
TECHNICAL DATA Manufacturer LM-Instruments Oy, PL 88 (Norrbyn rantatie 8) FI-21601 Parainen, Finland Model LM-ProPower CombiLED Classification EN60601-1: Class 1, Type B 93/42/EEC: Medical products, class IIa L x W x H 270 x 110 x 165 mm (without bottle and powder container) -
Page 40: Warranty
Warranty 10. WARRANTY 10.1. Warranty terms The following warranty terms apply to the sale of LM-Instruments Oy’s products (hereinafter “Products”) to a purchasing company or individual by LM-Instruments Oy (hereinafter “Manufacturer”). Manufacturer here by warrants that the Products will be free from defects arising from faulty materials or workmanship for a period of twenty four (24) months from the date of purchase by a customer from Manufacturer’s authorized dealer (hereinafter “Authorized Dealer”). -
Page 41: Delivery Information
Warranty 10.2. Delivery Information Device Model LM-ProPower CombiLED Water connection Bottle Tap water connection Device Serial Number Purchase order number Order date Delivery date Installation Information Installation done (date) Installation done by (person) Installation location (address) Installation location (building and room number) -
Page 42: Installation Check-List
Warranty 10.3. Installation check-list Task Description Initials Date Visual check Delivery packing was undamaged Content of the All the devices and part were according to the delivery section “3. Content of delivery” on page 11“ Visual check All the parts were intact Mains connection Mains supply is in compliance with back panel label information (picture in section 3.7) voltage:_____ V,... -
Page 43: Operational Test
Warranty 10.4. Operational test Additional equipment needed: Artificial denture, cup for water flow, timer. Task Description Pass/Fail Initials Date Connect cable to Green standby light is illuminated mains Select mode Select scaler mode by pressing S on control panel. Test Scaler Irrigation Test the water regulation of the handpiece by mode selecting irrigation mode and testing handpiece... - Page 44 LMDental LM-Instruments Oy PL 88 (Norrbyn rantatie 8) FI-21601 Parainen, Finland Tel. +358 2 4546 400 Fax +358 2 4546 444 info@lm-dental.com www.lm-dental.com User manual language versions available at materialbank.lm-dental.com...
Need help?
Do you have a question about the LM-ProPower CombiLED and is the answer not in the manual?
Questions and answers