Advertisement
Quick Links
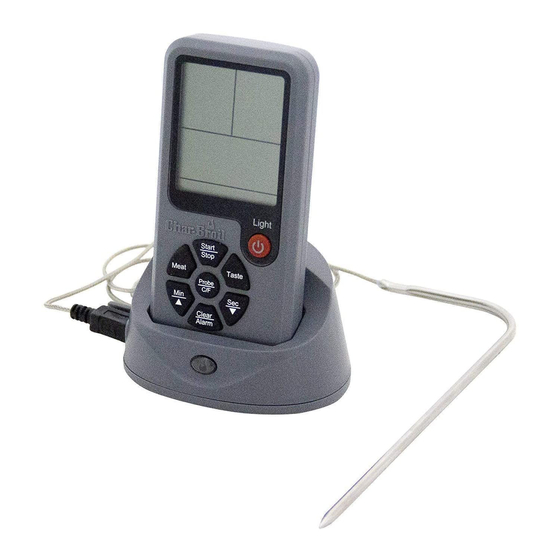
Wireless Multi-Sensor
Meat Thermometer
Model: 4885637
USER MANUAL
INTRODUCTION
Thank you for selecting the CharBroil™ Wireless Multi-Sensor Meat
Thermometer. Please keep this manual for operation instructions and for
future reference.
OVERVIEW
FRONT VIEW
5
2
3
6
1. POWER : Power ON / OFF - Backlight ON / OFF
2. MEAT:
Select meat type
3.
PROBE / CF: Select probe tip or cold spot / change
between °C and °F
4. TASTE: S et Target Temperature
5.
START / STOP: Timer Start/Stop
6. MIN/ UP: Timer Minutes / Scroll Up
7. SEC/ DOWN: Timer Seconds / Scroll Down
8. CLEAR / ALARM: Clear entry / Alarm Silence
BACK VIEW
1
2
2
3
LCD SCREEN
7
5. Alarm ON icon
1. Meat Type
6. Sensor selection Icon
2. Target Temperature
7.
3. Countdown Timer
4. Remaining Time
CHARBROIL, LLC. INSTRUCTIONS © 2013
HANDHELD
RECEIVER
1
4
7
8
TRANSMITTER
1. Removable Belt Clip
2.
Battery Compartment
3.
Transmitter ON/OFF
4. Transmitter Jack
4
1
2
3
4
5
6
Current temperature
TRANSMITTER AND PROBE
2
1
2
3
GETTING STARTED
BATTERIES
Insert the batteries as shown, taking care to match the
polarities (+ / -). Insert batteries into both receiver and
transmitter.
1
3
+
-
-
+
2
TRANSMITTER DATA TRANSMISSION
Place the transmitter within 100 Feet of the handheld unit.
OPERATION
CAUTION The probe is a sharp metal object, and will
become hot during cooking. Take care when handling.
1. Plug the probe connector to the transmitter jack.
2. Insert tip of the probe into the center of the meat,
taking care not to pierce through it. Do not expose any
part of the probe or cable to open fl ames.
3. The probe contains 5 separate sensors spaced along the probe
beginning at the tip. If utilizing the "Cold Spot" function, make sure
probe is fully inserted up to the "Cold Spot" mark indicated on the
probe.
4. Press the POWER button on both transmitter and handheld
receiver.
5. Press the MEAT button on handheld receiver to select the type of
meat that you are cooking. Each press of the button will cycle
through the selections. BEEF - LAMB - PORK - POULTRY
(PLTRY) - GROUND BEEF/LAMB (HMBGR) - OTHER
6. Press the TASTE button on handheld receiver to select the
doneness of meat that you desire. Each press of the button will
cycle through the selections. RARE - MED. RARE - MED - MED.
WELL - WELL.
NOTE - if you select meat type "OTHER" you can set the desired
internal temperature manually. The default temperature is 150°F.
Press the UP/DOWN buttons to set the desired target
temperatures. The selectable range is 110°F to 250°F.
7. Set the Timer - Press the MIN or SEC button on handheld receiver
to select the desired cooking time.
NOTE - if you hold the button for more than 10 seconds, the digits will
increase/decrease rapidly. To reset the time, press the CLEAR
button.
8. Set the Alarm - Press and hold the ALARM button on handheld
receiver for 3 seconds to select Alarm ON or OFF. The
display when the alarm is active. Once the food has reached the
target temperature. the
9. Set the Probe Mode.
Probe Function: The display can be set to "Tip" or "Coldspot". To
use the probe in "TIP" mode, press the "PROBE" button until "Tip"
shows in the display. This function will display the temperature
sensed by the Tip sensor of the probe.
Press the "PROBE" button again to switch to the "Coldspot"
function. This function will scan each of the sensors in the probe
and display the coldest reading.
PRINTED IN CHINA
1. Battery Compartment
1
2. Connector jack
for probe
3. POWER:
ON / OFF
3
1. Probe Connector
2. Multi-Sensor Probe
3. "Cold Spot" mark
-
+
1
+
-
will flash and an alarm beep will sound.
80022298_4885637 08.09.13
3
icon will
Advertisement

Related Manuals for Char-Broil 4885637


Summary of Contents for Char-Broil 4885637
- Page 1 2. Connector jack for probe Wireless Multi-Sensor 3. POWER: ON / OFF Meat Thermometer Model: 4885637 USER MANUAL 1. Probe Connector INTRODUCTION 2. Multi-Sensor Probe Thank you for selecting the CharBroil™ Wireless Multi-Sensor Meat Thermometer. Please keep this manual for operation instructions and for 3.
- Page 2 • Do not cover the ventilation holes with any items such Product No.: 4885637 as newspapers, curtains etc. Product Name: Wireless Multi-Sensor Thermometer • Do not immerse the unit in water. If you spill liquid over it, dry it immediately with a soft, lint-free cloth.
Need help?
Do you have a question about the 4885637 and is the answer not in the manual?
Questions and answers