Advertisement
Advertisement

Summary of Contents for GreenWave PowerNode
- Page 1 Home Energy Management PowerNodes...
-
Page 2: Table Of Contents
Table of Contents Introduction PowerNode Overview Installation Common Z-Wave Tasks Network Inclusion Process Network Exclusion Process Safety Information About GreenWave Home Energy Management PowerNodes... -
Page 3: Introduction
Introduction The GreenWave Reality platform helps create a smart, energy-efficient home through the monitoring and controlling of your powered appliances and electronics. You can conserve energy with minimal impact to your lifestyle by using our products to easily manage your powered devices. Simply connect our Gateway to your home network, plug your devices into our PowerNodes, and then monitor and control the devices’... -
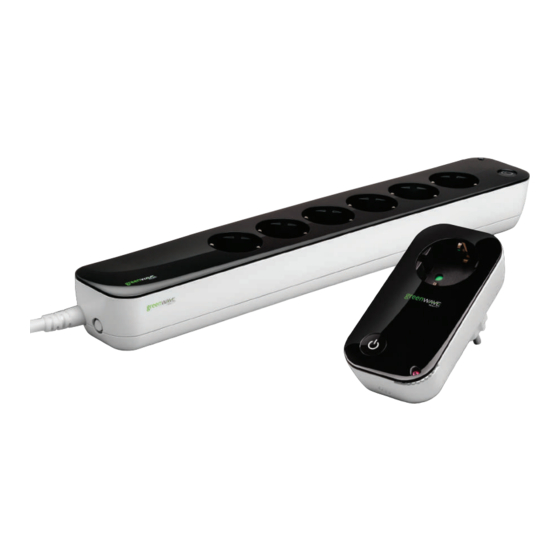
Page 4: Powernode Overview
GreenWave Reality home network so that you can monitor and control your devices’ power usage remotely through a Web browser or smartphone. The PowerNode is available as a single outlet node or as a six-outlet strip. - Page 5 1. PowerNode plug: Prongs that you plug into your power outlet. 2. PowerNode outlet: Outlet where you plug in your appliance or electrical device. 3. Room color selector: Wheel that you rotate you specify the associated room color. 4. Sync button: Button that you press to sync PowerNode with Gateway.
- Page 6 Your PowerNode has a corner wheel with colored numbers to represent the room or device that the PowerNode is powering. Set the PowerNode to the colored number you want to use to identify the room or device (this is referred to as the “room color”).
- Page 7 Indicators Your PowerNode has an indicator that displays any of the following patterns and colors to show you its current status: Off (no color): All PowerNode ports Rotating green double bars: PowerNode is in connected to the Gateway are off.
-
Page 8: Installation
Installation Before you install your PowerNode and powered devices, make sure that your GreenWave Reality Gateway is already connected to your home network and operating (refer to the instructions that came with your Gateway). There are four basic steps to install your PowerNode and powered devices: 1. - Page 9 2. Choose the Powered Device and Location Choose the appliance or electronics device you would like to connect to your PowerNode. Turn the device off and unplug it from any power source. As discussed in the “Installation Tips” section, you should attach only one device to each PowerNode outlet (one device for a single-outlet PowerNode or six devices for a six-outlet PowerNode strip).
- Page 10 Connect only one appliance per PowerNode outlet. For best results, attach only one powered device to each PowerNode outlet (one device for a single-outlet PowerNode or six devices for a six-outlet PowerNode strip). Do not connect power strips and extension cords (or other PowerNodes) to the PowerNode.
-
Page 11: Common Z-Wave Tasks
Network Inclusion Process The process for adding a PowerNode to your home network is called “inclusion.” It must only be performed once, and you must have the Gateway plugged in and working first. You can start the inclusion process by pressing and holding the Gateway network button for two seconds so the rotating “inclusion mode”... -
Page 12: Network Exclusion Process
Network Exclusion Process Note: If your PowerNode is new and has never been used before, then you should not need to perform the exclu- sion process. A PowerNode that has been previously used with a different Z-Wave network must have its association (homeID) with the other network removed before you can connect it to your GreenWave Reality home network. - Page 13 To complete the process you must perform the following steps: 1. Unplug the PowerNode from the wall socket. 2. Locate the network button on the PowerNode. It is a small round button on the side of the device, marked with the sync symbol.
-
Page 14: Safety Information
Safety Information Indoor Use Only - Your Gateway should be used only in dry, indoor locations. Do not use your Gateway in high-humidity locations such as greenhouses, saunas, washrooms, or patios. Do not use your Gateway in locations where it can get wet such as near aquariums or running water. Do Not Disassemble - Your Gateway has no user-serviceable parts inside. -
Page 15: About Greenwave
About GreenWave Reality GreenWave Reality is a global innovator in the emerging Home Energy Management market. GreenWave Reality provides an affordable, easy-to-use, standards-based platform that allows utilities enhance their relationship with consumers and better balance energy on the grid while consumers can conserve energy with a minimal impact to their lifestyle by easily monitoring and controlling their appliances and adding intelligent LED lighting. - Page 16 Model Number Wireless Network Features NP160-F Z-Wave Radio Frequency: 868.42MHz NP162-F Z-Wave Maximum Inter-node Range: 30m GreenWave Reality PowerDNA: v1.0 Environmental Conditions Z-Wave Command Classes Certified Operating Temperature: 0°C to +25°C Storage Temperature: -20°C to +60°C Binary Switch Maximum Humidity: 5% to 90% N/C...
Need help?
Do you have a question about the PowerNode and is the answer not in the manual?
Questions and answers