Table of Contents
Advertisement
Quick Links
20____
Year of Manufacture:
Introduction / Safety
Assembly
Component Identification
Operation
Maintenance
Troubleshooting
Dryer & Exhaust Hood Ducting
Installation: Conveyor Belt Covers
Warranty / Terms & Conditions
Electrical Drawing #:
Serial Number:
VTX
(Please log your machine's serial number and date of purchase for future reference.)
DB-30 & DB-II-30
Conveyor Drying System
Assembly & Operating Manual
Rev:______
Date:____
Pg #
2
3-4
5-6
7
8
9
Vastex E-mail assistance
10
Purchasing & Product Info:
11
sales@vastex.com
Electrical Support:
12
stech@vastex.com
Tech Support, Mechanical Setup, and Operation:
techsupport@vastex.com
Screen Printing Issues & Support:
/
/
____
______
printech@vastex.com
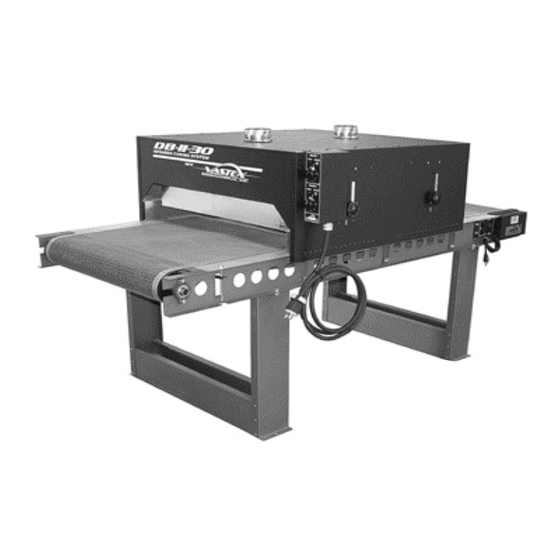
DB-30 Shown as table top
model, optional legs availa-
ble.
DB-II-30 is floor model only.
Vastex
International, Inc.
1032 N. Irving St.
Allentown, Pa. 18109 USA
Phone# 610 434-6004 Fax# 610 434-6607
Web Site www.vastex.com
Authorized Representative in Europe:
Certification Experts BV
Nieuwstad 100 1381 CE Weesp,
The Netherlands
Tel : + 31 (0) 294 – 48 33 55
Doc # 01-01-013C
Original Instructions
Advertisement
Table of Contents

Summary of Contents for VASTEX DB-30
- Page 1 Year of Manufacture: Doc # 01-01-013C Original Instructions DB-30 & DB-II-30 Conveyor Drying System Assembly & Operating Manual DB-30 Shown as table top model, optional legs availa- ble. DB-II-30 is floor model only. Vastex International, Inc. 1032 N. Irving St.
-
Page 2: Main Unit
1960 and has the knowledge and expertise to supply a quality dryer and help you keep it running for years to come. VASTEX has innovated many of the features found in conveyor ovens today from control methods, modular features, air movements and belt tracking. - Page 3 Tools Needed: (2) 9/16” open end wrenches, (1) 7/16” open end wrench or socket, (1) 1/4” nut driver OR flat blade screw driver 1) The conveyors are assembled in the same way for all DB-Series dryers. The DB-30 is being used for the pictures.
- Page 4 Assembly (cont’d) 5) The belt needs to be installed as shown in the diagram below. Be sure the belt is routed under the brace found near the gear motor. To connect your belt, align the Alligator Lace and install the pin. Some belts will have a plastic flap over the Alligator Lace.
-
Page 5: Component Identification
Pulley The pulleys at either end of the conveyor are made by VASTEX of 4 ½ inch tubing with ¾ inch center shaft. They are mounted on self aligning flange bearing blocks for precision rolling. - Page 6 240 Volt 2.5 to 15 Amps 240 Volt 22 Amps Nema 6-15R Nema 5-20R Nema 5-15R CEE 7/7 L6-30R DB-240, DB-30, DB-18-240 DB-120, DB-18 & 120 Volt “X”Series Conv. All Continental Europe DB-II-18 & DB-II-30 240 Volt “X”Series Conv. DB-30-120...
-
Page 7: Dryer Operation
Dryer Operation Startup Procedure Be sure your breaker is in the off position and the dryer’s dial controls are off. Plug the Turn on Power Conveyor and Chamber into their properly rated outlets and turn the breaker on. Check belt path: Remove any objects from the conveyor and belt. -
Page 8: Maintenance
Maintenance Caution! Power must be turned off at the external disconnect, or the machine unplugged, before entering any part of this machine. A qualified electrician should perform any internal testing requiring power on! Electrical Electrical connections will loosen in time from heating and cooling. Every three (3) months the power should be turned Connections off at the external disconnect, or unplugged, and all the points of connection should be inspected and tightened. -
Page 9: Troubleshooting
Troubleshooting IMPORTANT Turn off and lock out power at the main disconnect before entering any part this equipment . Do Not operate with any covers or guards removed. Belt Speed Controller adjustment Setting the low speed pot adjustment: (small screw driver with plastic handle is needed) Turn the speed pots clockwise to increase the speed and counterclockwise to decrease. - Page 11 Doc. # 01-01-014 Vastex International, Inc. 1032 N. Irving St. Installation: Conveyor Belt Covers Allentown, Pa. 18109 USA Phone# 610 434-6004 DB Series and EC-I Series Dryers Fax# 610 434-6607 Package Contents: Web Site www.vastex.com Tools Required: 1/4” Nut Driver, or 1/4” socket and ratchet (3) Belt Covers (actual covers may differ from pictures) E-Mail info@vastex.com...
- Page 12 The defective part or parts will be repaired or replaced at the discretion of Vastex Internation- al, Inc. If the equipment in question is less than one (1) year old, it will be shipped to the customer at no charge, with an RGA issued by Vastex for the defective part. The defec- tive part must be shipped back to Vastex freight prepaid within 30 days or the account will be billed.
Need help?
Do you have a question about the DB-30 and is the answer not in the manual?
Questions and answers