Table of Contents
Advertisement
Advertisement
Table of Contents

Summary of Contents for Audient Sono
- Page 1 Guitar Recording Interface User Manual V1.0 audient.com...
-
Page 2: Table Of Contents
Saftey Information Initial Setup Declaration of Conformities Cabinets • Two Notes Power Amp and Cab Simulation Device Setup: Sono was designed to be the ultimate audio Microphones interface for guitarists. • 3 Band Tone Control Installation on Mac Rooms Installation on Windows... -
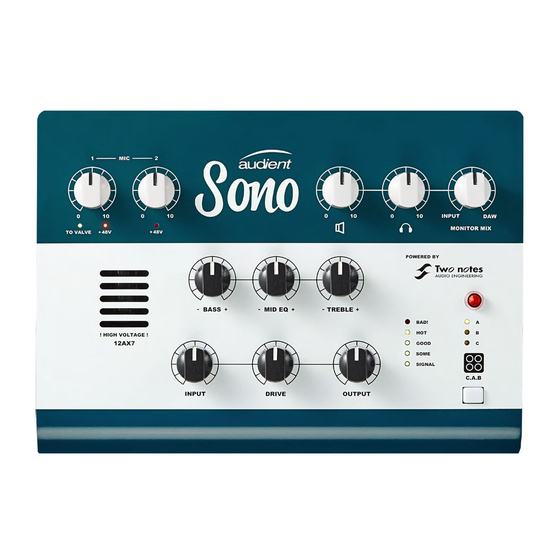
Page 3: Sono Overview
Sono Overview Sono Overview Microphone To 12V DC Valve Switch USB C Input Speaker Power Outputs Input Speaker Headphone Output Output Level Mic Pre Gain Level Monitor Mix Control ‘Mic Input To Valve’ Indicator Phantom Power Switch Power Switch Mic/Line... -
Page 4: Box Contents
Box Contents and Setup Safety Information In your Sono packaging you should find the Important Safety Instructions following items: Please read all of these instructions and save Sono utilises an external switch-mode power • Sono them for later reference before connecting supply that is very quiet and rated at 2A. -
Page 5: Declaration Of Conformities
Safety Information Declaration of Conformities Important Safety Instructions FCC Part 15B 1. Read these instructions 11. Refer all servicing to qualified service This apparatus has been tested and found 1. Re-orient or relocate the receiving antenna personnel. Servicing is required when to comply with the limits of a class-A digital 2. -
Page 6: Device Setup
During a recording session it can take a long time until a musical instrument is actually played. If Sono would go into a standby mode or similar, this will cause a disruption to a recording session as the user would expect the unit to be operational even if the musical instrument input is not being actively used. - Page 7 Download the Latest Sono Software Preferences Head to our website for the latest version of Check that Sono is set as your audio device for our Sono Software: both the input device and the output device. It’s also recommended to disable system sounds audient.com/products/downloads/sono...
- Page 8 PC Settings > Control Panel > Hardware and Sound > Sound Connect Sono Here you can see whether Sono is visible to Using the USB cable provided, connect the PC and you can make it the computers Sono to your computer’s USB port. Then default sound device by pressing ‘Set Default’.
-
Page 9: Hardware Features
Hardware Features Guitar Preamp Channel Guitar Sono includes a dedicated guitar channel utilising a High Voltage 12AX7 valve and can be treated just like the input of a classic valve amplifer. This section will explain the stages of the Guitar Preamp channel and how they can Valve Stage 1 all be used to dial in your perfect tone. - Page 10 Three Band Tone Control as explained above or through the use of Sono is designed to work with a wide variety of pedals such as Boost’s or Overdrives. The Three Band control allows you to boost Guitars, including bases.
-
Page 11: Mic Pres
This can be engaged by pressing the Sono then this can be connected to line input +48V buttons found on the rear of Sono. Torpedo CAB processing can then be applied to this input by pressing and holding the C.A.B... -
Page 12: Monitor And Headphone
ADAT and S/PDIF inputs. Any routing in the application will be ignored whilst To Amp is being used and the Sono will The optical connection will also carry the revert to being controlled by the hardware signal required to clock Sono from an external Monitor Mix control. -
Page 13: Signal Flow Diagrams
Torpedo Processing is active. Pressing and The below diagram shows how the input holding the C.A.B button will bypass the There are two ways in which the Sono outputs The To-Amp output on Sono automatically signal is routed through Sono. - Page 14 Sono Output using the Sono Mixer DSP Mixer Main Mix Cue Mix Inputs 1, 2 ader & No Cab & Pan ader & Pan Software Features Digital ader Inputs & Pan ader & Pan DAW Playback ader & Pan ader &...
-
Page 15: Sono Application
If you simply want to plug-in and play, with minimal setup, the Monitor Mix control on the Sono gives you a basic way to blend between your input signal and the signal being played Sono Application... -
Page 16: Sono Application Menu
Digital Input Visit Sono Knowledge Base Channels Opens a browser windows for the Audient Helpdesk with helpful articles and FAQ’s. Check for Updates The Sono app will check with the Audient update server for any available firmware updates for Sono. - Page 17 Mic/Line 1 input on the rear of Sono or the signals to be phase cancelling such as micing Guitar input on the front of Sono. If a jack is the front and rear of a guitar cab. connected to the guitar input, The Mic/Line Phase input is switched out.
-
Page 18: Master Section
System Panel. This contains advanced section. This part of the mixer will affect things allowing you to concentrate on the sides and functions of the Sono application and allows on a more global scale. hear parts which may normally be hidden you to change some behaviours of the device. - Page 19 Main Mix - This is the main mix which you Preferred Clock Source create within the mixer. This will be the default You are able to use any of Sono’s inputs, setting for most Sono users including the digital inputs, to connect a Allow you to select where the Sono takes its talkback microphone.
-
Page 20: Firmware Update
Ctrl + 4 View System Panel Click Update and the update will begin. The Sono may turn off a number of times during the process. Once the update has completed, fully reboot the Sono by flicking the power Then select the preset you wish to use. -
Page 21: Two Notes Remote Software
Torpedo Remote Application Built into Sono is Two notes Torpedo cabinet simulation. Allowing you to dial in realistic, punchy tones from the comfort of your desktop. The Torpedo Remote application allows you to adjust numerous parameters such as the cabinet, the microphone used, the room it’s been recorded in and much more. -
Page 22: Initial Setup
Torpedo Remote Application Choose Your Cab Initial Setup Simply click on the Sono to start using the Cabinets are split into their speaker size and remote software. At this point, you will need to the number of speakers used in that cabinet. -
Page 23: Microphones
Torpedo Remote Application Torpedo Remote Application Choose Your Mic Choose Your Room You can also adjust the distance of the Basement microphone from the front of the cabinet. This allows you to get more of the direct sound A room with stone walls to give plenty of To capture the sound of the Cabinet, you’ll from the cabinet by placing the microphone Once you’ve chosen the cabinet and the... -
Page 24: Saving Presets
This is controlled using the Drive knob on the way you like it and then hit SAVE in the top of Sono. Sono itself and whilst Sono is in use, the Power right hand corner of your Rack. Amp Knob will be locked. -
Page 25: Cabinet Manager
Sono’s three preset slots, allows you to view your list of available this cabinet must be stored on Sono itself cabinets and store up to three onto the Sono using the cabinet manager. Otherwise a itself. -
Page 26: Pro Tools Setup
If using Windows, make sure that you have set can either be routed through the Sono mixer All of Sono’s input and output channels will be the correct latency and buffer size settings or hard-wired directly from Pro Tools to the available to Logic for routing. - Page 27 Studio > Studio Setup Select Audient Sono in the menu to ensure that File > Project Settings > Audio Cubase / Nuendo addresses the Sono device driver. You will be asked if this is OK, select ‘switch’.
-
Page 28: Other Daws
Our Help centre is regularly updated with information to give tips and tricks on how to use Sono, as well as guides on how to avoid or resolve common issues. If further assistance is required then you can also submit a support ticket through our help... -
Page 29: Specifications
CROSSTALK: -90dB @ 1kHz & 10kHz Packaged: 2.0kg THD+N @ -1dBFS (1kHz): <0.002% (defined as a Dealer which has purchased the product directly from Audient in the UK, or one of DYNAMIC RANGE: 114dB A-weighted Unit Dimensions: 229mm (w) x 67mm (h) x 165mm (d) our Authorised Distributors outside the UK). -
Page 30: Service
Your warranty will be void if you tamper with the device at component level. If you The Audient warranty term is additional to any statutory rights in the country of purchase or as offered by have any questions with regard to the repair, please contact Audient Ltd. -
Page 31: Glossary
Glossary Below are a list of common words you may encounter in this manual or whilst using Sono. Amperes ADAT Alesis Digital Audio Tape Analogue to Digital Converter Digital Audio Workstation Central Processing Unit Artist Headphone Mix Digital to Analogue Converter Decibel Decibel referenced to 0.775Vrms = 0 dBu...
Need help?
Do you have a question about the Sono and is the answer not in the manual?
Questions and answers