Advertisement
Advertisement
Table of Contents

Subscribe to Our Youtube Channel
Related Manuals for Rato RG3.6-75Q-D-II


Summary of Contents for Rato RG3.6-75Q-D-II
- Page 1 GASOLINE TILLER Owner’s Manual RG3.6-75Q-D-II Original instruction...
- Page 3 Thank you for choosing a power tiller of our company. This machine is small, light, multi-functional, and with a high efficiency for cultivating. It can climb hills, run in water, walk over the field ridges and ditches, move freely and change the directions easily, and it is especially applicable for various working in hilly area, dry land, paddy field, orchard, vegetable garden and greenhouse, etc.
-
Page 4: Table Of Contents
CONTENTS 1.SAFETY LABELS..................2 2.SAFETY INSTRUCTION................3 3.COMPONENTS.....................5 4.ASSEMBLY....................6 5.CONTROLS....................8 6.BEFORE OPERATION................10 7.OPERATION....................11 8.SERVICING....................17 9.STORAGE....................23 10.TRANSPORTING..................24 11.SPECIFICATIONS..................25... -
Page 5: Safety Labels
SAFETY LABEL LOCATIONS These labels warn you of potential hazards which can cause serious injury. Read the labels and safety notes and precautions described in this manual carefully. Warning: Read the instruction manual before using the machine. Danger of cutting yourself. Moving milling cutters. Disconnect the spark plug cap and read the instructions before Danger of cutting yourself. -
Page 6: Safety Instruction
2. SAFETY INSTRUCTION 1) Training a) Read the instructions carefully. Be familiar with the controls and the proper use of the equipment; b) Never allow children or people unfamiliar with these instructions to use the machine. Local regulations can restrict the age of the operator; c) Never work while people, especially children, or pets are nearby;... - Page 7 l) Stop the engine: - Whenever you leave the machine; - Before refueling; m) Reduce the throttle setting during engine shut down and, if the engine is provided with a shut-off valve, turn the fuel off at the conclusion of working; 4) Maintenance and storage a) Keep all nuts, bolts and screws tight to ensure the equipment is in safe working condition;...
-
Page 8: Components
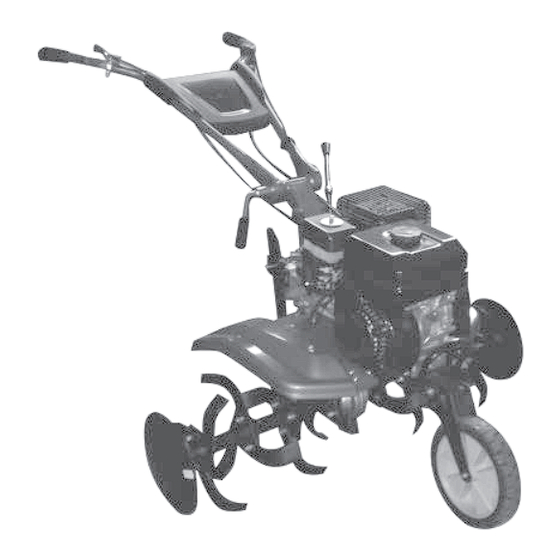
3. COMPONENTS Serieal number 1. switch 9. Handrail height adjustor 2. Muffler 10. Depth regulator 3. Fuel tank cover 11. Dipstick 4. Front wheel 12. Starter 5. Belt cover 13. Fuel valve 6. Shift handle 14. Choke 7. Throttle lever 15. -
Page 9: Assembly
4. ASSEMBLY NOTICE: The installed work shall be carried out only by specifically trained personnel. 4.1 UNPACKING 4.1.1 Remove all loose items from the carton. 4.1.2 Remove the plastic bag and it’s ready for assembly. 4.2 Assemble the connection tube with gear box by four M8×16 bolts. 4.3 Handrail 4.3.1 Assemble the handrail with connection tube. - Page 10 4.4 Shift lever 4.4.1 Remove belt box cover. 4.4.2 Remove passive belt wheel. 4.4.3 Assemble shift lever with pin. 4.4.4 Assemble the passive belt wheel and belt box cover. 4.5 Blade 4.5.1 Lean the machine left side. 4.5.2 Fix the outboard blade at right side by pin. 4.5.3 Assemble left side blade as above step.
-
Page 11: Controls
5. CONTROLS 5.1 FUEL VALVE LEVER The fuel valve opens and closes the passage between the fuel tank and the carburetor. The fuel valve lever must be in the “ON” position for the engine to run. When the engine is not in use, leave the fuel valve lever in the “OFF” position to prevent carburetor flooding and to reduce the possibility of fuel leakage. - Page 12 Starter handle 5.4 CLUTCH LEVER It situated on the left handrail. Connect the worm bar and engine output shaft to drive the hoe blade when the lever is squeezed. Clutch handle 5.4 SHIFT HANDLE The machine has two shifts. The shift handle should be operated to the suitable position to let the machine go forward or go backward.
-
Page 13: Before Operation
6. BEFORE OPERATION 6.1 CHECK THE GENERAL CONDITION Look around and underneath the engine for signs of oil or gasoline leaks. Remove any excessive dirt or debris, especially around the muffler and recoil starter. Look for signs of damage. Check that all shields and covers are in place, and all nuts, bolts, and screws are tightened. -
Page 14: Operation
7. OPERATION The Motor is equipped with fenders. The motor may never be started without it or with a defect fender. Before start the engine, be sure the clutch is disengaged and the shift lever is in the neutral position to prevent sudden uncontrolled movement when the engine stars. - Page 15 7.1.4 Move the throttle lever to the left.
- Page 16 7.1.7 As the engine warm up, open the choke gradually. (1)Choke lever (2)“ON” 7.2 OPERATE THE MACHINE 7.2.1 Start the engine as above. Let the engine run a few minutes to warm before use. 7.2.2 Move the shift handle to the desired position (forward/backward). Engine Model Shift Gear...
- Page 17 Clutch handle Note: If the shift lever will not engage the desired gear, stop the engine, then squeeze the clutch lever and move the tiller slightly to reposit the gears. Reduce engine speed (move the throttle lever to the low position) before operate the clutch.
- Page 18 Normally, you should stop the engine as followed steps after use. 7.3.1 Move the throttle lever fully to the right. Clutch handle 7.3.2 Move the engine switch to the “OFF” position.
- Page 19 7.3.3 Move the fuel valve lever to the “OFF” position. 7.3.4 Clean both hoe blades. Note: Waiting up to 30 minutes after use to allow the engine to cool 7.3.5 Tighten loose screws and nuts. 7.3.6 Check for loose or damaged parts. If required, change damaged parts. 7.3.7 Disconnecting the spark plug cable.
-
Page 20: Servicing
8. SERVICING 8.1 SAFETY PRECAUTIONS Make sure the engine is off before you begin any maintenance or repair. This will eliminate several potential hazards: Carbon monoxide poisoning from engine exhaust. Never run the machine indoors. The exhaust fumes contain carbon monoxide, a very toxic gas. - Page 21 8.2 MAINTENANCE SCHEDULE REGULAR 5Hrs. or 25Hrs. 50Hrs. 100Hrs 250Hrs. Before SERVICE First or Every or Every 6 or Every 6 or Every 2 each use PERIOD(4) month 3 months months months year Engine oil Check Change(2) Change(2) Air filter Check Clean (1) Clean (1)
- Page 22 8.4 ADDING FUEL 8.2.1 Remove the fuel tank cap. 8.2.2 Add fuel to the bottom of the fuel level limit in the neck of the fuel tank. Do not overfill. Wipe up spilled fuel before starting the engine. Fuel limit 8.5 ENGINE OIL LEVEL CHECK 8.5.1 Check the oil level when engine is stopped.
- Page 23 8.7 OIL CHANGE Drain the engine oil when the engine is warm. Warm oil drains quickly and completely. 8.7.1 Turn the fuel valve to off position to reduce the possibility of fuel. 8.7.2 Place a suitable container next to the engine to catch the used oil. 8.7.3 Remove the drain bolt and drain the oil into the container by slightly tipping the engine toward the oil filler cap/dipstick.
- Page 24 (1) Remove the air cleaner cover off and take the element out. (2) Paper element: Wash the element with home detergents and warm water (or non-flammable or high flash-point cleansing solvents) and dry up. Foam element: Soak in clean engine oil until saturated. Squeeze out excess oil, otherwise, the engine will smoke in starting stage.
- Page 25 0.028~0.031 in (0.70~0.80mm). Correct the gap if necessary, by carefully bending the side electrode. 5. Install the spark plug carefully, by hand, to avoid cross-threading. 6. After the spark plug seats, tighten with a spark plug wrench to compress the sealing washer.
-
Page 26: Storage
9. STORAGE Never store the machine with petrol in the fuel tank in a confined area with bad ventilation. Petrol fumes could reach open flames, sparks and cigarettes etc. If the machine is to be stored for a longer period than 30 days, the following methods are recommended. -
Page 27: Transporting
10. TRANSPORTING If the engine has been running, allow it to cool for at least 15 minutes before loading the machine on the transport vehicle. A hot engine and exhaust system can burn you and can ignite some materials. Keep the engine machine when transporting to reduce the possibility of fuel leakage. -
Page 28: Specifications
11. SPECIFICATIONS Item RG3.6-75Q-D-II Model R210 Gasoline engine Engine type Air-cooled,4-storke,OHV,single cylinder Displacement (mL) 21 2 Rated Power [kW/(r/min)] Engine Max. Torque [N·m/( r/min Igniting System Transistorized Magneto Fuel Consumption( g/kw.h ) Fuel Tank Capacity (L) Engine Oil Capacity (L) Machine’s dimension(length ×... - Page 32 93004-U070720-0000...
Need help?
Do you have a question about the RG3.6-75Q-D-II and is the answer not in the manual?
Questions and answers