Table of Contents
Advertisement
Advertisement
Table of Contents

Subscribe to Our Youtube Channel
Summary of Contents for Phisung E06
- Page 1 Android GPS FHD Smart Mirror Camera English Quick Start Guide...
- Page 2 [To Customer] Dear Customer, Thanks for buying our car camera, it is our honor and pleasure to serve you to using our product. Before using this product, please read this manual very carefully and keep it properly. As production date and batch difference, the instruction maybe have difference with the actual object.
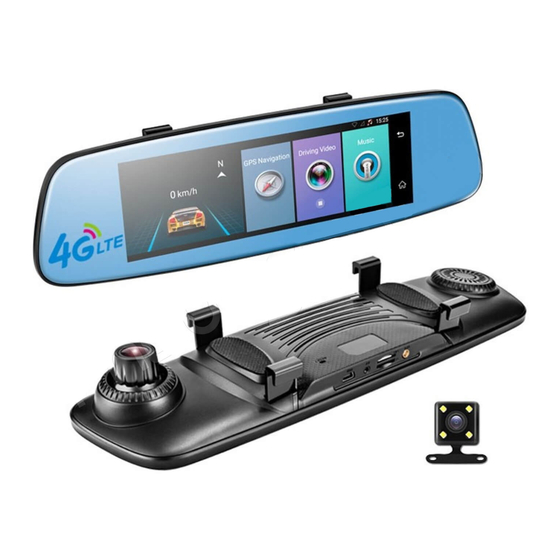
- Page 3 [Product Overview] This device is with quad core processor, 16G EMMC + 1G DDR , and built in wifi, 4G, Bluetooth, dual channels video recording , as well as with Android 5.1 system. Part one: basic functions 1. Dual Cams Recording & Parking view with line It’s video quality is FHD1080P in front camera, back is 640*480 resolution.
- Page 4 ➢ FVMA (Forward Vehicle Moving Alarm) An alert is triggered when the vehicle ahead of you moves based on the real-time video recorder. 6. Car Assist App Mobile Remote Monitor With our unique remote monitor mobile app “Car Assist” and internet connection, it allows you to remote monitor your car driving path, and what happened around your car.
- Page 5 Part two: E06 product structure. Image 1: car dvr touch screen panel 1. 7.84 inch Touch Screen You could touch operate here about the applications, and playback the video files directly on car dvr.
- Page 6 Image 2: car dvr interface and button 2. Power button ➢ Power ON/OFF When car dvr at OFF status, keep pressing Power button for 2-3 seconds, will turn on the car dvr; Remarks: when you power on the device, please connect with our standard car charger into cigar lighter to power supply this device, do not use other DC power cable or test it at home (Home’s power is not enough power for this device) ...
- Page 7 the power button to turn off the car dvr. ➢ Screen Sleep Mode ---When dvr at ON status, press the Power button, it will enter the screen sleep mode marked with position and time. ---Press again the Power button, it will get the screen background light totally off, the device just like the normal rearview mirror. Even if under screen sleep mode, other functions: video recording/GPS navigation/ FM transmitter ect function still is working simultaneously.
- Page 8 7. TF card slot Before turn on the car dvr, please insert the Class 10 High speed SDHC micro sd card into TF card slot for video recording. TF card maximum capacity support 32GB. 8. 4G/3G/2G Micro-SIM card slot Insert the micro-sim card into this slot for internet surfing. 9.
- Page 9 Part three: menu interface After the car dvr switch on, it will enter the dvr’s main user interface as below: Slide from right to left the menu, you will find “GPS navigation/ Driving Video/Music/Apps/ Bluetooth/FM station/Settings”...
- Page 10 Image 6: Main Menu Interface it will display the driving speed and direction. Remarks: If GPS signal is weak, it will influence the speed accuracy) GPS Navigation: click it will enter the default GPS navigation Driving Video: click it will enter car video recording menu and settings Music: click it will play the local music files from device or memory card.
- Page 11 Apps: click it will enter the systems default application and other app you downloaded into this car dvr as below image: Image 7: App List Here are some pre-installed applications for refer: Browser: default Browser CarPlayer: playback the video files from car dvr ...
- Page 12 Bluetooth shortcut: click it will quickly enter Bluetooth hands-free settings menu FM station: click it will enter FM transmitter function menu Settings: you could set up car dvr settings and android settings. Back to previous menu Back to main menu [Main Functions Introduction] Part one: function of video recording Start video recording:...
- Page 13 video recording menu as below (Image 7): This device support Picture in Picture function Dvr Float Mini window Image 8: Main menu with dvr float mini window...
- Page 14 Playback Recording status video/ph otos Start/Stop video recording PIP mode Take Photo Time water marker DVR settings ADAS Image 9: Driving video recording menu Function keys for video recording: Switchover of front/PIP/ rear camera display This car dvr support Auto Reverse Parking: when get the car in reverse gear, the car dvr will automatically switch to the rear camera image with parking line preview (Image 8).
- Page 15 2. Video and photo files playback: there are 2 ways to check and playback the current video files: a) Enter “Driving Video” menu, and then click this button will enter the video files list as below (Image 8): you could select the video files by time or by camera to playback it, also you could delete the video files you want. ➢...
- Page 16 Switch to the delete Current video mode menu Touch slid up and down at Front/Back cam this area to Video files list adjust the Touch slid up and brightness+/- down at this area to adjust the Play/ Pause Volume +/- Current video file whole Image 12: DVR car player...
- Page 17 Image 13: car dvr settings ➢ Auto-Save Time (Take effect after restarting video): set up the video loop recording time to 1min/2mins/3mins ➢ Auto Exit Preview: set up the time of automatically exit from video recording preview to the main menu when dvr no any operation to save the power ➢...
- Page 18 ➢ Display GPS Water Mark : ON/OFF of gps speed water mark ➢ Current Version : check the dvr software version Click it will enter ADAS settings (Image12): Image 14: ADAS settings ➢ How to use the ADAS function? A-Installation and Adjustment A.1.
- Page 19 Image 15: ADAS adjustment ADAS can run correctly if we meet the above requirement. If the installation deviation is large, the experience maybe will be bad. Also please refer to the below pictures: Image 16: ADAS adjustment...
- Page 20 A.2. Manual Adjustment User can adjust the camera position manually, that will be good to finish the installation quickly. Slide the horizontal calibration line, make it is aligned with the land line. Land line means the intersection line of sky and ground. ...
- Page 21 Right wheel press to the lane: lane area will turn red with prompt tone C-FCWS (front collision warning system) C.1. Trigger condition Auto calibration is finished Driving GPS speed is more than 30KM/h, and the GPS signal is normal (GPS speed is lower than car dashboard speed) ...
- Page 22 Camera installation meet the suggested angle GPS speed is 0 and can keep it more than 4s The ahead car start to move on from the parking status D.2. Warning status output Forward vehicle moving: warning tone The normal status is as below: Image 17: FVMA adjustment...
- Page 23 Other dvr settings, please click and find “Other”, you will check more dvr settings as below (image 16): Image 18: car dvr other settings ➢ Auto Sleep: set up the dvr automatically sleep time after the car engineer is off Enable Wake UP by Collision: if enable this function, the camera will automatically wake up and send the alarm photo to your smart phone “CarAssist”...
- Page 24 Part two: GPS Navigation Click the gps navigation button will enter the default GPS Navigation Map (current default Navigation is Google Maps as like below image 8): Of course, you could set up other GPS Map as the default navigation from the list. For example “Navitel”, “Waze” and so on. How to set-up the other default GPS Map as you like? (image 9) ...
- Page 25 Image 20: GPS navigation list for choice Part three: Bluetooth Handsfree function Click Bluetooth to enter the following interface: (Image: 21 ) Click Start Bluetooth: Start the bluetooth function of mobile phone and bind the function after finding “PiBT”, and the pair them. Also you could customize the dvr’s Bluetooth name.
- Page 26 Bluthtooth setting Call Log, record the call history Sync the phone contact DailPad, make the phone call after BT pair Image 21: Bluetooth Hands-free Menu...
- Page 27 Part four: FM Transmitter function Click “FM station” button will enter FM transmitter menu (Image 22): Firstly select transmitting frequency of FM (eg. FM 100MHZ ) and then click the FM transmitting has been started. Open a video or play a piece of music and set the radio to corresponding frequency (eg. FM 100MHZ ) for receiving the test. ...
- Page 28 Part five: Multimedia Entertainment function Click music player button will enter Music player interface, you will play your favorite songs. If you want to play the video ,please click car player to play the video files; if you want to check the photo, please enter gallery button.
- Page 29 Part five: Android Settings 1, Setting include (Image 24) : ➢ Adjust Volume ➢ Adjust Brightness ➢ Online previewing enabled (Only works in 4G mobile network: ON/OFF ➢ Auto Scan BT keyboard: ON/OFF ➢ 4G Mobile Network Statue: ON/OFF ➢ SoftAP: ON/OFF ➢...
- Page 30 ➢ Camera Settings(Image 25): Choose the auto exit Preview time to Set up the loop ensure dvr will not recording video influence driving clip time Front Cam Video resolution Voice record or not when dvr recording Image 25: camera settings 2, Other settings include (Image 26) : ➢...
- Page 31 ➢ More: click it will enter the android normal settings, include WIF/SIM Cards/Display/Storage/Apps/Language&Input/Date&Time/AboutDevice/Bluetooth/Data usage and etc settings up. ➢ Systems updates: it support online upgrade to latest version or upgrade systems by local files via TF card . ➢ Version: DVR current version information. Click “More”...
- Page 32 Image 27: Android normal settings 3, Storage settings include (Image 28) : it will display the external sd card/DVR internal storage information; Also, you could enter Files Management menu list or Format SD card here.
- Page 33 Enter “file manager” Format the micro sd card Image 28: Storage settings ➢ For safe driving, please don’t check the video or photo when you are driving. Thank you. ➢ When dvr recording become slow or bad effect, please try the format SD card. 4, DvrAssist app download QR code and binding (Image 29) : Image 29: car assist app download and device bind...
- Page 34 [How to use the CarAssist app?] Part 1: Download “CarAssist” App Image 30: CarAssist App QRcode CarAsssit app support live time video preview and remote monitor from the car dvr. CarAssist app works for Android / iOS device. There are 3 ways to download the “CarAssist” app: ➢...
- Page 35 Image 31: Scan the car assist app QR code to download the app ➢ Method 2: Open your smart phone browser directly, input this website: www.carassist.cn (Now it is one Chinese website page) to download the CarAssist (车车助手)App. And then install this app into your smart phone.
- Page 36 Image 32: Use the browser to download the car assist app ➢ Method 3: We also could download the “CarAssist” app from iOS market iTunes app, too Part 2: Bind your smart phone with car dvr via “CarAssist” App ➢ Turn on car dvr’s WiFi internet or 4G data internet if it is available (if you want to use the 4G data , please insert the SIM card firstly);...
- Page 37 Image 33: Use the browser to download the car assist app ➢ Back to “Device Management” on app, and then choose “Scan Device “, and then scan the dvr assist app QR code (image 29); Also, you could input the device number (eg“ ”) to bind with dvr.
- Page 38 Image 34 : Scan Device Image 35 : Scan the dvr ‘s Dvr assist app QR code to bind with phone...
- Page 39 ➢ And then the app will send the binding request to the dvr, click “Agree” on dvr will finally bind the phone and camera. Image 36 : Accept the binding request on dvr After confirmation, your smart phone will be binding with this car dvr. You could start to capture the live time video from the camera via Wifi hotspot connection, or remotely capture the image / video from this camera via 4G/3G internet connection.
- Page 40 Step3: Click 10s Video capture button, you will see the live steaming video from car camera via wifi connection Click”+”to connect with dvr’s wifi hotspot Please ensure the dvr and phone at one wifi internet Click “Phone files” button, will see the video files download Click “DVR”...
- Page 41 Image 38 : 10s video capture from the dvr ➢ Click “Me” button will enter below interface to run more functions: Here list the CarAssist app functions: Ps: as this CarAssist App some functions is based on WeChat , so some functions maybe will not available temporarily. “Null” means it is unavailable for now, but we will update and keep developing it.
- Page 42 Click “GPS Track history”, you could “Monitor and Alarm” track your car driving function is very import path history. for remote monitor Image 39 : Me menu interface Monitor and Alarm: When your car is parking, if car accident or collision occurred, and the camera is under internet connection (4G/ wifi internet available), it will send alarm message and photo to your smart phone, no matter where you are.
- Page 43 Remotely capture one video file Watch live time Remotely take one video preview photo from camera Image 40 : Me menu interface Image 40: Monitor and Alarm video is capturing...
- Page 44 GPS Track history: Click it, you could track your car driving path history by date. Image 41 : GPS logger track history interface Navigation Plan: Null Datacard Management: memory card files management Driver Score: Null...
- Page 45 Setting: set up the app settings. [Installation Instructions] 1. Close automobile engine: 2. Insert the Micro SD card into TF card slot 【Notice】Please use high speed memory card (Class 10), capacity could not less than 512MB, micro sd card maximum support 32GB. 3.
- Page 46 Image 42: Mirror dvr installation wire diagram...
- Page 47 Image 43: Rear camera installation wire diagram...
- Page 48 [Product Specification] Product Parameter MT6735, 1.3Ghz, Quad Core A53 Android 5.1 Display 7.84 inch, MIPI port Screen Resolution 7.84inch, 1280*400 Flash ROM 16GB EMMC Storage 1GB LPDDR3 GC2023; 1080P; F=2.0; 6 layers glass; H.264 code; 140 Degree angle view; Front Camera Support Dual Channels Video Recording Rear Camera OV9726;...
- Page 49 Standby power consumption 7MAH Touch screen Capacitive 5-point Touch Speaker Built in Speaker ( power:8Ω/2W ) Built in MIC-phone noise reduction Input/Output TF card Support TF card, maximum 32GB Mini USB 2.0 for power supply Key button Power button RESET Support External power Cigarette lighter power supply, DC 12-24V, the car charger output 5V 3A...
- Page 50 [Product FAQ] If the device could not work normally, please check below reason and solutions firstly. If still could not solve, please contact us for warranty. Thank you. Problem Reason Solutions 1, Please click the RESET button to recover the dvr. 2, After long time shipping, the build in battery power already used up, so 1, After long time shipping, car dvr’s battery power please use our standard car charger to plug into the cigar lighter to power...
- Page 51 Problem Reason Solutions DVR is always hangs on the After charging, if it is still the same, then that’s the firmware reason, please Firmware problem android contact us for free firmware flash. How does the FM transmitter work? 1, Please power on the FM transmit. 2, Choose one FM frequency , eg: set up the FM 98.7 or other frequency This car dvr support FM transmitter function, not which will not receive any your local Radio signal.
- Page 52 Problem Reason Solutions 1, Camera lens or the window front windshield is 1, Clean up the front lens and front windshield not clean Video quality is not clear? 2, Tear off the camera lens protective film 2, Did not tear off the camera lens ‘s protective film 3, Adjust the camera lens shooting direction 3, Camera lens ‘s shooting direction is not suitable 1, TF card speed is too low...
- Page 53 Problem Reason Solutions 1, Click the Reset button 2, Keep pressing 3 seconds power button to restart the dvr DVR crash? Caused by Abnormal operation 3, Click android settings—More—enter android settings to recover to the default settings. 1, If you playback the video files on dvr, yes, it will display with one whole 1, Playback the video files on the dvr video file.
- Page 54 1, Please turn on the DVR’s wifi or insert the SIM card make the internet Could not bind the dvr with 1, The car dvr has no internet available available smart phone via CarAssist 2, Smart phone has no internet , too 2, Make sure your smartphone also has internet available , no matter wifi app? or 4G/3G data internet...
Need help?
Do you have a question about the E06 and is the answer not in the manual?
Questions and answers