Advertisement
Advertisement

Subscribe to Our Youtube Channel
Related Manuals for Jakka JRH73 Series


Summary of Contents for Jakka JRH73 Series
- Page 1 User’s Manual JAKKA heat recovery units JRH73 Series...
-
Page 2: Table Of Contents
Contents Safety ..........1 Control List ........2 Components ........3 Dimensions ........3 Technical specification....3 Installation ........4 Maintenance ........7 Troubleshooting......10... -
Page 3: Safety
Safety • This product must not be disassembled under any circumstances. Only authorized repair technicians are qualified to conduct disassembly and repairs. • Failure to heed this warning may result in fire, electrical shock or injury. • Do not install this product in a refrigerated warehouse, heated swimming pool or other location where temperature and humidity are significantly different. -
Page 4: Control List
Control List NOTE Control procedures required after commissioning and in case of a malfunction are listed below. In the event of further malfunction after initial controls, consult to our company. CONTROL LIST √ Make sure the unit receives power and grounding is done! Make sure the length of electric cables is correct! (Check for overheating on cables!) Check if the cables heading to the electrical box are shielded (protected against magnetic field) and shield is grounded. -
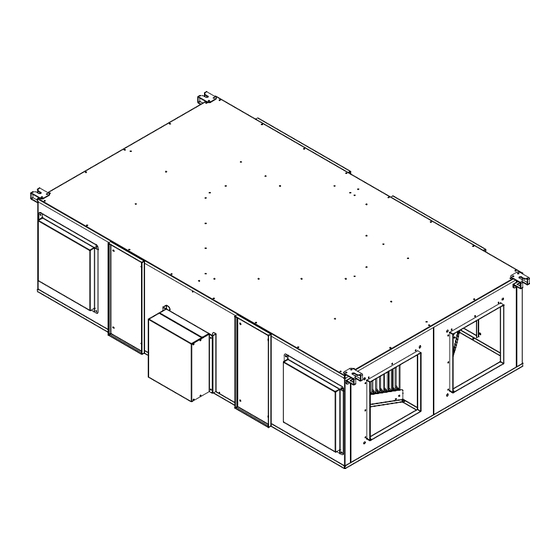
Page 5: Components
Components Heat Exchanger Filter E-Box Casing Duct Connections Alternative Duct Connections Optional Second Stage Filter Dimensions Dimensions Model 1296 1331 1200 1458 1494 1500 1458 1494 2000 1820 1086 1856 3000 1790 1186 2006 1088 4000 2182 1238 2182 1140 5000 2282 1238 2318 1140 6000 2282 1338... -
Page 6: Installation
Installation Checking Product Received After receiving the product, inspect for any shipping damage. Claims for damage, either apparent or concealed, should be files immediately with the shipping company. Check for the model number and electrical properties like power supply, voltage and frequency whether they fit your demand or not. - Page 7 Installation Connecting the ducts The duct connections in the unit are made of ABS material hence do not need additional insulation. After connecting the unit; make sure that there is no leakage between the duct connections of the unit and the duct. Use a duct tape where necessary. Fresh air grille (exhaust outlet)
- Page 8 Installation Alternative Alternative RIGHT HAND SIDE Air Outlet Air Outlet INSTALLATION Air Outlet Air Outlet (Exhaust Air or (Exhaust Air or Fresh Air) Fresh Air) Air Inlet Air Inlet (Return Air or (Return Air or Outside Air) Outside Air) LEFT HAND SIDE INSTALLATION Air Inlet Air Inlet...
- Page 9 Installation CAUTION Before connecting the ducts, check that no sawdust or any other foreign material (scaps of paper, vinyl, building material etc.) exist in the ducts. Make sure service doors open easily and fan/ filter can be pulled out. Pay attention to the warnings before connecting the units to ducts. Preparation of roof bolts Hang the rubber anti-vibration pad to the bolt and balance the unit so that it remain horizontally.
-
Page 10: Maintenance
Maintenance WARNING Disconnect electric power, including remote disconnects before servicing. Follow proper lockout / tagout procedures to ensure the equipment cannot be inadvertently energized. Secure drive sheaves to ensure rotor cannot freewheel. Failure to secure drive sheaves or disconnect power before servicing could result in death or serious injury. - Page 11 Maintenance NOTE JAKKA Controllers for this units have a preset timer to monitor filter occupancy according to factory set timer. Remote controller informs the user to check the filters. After the filters are cleaned by the user, filter warning alarm must be reset.
- Page 12 Maintenance NOTE Maximum mass of the exchanger is 22 kg. Heat recovery exchanger Clean with hot water or steam Clean the heat recovery exchanger with hot water or steam. Use natural detergent or soap powder if need be. Leave it to dry after cleaning and mount it to the unit after it is completely dry.
-
Page 13: Troubleshooting
Troubleshooting FAULT REASON SOLUTION a. Power supply off a. Turn on the power supply b. No signal from the b. Press the correct buttons of the control panel control panel FANS DO NOT WORK c. Incorrect or loose c. Connect connections correctly electrical connection d. - Page 14 For Troubleshouting Please Contact Boulevard Zoran Djindjic, 80, 11070 Novi Beograd Tel: +381 11 2600 901 • Fax: +381 11 2600 906 www.jakkagroup.com • jakkagroup@jakkagroup.com...
Need help?
Do you have a question about the JRH73 Series and is the answer not in the manual?
Questions and answers