Table of Contents
Advertisement
PLEASE READ THIS MANUAL CAREFULLY
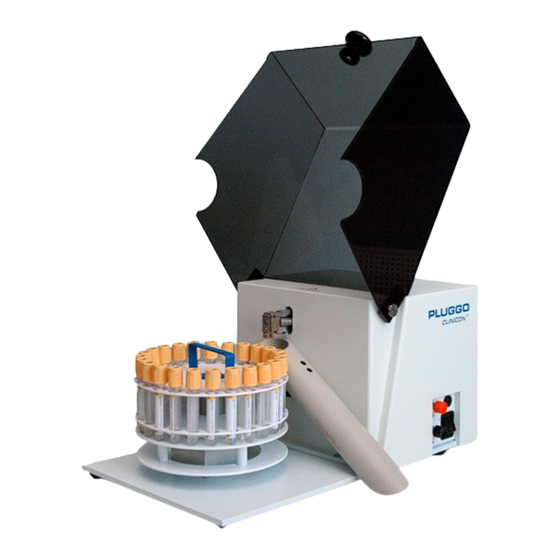
This manual describes the automated de-capper PLUGGO.
____________________________________________________________________________________
Phone +46 8 37 8134, Telefax +46 8 37 8138
www.clinicon.se, e-mail: info@clinicon.se
atencion.clientes@akralab.es · 965 116 521 · 902 222 275 · www.akralab.es
User's Handbook
BEFORE ATTEMPTING
TO USE THE INSTRUMENT
Content
1.
2.
3.
4.
5.
5.1 Serviceable Parts and Spare Parts list
5.2 Repackaging Instruction and Service Shipment
6.
7.
Rev no 7d
1
Advertisement
Table of Contents

Summary of Contents for AkraLab PLUGGO
-
Page 1: Table Of Contents
Warranty Declaration of Conformity ____________________________________________________________________________________ Clinicon AB, Box 7025, S-161 07 Bromma, Sweden Phone +46 8 37 8134, Telefax +46 8 37 8138 www.clinicon.se, e-mail: info@clinicon.se Rev no 7d atencion.clientes@akralab.es · 965 116 521 · 902 222 275 · www.akralab.es... -
Page 2: General Information
Tube Handling Pluggo is capable of handling 5ml, 7ml, 7ml long and 10ml Vacuum tubes of the same brand. Note: Each tube size has to be loaded in its corresponding carousel size with different colour marks. - Page 3 When Pluggo is in operation, the de-capped plugs have to be collected and handled as biohazard waste. The chute mounted on Pluggo will guide the plugs to the right side of the equipment. As an option, a special chute for left hand mounting could be ordered.
-
Page 4: Installation
Open the plexiglass cover and inspect the de-capper arm. Its position should be as indicated in the figure 1: Leaf Spring Puller Puller action rod Screws Spring Stop Needle in protected position Figure 1: De-capper arm in home position atencion.clientes@akralab.es · 965 116 521 · 902 222 275 · www.akralab.es... - Page 5 Locate the black “home position pin” on the drive disk. It should always be pointing directly towards the black pad and in line with the de-capper head. Pluggo is now ready for operation. Please proceed to “operation instructions” for further information before operation starts.
-
Page 6: Operation Instructions
As an alternative, the drive disk could be turned counter clockwise manually until it reaches the home position. Make sure not to rotate beyond the home snap location! Note: If the drive disk is slightly out of the home snap position, Pluggo will fail in de- capping the tubes. -
Page 7: Normal Operation
On daily basis, remove the chute and de-capper head for cleaning according the Cleaning/Service instructions. Figure 4: Chute attached on Pluggo (standard on right-side) To remove the chute: Lift and pull it straight out from side of Pluggo atencion.clientes@akralab.es · 965 116 521 · 902 222 275 · www.akralab.es... -
Page 8: Cleaning Instructions
Figure 5: Removal of de-capper head Clean unit and cover by using disinfectant solution on a cleaning cloth. Note: Never use spray solution on Pluggo unit! It may affect the mechanical function. atencion.clientes@akralab.es · 965 116 521 · 902 222 275 · www.akralab.es... - Page 9 In pressed position, turn right (90 degree clockwise) and release. The head should now be in locked normal position. Press Red button once, then Start to let Pluggo go to automatic stop. • To mount chute: Hold chute with spring downwards and press onto holder.
-
Page 10: Service Instructions
Clean the Tube support with Acetone. • Remove protective film from the rubber pad and put it onto the tube support. • Press firmly on the rubber pad. • atencion.clientes@akralab.es · 965 116 521 · 902 222 275 · www.akralab.es... - Page 11 Use a small screwdriver 3 mm to remove the middle screw, see figure 7. Replace the Leaf Spring with a new according to the specified part in the spare part list below. atencion.clientes@akralab.es · 965 116 521 · 902 222 275 · www.akralab.es...
- Page 12 96 00 4490 Chute for caps left-hand side optional 96 00 4463 Home position pin black pin on the disk drive 95 83 00 26 Fuse, T1A/250V slow blow atencion.clientes@akralab.es · 965 116 521 · 902 222 275 · www.akralab.es...
- Page 13 Make sure the power cord is tucked to the side of the unit. Place the cardboard on top of the Pluggo unit. Cut down the box in the corners to reduce the height down to the top level of the unit. This will ensure stability of the content during shipment.
-
Page 14: Warranty
Adress to Clinicon AB or service centre: Since product developments is a continuous process, Clinicon AB reserves the right to make changes in the specifications without notice. atencion.clientes@akralab.es · 965 116 521 · 902 222 275 · www.akralab.es... -
Page 15: Declaration Of Conformity
Safety of machinery: EN 12100 • Electric safety: EN 61010 • EN 61010-2-081 • EMC requirements: EN 60000-6-3 • EN 55022 Class B • atencion.clientes@akralab.es · 965 116 521 · 902 222 275 · www.akralab.es...
Need help?
Do you have a question about the PLUGGO and is the answer not in the manual?
Questions and answers