Table of Contents
Advertisement
1218694.5.6.7
Speed to Sound
Clock Radio
for use with iPod/iPhone
Instruction Manual
"Made for iPod" and "Made for iPhone" mean that an electronic accessory has been
designed to connect specifically to iPod or iPhone, respectively, and has been certi-
fied by the developer to meet Apple performance standards.
1
Advertisement
Table of Contents

Summary of Contents for Centrios 1218695
- Page 1 1218694.5.6.7 Speed to Sound Clock Radio for use with iPod/iPhone Instruction Manual “Made for iPod” and “Made for iPhone” mean that an electronic accessory has been designed to connect specifically to iPod or iPhone, respectively, and has been certi- fied by the developer to meet Apple performance standards.
-
Page 2: Introduction
INTRODUCTION Congratulations on your purchase of this unit for your iPod/iPhone. Uniquely designed to work with your iPod/iPhone, this stereo audio system with the built-in universal dock provides advanced audio and radio performance that brings out the best in your music. -
Page 3: Ipod Legal
IPOD LEGAL This unit operates with the below iPod/iPhone models: Apple is not responsible for the operation of this device or its compliance with safety and regulatory standards. Please note that the use of this accessory with iPod or iPhone may affect wireless performance. -
Page 4: Table Of Contents
TABLE OF CONTENTS INTRODUCTION IPOD LEGAL GETTING STARTED Installing the AC adapter Installing the backup battery for clock and alarm settings Remote control use and battery replacement Installing the dock adapter Location of controls on the main unit Location of controls on the remote control Location of indications on the LCD screen Setting the clock time Setting the alarm time... -
Page 5: Getting Started
GETTING STARTED Installing the AC Adapter Locate the AC adapter jack on the back of the unit. Insert the AC adapter cable into the jack, and plug into the wall outlet. Installing the Backup Battery for Clock and Alarm Settings In order to offer consistent clock settings and alarm functions, this product uses a backup battery (not included). -
Page 6: Remote Control Use And Battery Replacement
GETTING STARTED Remote Control - First Time Use and Battery Replacement The remote control battery has been previously installed is and ready for immedi- ate use. For the first time use, pull out the insulation tag from the button battery tray before operating the remote control. -
Page 7: Location Of Controls On The Main Unit
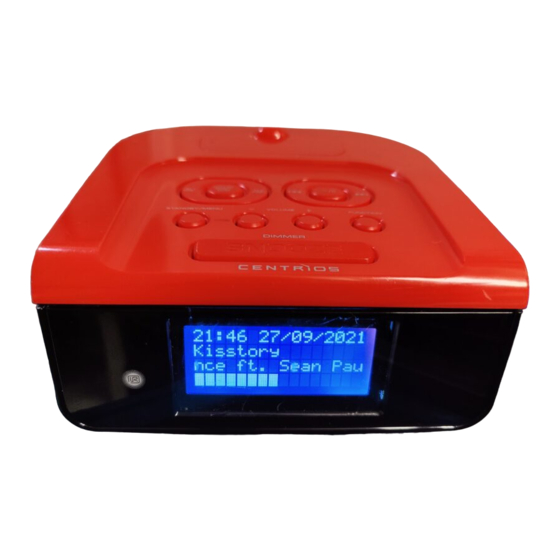
GETTING STARTED Location of Controls on the Main Unit 1. iPod/iPhone CONNECTOR 9. NEXT 2. CLOCK SET. / MEMORY / ENTER 10. PREVIOUS 3. ALARM 1 / PRE - 11. FUNCTION 4. ALARM 2 / PRE + 12. VOLUME + 5. -
Page 8: Location Of Controls On The Remote Control
GETTING STARTED Location of Controls on the Remote Control 1. STANDBY BUTTON Turns the unit on/off or switches off alarm when alarm is sounding. 2. MUTE BUTTON 3. FUNCTION BUTTON 4. MENU BUTTON 5. OK BUTTON 6. PREVIOUS BUTTON Skips to the previous track when iPod is playing, or scans currently playing track toward the beginning by pressing and holding. -
Page 9: Location Of Indications On The Lcd Screen
GETTING STARTED Location of Indications on the LCD Screen Aux Indicator Sleep Indicator iPod Indicator Radio Indicator Snooze Indicator AM/ PM Indicato r FM Indicato r MHz Indicator Stereo Indicator Wake To Indicator: Alarm 1 Armed iPod, Radio, Buzzer Alarm 2 Armed Radio Frequency/Time Volume Level Display... -
Page 10: Setting The Clock Time
GETTING STARTED Setting the Clock Time 1. To set the time, first locate the CLOCK SET. / MEMORY button. Press this button and the unit display shows 12hr . Press the button to select 24hr or 12hr. Then press the CLOCK SET. / MEMORY button to confirm. 2. -
Page 11: Operational Instructions
OPERATIONAL INSTRUCTIONS IMPORTANT 1. Occasionally, files on iPod can become corrupted. This may cause erratic behaviour with your products. Apple recommends that you visit their website www.apple.com to obtain instructions on resetting or restoring your iPod/ iPhone to factory settings. 2. -
Page 12: Listening To Your Favorite Songs On Your Ipod/Iphone
OPERATIONAL INSTRUCTIONS Listening to Your Favorite Songs on Your iPod/iPhone 1. To listen to music, turn on the unit then press FUNCTION button to select iPod mode. Make sure that your iPod/iPhone is inserted into the built-in universal dock correctly. It will then automatically turn ON and music will begin to play. NOTE: If the sound is not audible, the unit may not be detecting that your iPod is in the play mode. -
Page 13: Listening To Other Audio Devices
OPERATIONAL INSTRUCTIONS Listening to Other Audio Devices You can still listen to other audio players that are not an iPod, with the unit by simply using the AUX-IN jack, located on the rear of the unit. Please ensure that before using the AUX-IN jack there is no iPod in the built-in universal dock. -
Page 14: Using The Alarm Function
OPERATIONAL INSTRUCTIONS Using the Alarm Function 1. To deactivate the alarm, press the ALARM 1 or the ALARM 2 repeatedly until the alarm icon disappears. 2. To activate the alarm, press the ALARM 1 or the ALARM 2 button again until alarm icon appears. -
Page 15: Setting The Sleep Time
OPERATIONAL INSTRUCTIONS Setting the Sleep Time 1. To enter into the sleep mode, press the SLEEP button while the unit is ON or while listening to your iPod/iPhone or the radio. The unit will automatically turn off after the selected period of time. 2. -
Page 16: Maintenance & Troubleshooting Guide
MAINTENANCE & TROUBLESHOOTING GUIDE Maintenance · Place the unit on a level surface away from sources of direct sunlight or excessive heat. · Protect your furniture. When placing the unit on a natural wood and lacquered finish, a cloth or other protective material should be placed between it and the furniture. ·... - Page 17 MAINTENANCE & TROUBLESHOOTING GUIDE Troubleshooting – Continued Your iPod/iPhone is not charged even though it is in the dock. · Your iPod/iPhone might not be properly docked. Take your iPod/iPhone out of the dock, and remove any obstructions on the connector from the dock and on your iPod/ iPhone.
-
Page 18: User Safety Guide
USER SAFETY GUIDE WARNING · TO PREVENT FIRE OR SHOCK HAZARD. DO NOT EXPOSE THIS APPLIANCE TO RAIN OR MOISTURE. · THIS APPLIANCE SHALL NOT BE EXPOSED TO DRIPPING OR SPLASHING WATER AND THAT NO OBJECT FILLED WITH LIQUIDS SUCH AS VASES SHALL BE PLACED ON APPARATUS. - Page 19 USER SAFETY GUIDE IMPORTANT SAFETY INSTRUCTIONS - continued 12. Protect the power cord from being walked on or pinched particu- larly at plugs, convenience receptacles, and the point where they exit from the apparatus. 13. Only use attachments/accessories specified by the manufacturer. 14.
- Page 20 USER SAFETY GUIDE IMPORTANT SAFETY INSTRUCTIONS - continued CLEANING Always disconnect unit from power supply before attempting to clean it. Use soft cloth moistened with soapy water, and wipe gently. Do not use solvents or abrasive materials. SAFETY The apparatus shall not be exposed to dripping or splashing and that no objects filled with liquids, such as vases, shall be placed on the ap- paratus.
- Page 21 USER SAFETY GUIDE ADDITIONAL IMPORTANT INSTRUCTIONS Place the apparatus some distance from nearby objects or walls for sufficient ventila- tion. The ventilation should not be impeded by covering the ventilation openings with items such as newspapers, table-cloths, curtains, etc. · No naked flame sources such as lighted candles should be placed on the apparatus. ·...
-
Page 22: Specifications
SPECIFICATIONS General · Power Requirement · Main Unit: DC 9V, 2000mA adapter · Clock Backup: Two 1.5V “AAA” size batteries (not included) · Remote Control: One 3V “CR2025” size lithium battery (included) · Speakers: 8 Ohms (each) · Output Power: 2 x 1W (RMS) Radio ·... -
Page 23: Warranty
WARRANTY THE SOURCE WARRANTY The Source warrants that this product will be free from defects in materials and workmanship for a period of one (1) year from the date of purchase. Within this period, simply take the product and your proof of purchase to any The Source store or dealer and the product will be repaired without charge for parts and labour.
Need help?
Do you have a question about the 1218695 and is the answer not in the manual?
Questions and answers