
Subscribe to Our Youtube Channel
Summary of Contents for KoolKani KK-360R
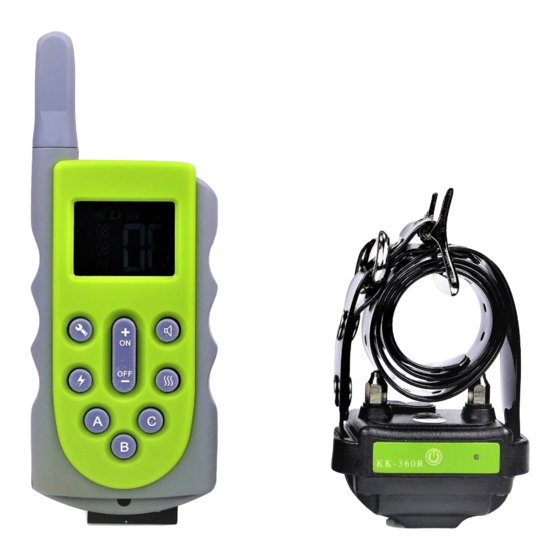
- Page 1 ® KoolKani KK-360R User’s Manual Rechargeable Multi-Dog Remote Training System Advanced Model of 600 Meter Remote Range Fully Waterproof & Submersible Collar Receiver Compact, Lightweight, and Convenient!
-
Page 2: Main Features
Compact, Lightweight, and Convenient! Please read this manual thoroughly and carefully before operating. Thank you for purchasing our KoolKani® KK-360R Remote Dog Training System. This is an effective multi-dog training system (extra receivers required for multi-dog training), which provides all of the features for reliable, safe and humane training you want in a companion dog trainer. -
Page 3: Package Contents
Package Contents: 1 x Transmitter with large LCD display (9v 6F22 battery fitted); 1 x Rechargeable collar receiver with two sets of correction prongs (in different length) & quality TPU collar strap; 1 x Test bulb for testing static pulse stimulation correction (for testing purpose only, not to be used when the collar receiver is on the dog);... -
Page 4: Quick Start Guide
Quick Start Guide Step 1: Prepare the Remote Transmitter Press and hold down the ON button for 3 seconds to turn on the transmitter Press and hold down the OFF button for 3 seconds to turn off the transmitter The battery (9v 6F22) is installed in the transmitter handset and the transmitter handset is ready to use. - Page 5 Transmitter Handset Buttons & Symbols Information: LCD Screen Info: A: Battery capacity indicator B: Current selected dog channel C: Current selected correction mode D: Menu symbol (when transmitter is in menu mode) Or Transmitting symbol (when transmitter is sending command) E: Current selected level of correction F: Warning tone level setting for current dog G: Vibration level setting for current dog...
- Page 6 correction levels will be saved into the transmitter handset automatically when it quits the menu mode. On/Off (+/–) Button(s): Press and hold down ON button for 3 seconds, this will turn on the transmitter handset. Press and hold down the OFF button for 3 seconds, this will turn off the transmitter handset.
- Page 7 Static pulse Stimulation Button: Short press on the static pulse stimulation button, the selected collar receiver will emit a static pulse stimulation (less than 0.2 second) at selected level. If you keep holding down the static pulse stimulation button, the selected collar receiver will give out a continuous static pulse stimulation at the selected level for maximum 8 seconds* (safety setting) until the button is released.
- Page 8 The system has been tested in factory. When you receive the product, the collar receiver might still have power left. You might skip this step and try to turn it on (Step 3) and start using the system. If the collar receiver cannot be turned on, please put it on charge as following.
- Page 9 Step 3: Turn ON/OFF the Collar Receiver Press and hold down the power button for 3 seconds to turn on the collar receiver (green light will flash once when it's switched on). Short press 3 times repeatedly on the power button to turn off the collar receiver (green light will come up shortly each time you press the button and a red light will flash three times when it's switched off).
- Page 10 4. Repeat step 1 to step 3 every other month to make sure the battery inside collar receiver is not fully discharged. (The Li-ion battery will be permanently damaged if left fully discharged for an extended period of time.) Step 4: Match the Collar Receiver with the Transmitter ...
- Page 11 4.2 Make sure the collar receiver is turned ON. (The collar receiver will be turned on automatically after the charging or please refer to Step 3: Turn ON/OFF the Collar Receiver) . 4.3 On the transmitter handset, press and hold down any correction button (either beep tone button, vibration button or static pulse stimulation button).
- Page 12 Send vibration correction command to collar receiver:- Short press vibration button to sent short vibration command to collar receiver Press and hold down vibration button to send continuous vibration command to collar receiver (Up to 8 seconds) To test the vibration function: Short press the vibration button on the transmitter handset, the collar receiver will vibrate once.
- Page 13 To test the beep tone function: Short press the beep tone button on the transmitter handset, the collar receiver will bleep once. Press and hold down the beep tone button, the collar receiver will start bleeping continuously and stop bleeping when the button is released. Safety setting: The collar receiver will only bleep continuously for maximum 8 seconds if the button has been held down for longer than 8 seconds.
- Page 14 Change static pulse stimulation level setting: Short press Menu button once, static pulse stimulation level setting symbol in the left hand side panel should start flashing (if not, press static pulse stimulation button once), press "+" or "–" button to adjust the static pulse stimulation level, short press Menu button once to save the setting and quit the menu mode.
-
Page 15: Care And Cleaning
Care and Cleaning To ensure the effectiveness of this product and the comfort and safety of your dog, check the fit of his collar frequently. Your dog’s neck and the contact points must be washed weekly with a wash cloth and mild hand soap, and then rinsed thoroughly. If you notice that your dog is experiencing skin irritation, discontinue use of the collar for a few days. -
Page 16: General Training Tips
General Training Tips Please keep the following training tips in mind. Eliminate one misbehaviour or teach one obedience command at a time. If you move too fast with the training, your dog may become confused. Be consistent. Give your dog a tone or a vibration or stimulation with each misbehaviour. -
Page 17: Troubleshooting
Q3: Once my dog is trained and has been obeying my commands, will my dog have to continue to wear the collar receiver? A: Your dog may need to wear the collar receiver from time to time for reinforcement. Q4: Is the collar receiver waterproof? A: Yes. - Page 18 Problem No. 2: The collar receiver unit lose the sync-up connection with the transmitter handset: Occasionally, while the collar receiver is on, if the power button has been held down for longer time, the indicator light on collar receiver might start flashing red and green in turn without you pressing any correction button on the handset.
- Page 19 Federal Communications Commission (FCC) Interference Statement This equipment has been tested and found to comply with the limits for a Class B digital device, pursuant to Part 15 of the FCC Rules. These limits are designed to provide reasonable protection against harmful interference in a residential installation.
- Page 20 This device complies with Part 15 of the FCC Rules. Operation is subject to the following two conditions: (1) This device may not cause harmful interference, and (2) this device must accept any interference received, including interference that may cause undesired operation. FCC Caution: Any changes or modifications not expressly approved by the party responsible for compliance could void the user’s authority to operate this equipment.
Need help?
Do you have a question about the KK-360R and is the answer not in the manual?
Questions and answers