Table of Contents
Advertisement
Advertisement
Table of Contents
Troubleshooting

Summary of Contents for TESTAMED GlucoCheck Advance
- Page 1 Monitoring System ADVANCE Owner’s Manual For self-testing.
- Page 2 KEEP THESE INSTRUCTIONS IN A SAFE PLACE...
- Page 3 Regular monitoring of your blood glucose levels can help you and your doctor gain better control of your diabetes. Due to its compact size and easy operation, you can use the TESTAmed GlucoCheck ADVANCE Blood Glucose Monitoring System to easily monitor your blood glucose levels by yourself anywhere, any time.
-
Page 5: Table Of Contents
TABLE OF CONTENTS Before you begin ................Before you begin ................Important Information ..............Intended Use ................Test Principle ................Meter Overview ................Display Screen ................. Test Strip ..................Setting the Meter ................The four measuring modes ............12 Control Solution Testing ..............13 Performing a Control Solution Test .......... -
Page 6: Before You Begin
BEFORE YOU BEGIN Before you begin Important Information Severe dehydration and excessive water loss may cause readings which are lower than actual values. If you believe you are suffering from severe dehydration, consult a healthcare professional immediately. If your blood glucose results are lower or higher than usual, and you do not have any symptoms of illness, first repeat the test. -
Page 7: Intended Use
BEFORE YOU BEGIN Intended Use This system is intended for use outside the body (in vitro diagnostic use) by people with diabetes at home and by health care professionals in clinical settings as an aid to monitoring the effectiveness of diabetes control. It is intended to be used for the quantitative measurement of glucose (sugar) in fresh capillary (from the finger, palm, forearm, and upper arm) and venous blood samples. -
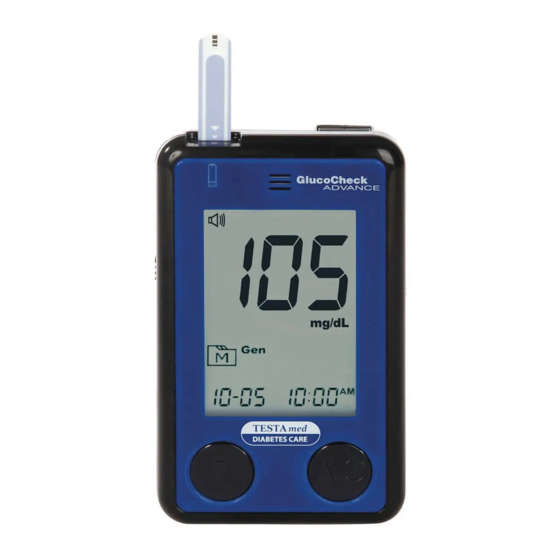
Page 8: Meter Overview
METER OVERVIEW Front Back... - Page 9 METER OVERVIEW Side 1. Strip Indicator Light 2. Display Screen 3. Test Slot: Insert test strip here to turn the meter on for testing. 4. Down Button: Select or change information and adjust decrement. 5. MAIN Button / Up button: Enter the meter memory and silence a reminder alarm / Select or change information and adjust increment.
-
Page 10: Display Screen
DISPLAY SCREEN 1. Blood Drop Symbol 9. Date 2. Volume Symbol 10. Test Strip Symbol 3. Test Result 11. Low Battery Symbol 4. Ketone Warning 12. Measurement Unit 5. Warning Symbol 13. Alarm Symbol 6. Memory Symbol 14. Day average 7. -
Page 11: Test Strip
Test results might be wrong if the contact bar is not fully inserted into the test slot. NOTE: The TESTAmed GlucoCheck ADVANCE meter should only be used with TESTAmed GlucoCheck ADVANCE Test Strips. Using other test strips with this meter can produce inaccurate results. -
Page 12: Setting The Meter
SETTING THE METER Before using your meter for the first time or if you change the meter battery, you should check and update these settings. Make sure you complete the steps below and have your desired settings saved. Setting the Measurement Unit Start with the meter off (no test strip inserted). - Page 13 SETTING THE METER Entering the Setting Mode Start with the meter off (no test strip inserted). Press SET. 1. Setting the date With the year flashing, press until the correct year appears. Press SET. With the month flashing, press until the correct month appears. Press SET.
- Page 14 SETTING THE METER 2. Setting the time format Press and release to select the desired time format --- 12h or 24h. Press SET. 3. Setting the time With the hour flashing, press until the correct hour appears. Press SET. With the minute flashing, press until the correct minute appears.
- Page 15 SETTING THE METER 5. Choosing a language Press the Main button to select L1/ L2. The default language for the meter is L1, which is German. To confirm your selection, press SET. NOTE: For this setting of choosing language, it‘s not allowed to have multi- languages setting under some circumstances, the meter will only be able to have one language, e.g.
- Page 16 SETTING THE MEETER 7. Setting the reminder alarm You may set up any or all of the remin- der alarms (1 – 4). The meter displays “On” or “OFF” and press to turn on or turn off to set the first reminder alarm.
-
Page 17: The Four Measuring Modes
THE FOUR MEASURING MODES The meter provides you with four modes for measuring, General, AC, PC and QC. Modes Use when General (displays as “Gen”) any time of day without regard to time since last meal no food intake for at least 8 hours 2 hours after a meal testing with the control solution You can switch between each mode by:... -
Page 18: Control Solution Testing
CONTROL SOLUTION TESTING Our Control Solution contains a known amount of glucose that reacts with test strips and is used to ensure your meter and test strips are working together correctly. Test strips, control solutions and sterile lancets are included in the kit (please check the contents on your product box). -
Page 19: Performing A Control Solution Test
PERFORMING A CONTROL SOLUTION TEST You will need: 1. Meter 2. Test Strip 3. Control Solution 1. Insert the test strip to turn on the meter Insert the test strip into the meter. Wait for the meter. Wait for the meter to display the 2. - Page 20 PERFORMING A CONTROL SOLUTION TEST WARNING: When doing the control solution test, you have to mark it so that the test result will be stored in the memory under QC. Failure to do so will mix up the blood glucose test results with the control solution test results in memory.
- Page 21 If you continue to have test results fall outside the range printed on the test strip vial, the meter and strips may not be working properly. Do NOT test your blood. Contact the TESTAmed Customer Service hotline for help. NOTE: §...
-
Page 22: Testing With Blood Sample
TESTING WITH BLOOD SAMPLE WARNING: To reduce the chance of infection: § Never share a lancet or the lancing device. § Always use a new, sterile lancet. Lancets are for single use only. § Avoid getting hand lotion, oils, dirt, or debris in or on the lancets and the lancing device. - Page 23 TESTING WITH BLOOD SAMPLE Fingertip testing Press the lancing device’s tip firmly against the lower side of your finger- tip. Press the release button to prick your finger, then a click indicates that the puncture is complete. Blood from sites other than the fi ngertip Replace the lancing device cap with the clear cap for AST.
-
Page 24: Alternative Site Testing
ALTERNATIVE SITE TESTING You can test on a variety of locations on your body. Important: There are limitations with AST (Alternative Site Testing). Please consult your health care professional before you perform AST. When to use AST ? Food, medication, illness, stress and exercise can affect blood glucose levels. -
Page 25: Performing A Blood Glucose Test
PERFORMING A BLOOD GLUCOSE TEST You will need: 1. Meter 2. Test Strip 3. Lancing Device 4. Lancet 1. Insert the test strip to turn on the meter Wait for the meter to display the Voice Guide Thank you for using this product. Please relax during the measurement. - Page 26 Discard the used test strip and retest with a new one. § If you have trouble filling the confirmation window, please contact your health care professional or the TESTAmed customer service for assistance.
- Page 27 PERFORMING A BLOOD GLUCOSE TEST 5. Read Your Result The result of your blood glucose test will appear after the meter counts down to 0. This blood glucose result will automatically be stored in the memory (100 mg/dl = 5.6 mmol/l). Voice Guide Your blood glucose is 100 milligrams per deciliter.
-
Page 28: Meter Memory
METER MEMORY The meter stores the 450 most recent blood glucose test results along with respective dates and times in its memory. To enter the meter memory, start with the meter switched off. Reviewing Test Results Press and release will appear on the display. Press again, and the first reading you see is the last blood glucose result along with date, time and the measurement mode. -
Page 29: Reviewing Blood Glucose Day Average Results
METER MEMORY Reviewing Blood Glucose Day Average Results Press and release When appears on the display, keep pressing for 3 seconds until the flashing “Day Avg” appears. Release and then your 7-day average result measured in general mode will appear on the display. (100mg/dl = 5.6 mmol/l) Press to review 14-, 21-, 28-, 60- and 90- day average results... -
Page 30: Downloading Results Onto A Computer
Health Care Software System, please contact TESTAmed customer services for assistance. 1. Installing the software To download the Health Care Software System, please visit the TESTAmed website: www.testamed.de 2. Connecting to a personal computer Push the USB slider up and insert the built-in USB of the meter to a USB port on your computer. -
Page 31: Maintenance
MAINTENANCE Battery Your meter comes with two 1.5V AAA size alkaline batteries. Low Battery Signal The meter will display one of the messages below to alert you when the meter power is getting low. 1. The symbol appears along with display messages. The meter is func-tional and the result remains ac- curate, but it is time to change the batteries. - Page 32 MAINTENANCE Replacing the Battery To replace the batteries, make sure that the meter is turned off. Press the edge of the battery cover and lift it up to remove. Remove the old batteries and replace with two 1.5V AAA size alkaline batteries.
-
Page 33: Caring For Your Meter
MAINTENANCE Caring for Your Meter To avoid the meter and test strips attracting dirt, dust or other contaminants, please wash and dry your hands thoroughly before use. Cleaning To clean the meter exterior, wipe it with a cloth moistened with tap water or a mild cleaning agent, then dry the device with a soft dry cloth. -
Page 34: Caring For Your Test Strips
MAINTENANCE Caring for Your Test Strips § Storage conditions: 35.6 °F – 89.6 °F (2 °C – 32 °C ), below 85 % relative humidity. Do not freeze. § Store your test strips in their original vial only. Do not transfer to another container. -
Page 35: Important Control Solution Information
MAINTENANCE Important Control Solution Information § Use only our control solutions with your meter. § Do not use the control solution beyond the expiry date or 3 months after first opening. Write the opening date on the control solution vial and discard the remaining solution after 3 months. -
Page 36: System Troubleshooting
SYSTEM TROUBLESHOOTING If you follow the recommended action but the problem persists, or error messages other than the ones below appear, please call your TESTAmed customer service. Do not attempt to repair yourself and never try to disassemble the meter under any circumstances. -
Page 37: Error Messages
Appears when ambient range temperature is above system operation range Problem with the meter Repeat the test with a new test strip. If the meter still does not work, please contact the TESTAmed customer service for assistance. -
Page 38: Troubleshooting
Problem with the meter Review the instructions Problem with the meter and repeat the test. If the meter still does not work, contact the TESTAmed customer service for assistance. Problem with the meter... - Page 39 Defective meter or test strips Please contact TESTAmed customer services If the test does not start after applying the sample: POSSIBLE CAUSE WHAT TO DO Insufficient blood sample Repeat the test using a new...
- Page 40 (68 °F – 77 °F / 20 °C – 25 °C) before testing Defective test strip Repeat the test with a new test strip Meter malfunction Please contact TESTAmed customer services.
-
Page 41: Detailed Information
DETAILED INFORMATION The meter provides you with plasma equivalent results Time of day Normal plasma glucose range for people without diabetes (mg/dl) Fasting and before meal Less than 100 mg/dl (5.6 mmol/l) 2 hours after meals Less than 140 mg/dl (7.8 mmol/l) Source: American Diabetes Association (2010). -
Page 42: Symbol Information
SYMBOL INFORMATION SYMBOL REFERENT SYMBOL REFERENT In vitro diagnostic Serial number medical device Caution, consult Do not reuse accompanying documents Authorised repre- Consult instructions sentative in the for use European Community Keep away from Sterilised using sunlight irradiation Do not use if package Keep dry is damaged Temperature limita-... -
Page 43: Specifications
SPECIFICATIONS Modell Nr.: REF-Nr. FOS-171V Dimension & Weight: 95.5(L) x 57(W) x 15(H) mm, 56.6 g Power Source: two 1.5V AAA alkaline batteries Display: LCD Memory: 450 measurement results with respective date and time External output: USB interface Auto electrode insertion detection Auto sample loading detection Auto reaction time count-down Auto switch-off after 3 minutes without action... - Page 48 TESTAmed DIABETES CARE Customer Support Hotline 0800-TREND 11 (0800-87363-11)* www.testamed.de *only available in Germany Distribution: Maurer Pharma GmbH Postfach 12 20 56136 Boppard – Bad Salzig BioCare Corporation 4F, No. 12, Lane 5, Sec. 2, Nanshan Rd., Luzhu Dist., 33852 Taoyuan City, TAIWAN MedNet GmbH Borkstraße 10, 48163 Münster –...
- Page 49 Client: Sebapharma Project: TESTAmed Blutzuckergerät Project No: 22674 Filename: Benutzerhandbuch_EN.ai Date: 30.05.2017 Client Counselling: Lisa Jacobi-Wichmann Art Direction: Inga Möller Production: Guido Stern Supplier: – Printing process: Offset Substrate: Paper Programm(vers.): InDesign CS5 For further technical questions please contact: Maria Glade, Tel.: +49(40) 89 96 90-63 m.glade@elbedesigncrew.de...
Need help?
Do you have a question about the GlucoCheck Advance and is the answer not in the manual?
Questions and answers