
Summary of Contents for Lowenstein Medical SOMNOcheck micro CARDIO
- Page 1 EN Instructions for Use SOMNOcheck micro SOMNOcheck micro CARDIO Sleep apnea diagnosis set...
-
Page 2: Table Of Contents
Contents Overview ....3 Sterilization ....51 Change of patient . -
Page 3: Overview
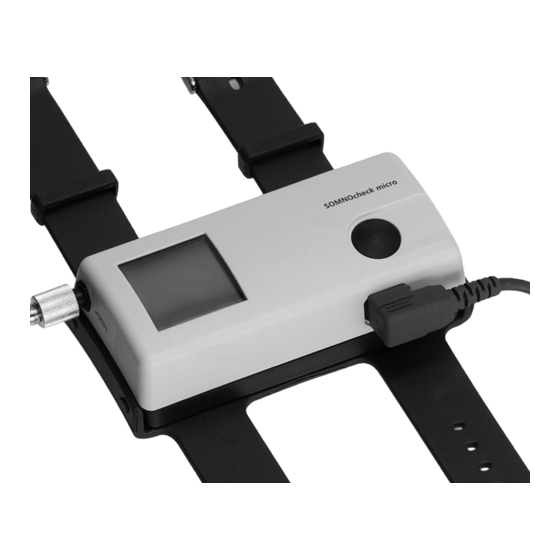
1. Overview 1.1 Device 2 Button 1 Connection for diagnostic nasal cannula 3 Connection for pulsoximetry sensor/CARDIO-Sensor 5 Display 4 Attachment for wristband 6 Wristband 7 USB port 9 Battery compartment 8 Rubber cover Overview... - Page 4 1 Connection for diagnostic nasal 5 Display cannula The display shows you the results of the recording This is where the diagnostic nasal cannula is and current measured values. connected to the device. Using the Luer lock 6 Wristband sealing cap supplied, you can seal the connection You can use the wristband to attach the device to for the diagnostic nasal cannula during the your patient’s forearm.
-
Page 5: Components
A CARDIO-Sensor is used as an option You can give the patient the device and its on the SOMNOcheck micro CARDIO. The term components to take away in the carrying bag. "pulsoximetry sensor" is used for both variants in 5 CD-ROM the text which follows. -
Page 6: Menu Structure For Signal Control Mode/Recording Mode
1.3 Menu structure for signal control mode/ recording mode Signal control mode Signalkontrollmodus Aufzeichnungsmodus Recording mode Overview... -
Page 7: Menu Structure For Results Display
1.4 Menu structure for results display SOMNOcheck micro Overview... - Page 8 SOMNOcheck micro CARDIO Overview...
-
Page 9: Symbols In The Display
1.5 Symbols in the display Display Symbol* Meaning Signal control mode (if at least one sensor is connected) Respiratory flow display: moves when there are signals SpO2 Oxygen saturation Pulse frequency display: symbol flashes at pulse frequency if there are signals Signal test* Signal test in progress Recording mode... -
Page 10: 1.6 Symbols For Risk For Sleep
Check for Check for Check for arrhythmia (AFib): page shown only in the arrhythmia Arrythmia event of positive findings. (Afib) (AFib)* Risk for sleep Risk for sleep disturbances (see “1.6 Symbols for risk for sleep disturbances” on page 14) disturbance* Duration of recording inadequate. - Page 11 Respiratory Respiratory events events* Respiratory Disturbance Index: number of apneas and hypopneas per hour within the artifact-free evaluation time of the pulsoximetry signal Obstructive Respiratory Disturbance Index: number of obstructive apneas and hypopneas per hour within the artifact-free evaluation time of the pulsoximetry signal. ORDI The sum of ORDI and CRDI may be less than RDI, especially if there has been no differentiation between...
- Page 12 Autonomic Autonomic arousals arousals Autonomic Arousal Index: number of autonomous arousals per hour within the artifact-free evaluation time of the pulsoximetry signal. If the warning Check for arrhythmia (AFib) has been issued, the device does not supply a result here. Respiratory Autonomic Arousal Index: number of autonomous arousals per hour within the artifact-free evaluation time of the pulsoximetry signals caused by a...
- Page 13 Analysis time Duration of artifact-free recording Flow rate Flow signal Pulse* Pulsoximetry signal Erase data* Erase measured data To erase press button for 3 To erase, press the button for 3 seconds sec* Next Date of next calibration (Year-Month-Day) calibration* Erase data* Erase measured data To erase press...
-
Page 14: Symbols For Risk For Sleep Disturbances
1.6 Symbols for risk for sleep disturbances Risk level Color Meaning None No data available The risk is low (LOW) if all the values are in the range shown here: Green AHI: <10 RDI: <10 AAI: <30 The risk is moderate (MODERATE) if at least one of Cardiovascular the values is in the range shown... -
Page 15: Display Of Cardiovascular Risk
1.7 Display of cardiovascular risk Risk level Color Meaning Cardiovascular No data present because time Risk None with a good pulse signal quality - - - was too short. - - - The risk is low (LOW) if the CRI is Green in the range 0 - 0.33. -
Page 16: Display Of Charging State
1.8 Display of charging state Symbol Meaning 100 % capacity 75 % capacity 50 % capacity 25 % capacity <10 % capacity: symbol flashes 0 % capacity: device switches off after 10 seconds Overview... -
Page 17: Markings On The Device
1.9 Markings on the device Symbols Meaning SOMNOcheck micro device ID plate Follow information in the instructions for use Do not dispose of the device in domestic waste Protection class BF CE symbol (confirms that the product conforms to the applicable European directives) IPX0 Protection against ingress of water... -
Page 18: Markings On The Packaging
Symbols Meaning SOMNOcheck micro Follow information in the instructions for use. States which batteries or rechargeable batteries can be used. Connection for diagnostic nasal cannula Pulsoximetry sensor Do not dispose of the device in domestic waste. Date of manufacture Diagnostic nasal cannula Intended to be used once and then disposed of. -
Page 19: Safety Instructions
1.11 Safety instructions Safety instructions indicate information relevant to safety. You will find safety instructions within instructions before a step which includes a risk to people or objects. Safety instructions consist of – the warning symbol (pictogram), – a word to indicate the level of hazard –... -
Page 20: Description Of Device
2. Description of device 2.1 Intended use SOMNOcheck micro is a data recording system for registering, recording, storing and evaluating biosignals during sleep. It is for detecting sleep-related respiratory disorders and concomitant risk factors to support diagnosis and to adjust and check therapy. Spheres of application include outpatient examinations at a patient’s home or in hospital. -
Page 21: Description Of Function
Version 2.11 onwards. The results are shown in the display after the end of the recording. SOMNOcheck micro CARDIO SOMNOcheck micro CARDIO additionally analyzes the signals recorded for parameters which provide information about cardiovascular risk. The CRI (Cardiac Risk Index) is shown in the display. - Page 22 • Signal control mode: if the device is receiving valid signals from the diagnostic nasal cannula and/or the pulsoximetry sensor outside a recording, it switches from the results display to signal control mode. The device displays current measured values, but does not store them.
- Page 23 Depending on the sensor attached, the signals below may be recorded and displayed. Sensor Measured values – Oxygen saturation Pulsoximetry sensor – Pulse frequency Diagnostic nasal cannula – Respiratory flow • PC mode: the device automatically switches to PC mode as soon as the device is connected to a PC via a USB cable.
- Page 24 A CARDIO-Sensor can be used as an option on SOMNOcheck micro CARDIO; during the recording, this also calculates CRI parameters and checks for Cheyne- Stokes respiration. The CARDIO-Sensor is color-coded to distinguish it from the pulsoximetry sensor.
-
Page 25: Measuring Conditions
2.3 Measuring conditions General • Follow the instructions for use for the pulsoximetry sensor and the diagnostic nasal cannula. • Follow the instructions for attaching the sensors and components. • Correct measurements are possible only if the system is operated properly. •... - Page 26 • With a high proportion of dysfunctional hemoglobins (e.g. carboxyhemoglobin or methemoglobin), measurement may deliver a normal result, even if the patient is hypoxic. This is caused by less hemoglobin being available for transporting oxygen. In such a case, there is no point using a two-wavelength pulsoximetry sensor as used with SOMNOcheck micro.
-
Page 27: Safety Instructions
3. Safety instructions Read these instructions for use through carefully. They are a constituent part of the device and must be available at all times. Use the device only for the intended use described (see “2.1 Intended use” on page 20). For your own safety and that of your patients, and in accordance with the requirements of directive 93/42/EEC, observe the following instructions. - Page 28 • Do not operate SOMNOcheck micro with devices which supply the body with energy – electrical stimulation devices, for example. • Maintain a safe distance between SOMNOcheck micro and devices which emit HF radiation (e.g. cellphones), otherwise there may be malfunctions (see “11.3 Safety distances”...
- Page 29 • If you have questions about faults, see the section entitled “8. Troubleshooting” on page 54. • Follow the section entitled “6. Hygiene treatment” on page 49 to prevent an infection or bacterial contamination. • Modifications to the device and opening the device are not permitted. Any claim •...
- Page 30 • Use of accessories, inverters and connecting cables other than those stated may lead to increased emission or to reduced immunity to interference of the device or system. Note • Dispose of the components in accordance with the regulations applicable in your medical sphere.
-
Page 31: Commissioning
4. Commissioning 4.1 Put on device 1. Insert the batteries/rechargeable batteries in the device (see “5.7 Insert batteries” on page 45). 2. Attach the device to the wristband (see illustration). 3. Ensure that the device engages fully in the holes on the wristband, otherwise the device may come loose. - Page 32 5. To increase wearing comfort, grease the nostrils ® lightly with Vaseline , for example. This stops the skin drying out. 6. Follow the instructions for use for the diagnostic nasal cannula. 7. Grasp the double tube of the diagnostic nasal cannula to the left and right so that the cannulas point upwards.
-
Page 33: Attach Pulsoximetry Sensor
4.3 Attach pulsoximetry sensor 1. Put on the device (see “4.1 Put on device” on page 31). 2. Push the pulsoximetry sensor onto one of your patient’s fingers. If you are monitoring your patient's blood pressure with a cuff on this arm, choose the other arm. 3. -
Page 34: Make A Connection To The Pc
4.4 Make a connection to the PC You have to connect the device to the PC via a USB cable in order to configure the device or transfer the data saved in the device to your PC. To do this, proceed as follows: 1. -
Page 35: Operation
5. Operation 5.1 Prepare a recording 1. Take a device and a copy of the patient’s instructions for use. 2. Read off the serial number of the device. 3. Enter the serial number of the device on the form on the reverse of the patient's instructions for use. -
Page 36: Perform A Recording
4. Ask your patient to put on the device and the sensors him or herself under your supervision. 5. Show your patient how to change the batteries or rechargeable batteries (see “5.7 Insert batteries” on page 45 and “5.8 Use rechargeable batteries” on page 46). - Page 37 – If the diagnostic nasal cannula and/or pulsoximetry sensor are attached, the device starts recording after the signal test. A floppy disk symbol appears in the bottom right of the display. The display switches off after 30 seconds to save power. The recording ends automatically after 8 hours or the time programmed using the software.
-
Page 38: Cancel Recording
– If the diagnostic nasal cannula and/or pulsoximetry sensor are attached, the device starts recording after the signal test. A floppy disk symbol appears in the bottom right of the display. After 30 seconds, the display switches off to save power. The recording ends automatically after 8 hours or at the time programmed using the software. -
Page 39: After The Recording
3. Wait until the start screen disappears. – If the sensors were connected to the device for less than 2 hours during a recording, recording time is not adequate for reliable results. A message appears in the display to indicate that the recording time was insufficient (Analysis time insufficient). -
Page 40: Read Out Results
Read out results on device 1. Press the button on the device. 2. Wait until the start screen disappears. 3. Call up the individual pages by briefly pressing the button. 4. With SOMNOcheck micro CARDIO only: read off cardiovascular risk (Cardiovascular Risk). Operation... - Page 41 5. In the event of positive findings only: the Check for Arrythmia (AFib) page is displayed. Check for arrhythmia (Afib) 6. With SOMNOcheck micro CARDIO and in the event of positive findings only: the Check for Cheyne Stokes Respiration page is displayed. Check for Cheyne Stokes...
- Page 42 7. Read off the risk for sleep disturbances (Risk for sleep disturbance). The risk is shown in three color-coded levels. The overall risk is determined by the highest individual risk. Risk level Color Meaning The risk is low if all the values are in the range shown here: Green (low)
- Page 43 cannula were attached to the device during the recording. The signal for the diagnostic nasal cannula was present at an adequate quality for less than 75 % of the artifact-free time of the pulsoximetry signal. The RDI is displayed in the color of the RDI risk determined.
- Page 44 Color <30 Green 30-40 Yellow >40 10. Read off the values for O saturation (O2 saturation). 11. Read off the other values (Others) (see “1.5 Symbols in the display” on page 9). Others Snore Pulse Ø RecTime 3.2 Notes: • If the sensors were connected to the device for less than 2 hours during a recording, recording time is not adequate for reliable results.
-
Page 45: Insert Batteries
• If recording time is only 2-4 hours, the recording time (Analysis time) for respiratory flow (Flow) and pulse frequency (Pulse) appear in the display. If a recording lasts 2 to 4 hours, the results determined are displayed, but the recording time is comparatively short. Repeat the recording if possible in order to obtain reliable results. -
Page 46: Use Rechargeable Batteries
1. Insert new batteries: – before commissioning – before using the device – if the display of charging state is flashing – if batteries are too old 2. Open the battery compartment. 3. Ensure the correct polarity of the batteries. 4. - Page 47 again after just a short time. • If you do not use the device for several weeks, recharge the battery before the next recording. • The display of charging state is based on alkaline manganese batteries and is therefore highly inaccurate when rechargeable batteries are used.
-
Page 48: Transport Device
5.9 Transport device 1. Stow the sleep apnea diagnosis set and the patient’s instructions for use in the carrying bag. Operation... -
Page 49: Hygiene Treatment
6. Hygiene treatment Caution! Risk of infection from pathogens! A carrying bag infected with pathogens will cause infections on a change of patients. – Dispose of the carrying bag in the event of potential pathogens such as MRSA, for example. Note! Risk of material damage as a result of ingress of liquids! Ingress of liquids will cause short-circuiting and damage both device and... -
Page 50: Clean
6.2 Clean 1. Remove the labels on the connecting cable of the pulsoximetry sensor. 2. If necessary: disconnect the USB cable from the device. 3. Take a lint-free damp cloth. 4. Clean the device and its components as described in the table below. Parts Clean SOMNOcheck micro... -
Page 51: Sterilization
Parts Disinfect Disposable component Diagnostic nasal cannula Do not subject the component to any treatment. Use a new component. Pulsoximetry sensor / Follow the manufacturer’s instructions for use. CARDIO-Sensor Luer lock adapter Follow the manufacturer’s instructions for use. After disinfecting by wiping, remove all residues of disinfectant with tap water and a mild detergent. -
Page 52: Function Check
7. Function check If you find faults during the function check, you may not use the device. Try to eliminate the fault with the help of the information in Section “8. Troubleshooting” on page 54. If this proves impossible, have the device repaired by the manufacturer or by specialist staff expressly authorized by the manufacturer to do so. - Page 53 5. Check whether the measured values shown in the display are plausible. The device is working correctly if the measured values shown in the display are plausible. Check display 1. Put on the diagnostic nasal cannula (see “4.2 Put on diagnostic nasal cannula” on page 31) and/or the pulsoximetry sensor (see “4.3 Attach pulsoximetry sensor”...
-
Page 54: Troubleshooting
8. Troubleshooting 8.1 Faults in the device Fault Cause of fault Remedy Diagnostic nasal cannula and/or Put on the missing sensor. pulsoximetry sensor not put on Plug connections are not Ensure the connections are No signal in flow, snore or properly connected firm. -
Page 55: Error Messages In The Display
Cable connection between Check all cable connections. device and PC is interrupted No connection can be made to the Device has switched off. device. Switch device back on at the Connection has been inactive for button. over 5 minutes Erase data (see “5.5 After the The device has been recording”... -
Page 56: Servicing
9. Servicing 1. Use the PC software to calibrate the pressure sensor for flow measurement every 2 years. The procedure is described in the User Manual for the PC software. 2. To read off the next calibration date: Call up the Erase data page by briefly pressing the button on the device several times. - Page 57 Dispose of diagnostic nasal cannula After use, take the Luer lock adapter off the diagnostic nasal cannula and dispose of the diagnostic nasal cannula in domestic waste. Dispose of pulsoximetry sensors Do not dispose of the device in domestic waste. To dispose of the device properly, contact an approved, certified electronics scrap dealer.
-
Page 58: Scope Of Supply
10. Scope of supply 10.1 Standard scope of supply SOMNOcheck micro sleep apnea diagnosis set WM 94500 Description Order number SOMNOcheck micro, basic device WM 94530 Set of 10 diagnostic nasal cannulas and 1 adapter WM 94519 Softtip sensor, size L with Minimed connector (right-angled) WM 94595 Carrying bag WM 94055... -
Page 59: Accessories
SOMNOcheck micro CARDIO sleep apnea diagnosis set WM 94570 Description Order number SOMNOcheck micro, basic device WM 94530 Set of 10 diagnostic nasal cannulas and 1 adapter WM 94519 Softtip sensor CARDIO, size L with Minimed connector (right-angled) WM 94585... -
Page 60: Replacement Parts
10.3 Replacement parts Description Order number SOMNOcheck micro, basic device WM 94530 Set of 10 diagnostic nasal cannulas and 1 adapter WM 94519 Softtip sensor, size L with Minimed connector (right-angled) WM 94595 Carrying bag WM 94055 Wristband WM 94560 Luer lock adapter WM 95221 Set, 10 Luer lock adapters... -
Page 61: Technical Data
11. Technical data 11.1 Specifications SOMNOcheck micro Product class to directive 93/42/EEC Dimensions W x H x D in mm 112 x 30 x 50 Weight: excl. batteries 79 g incl. 2 batteries 145 g Temperature range: operation +5 °C to +40 °C storage –20 °C to +60 °C transport... -
Page 62: Pulsoximetry Sensor
11.2 Pulsoximetry sensor Value range Parameter Unit Precision/calculation Min. Max. Sensor: wavelengths Maximum rise in temperature by 2 °C Sensor: heat output at application location A signal quality 90 % is good - Signal quality below that, SpO values and pulse frequency may be unreliable. -
Page 63: Safety Distances
11.3 Safety distances Recommended safety distances between portable and mobile HF telecommunication devices (e.g. cellphones) and SOMNO micro check Safety distance depending on transmission frequency Nominal power of HF device in m in W 150 kHz - 80 MHz 80 MHz - 800 MHz 800 MHz - 2.5 GHz 0.01 0.04... -
Page 64: Warranty
12. Warranty Löwenstein Medical gives the customer a limited manufacturer warranty on new original Löwenstein Medical products and any replacement part fitted by Löwenstein Medical in accordance with the warranty conditions applicable to the product in question and in accordance with the warranty periods from date of purchase as listed below. The warranty conditions are available on the website of the manufacturer. - Page 68 Löwenstein Medical Technology GmbH + Co. KG Kronsaalsweg 40 22525 Hamburg, Germany T: +49 40 54702-0 F: +49 40 54702-461 www.loewensteinmedical.de...
Need help?
Do you have a question about the SOMNOcheck micro CARDIO and is the answer not in the manual?
Questions and answers