Table of Contents
Advertisement
Advertisement
Table of Contents

Related Manuals for swissonic UA-2X2


Summary of Contents for swissonic UA-2X2
- Page 1 UA-2X2 audio interface user manual...
- Page 2 Musikhaus Thomann Thomann GmbH Hans-Thomann-Straße 1 96138 Burgebrach Germany Telephone: +49 (0) 9546 9223-0 E-mail: info@thomann.de Internet: www.thomann.de 20.06.2018, ID: 431012...
-
Page 3: Table Of Contents
Installation and starting up........................ 13 4.1 System requirements........................13 4.2 Hardware installation........................14 4.3 Driver and software installation....................14 Connections and controls........................20 Operating..............................25 6.1 Audio settings in Windows......................25 6.2 Control Panel in Windows......................27 6.3 Control panel in macOS......................... 29 UA-2X2... - Page 4 Table of contents Technical specifications........................30 Plug and connection assignment....................31 Protecting the environment......................34 audio interface...
-
Page 5: General Notes
If you sell the unit please make sure that the buyer also receives this manual. Our products are subject to a process of continuous development. Thus, they are subject to change. UA-2X2... -
Page 6: Further Information
General notes 1.1 Further information On our website (www.thomann.de) you will find lots of further information and details on the following points: Download This manual is also available as PDF file for you to download. Use the search function in the electronic version to find the topics of Keyword search interest for you quickly. -
Page 7: Notational Conventions
Letterings The letterings for connectors and controls are marked by square brackets and italics. Examples: [VOLUME] control, [Mono] button. Displays Texts and values displayed on the device are marked by quotation marks and italics. Examples: ‘24ch’ , ‘OFF’ . UA-2X2... -
Page 8: Symbols And Signal Words
General notes Instructions The individual steps of an instruction are numbered consecutively. The result of a step is indented and highlighted by an arrow. Example: Switch on the device. Press [Auto]. ð Automatic operation is started. Switch off the device. 1.3 Symbols and signal words In this section you will find an overview of the meaning of symbols and signal words that are used in this manual. - Page 9 NOTICE! This combination of symbol and signal word indicates a pos- sible dangerous situation that can result in material and environmental damage if it is not avoided. Warning signs Type of danger Warning – danger zone. UA-2X2...
-
Page 10: Safety Instructions
Safety instructions Safety instructions Intended use This device serves to convert analogue audio signals to digital audio signals and vice versa. Use the device only as described in this user manual. Any other use or use under other operating conditions is considered to be improper and may result in personal injury or property damage. No liability will be assumed for damages resulting from improper use. - Page 11 Safety instructions NOTICE! Operating conditions This device has been designed for indoor use only. To prevent damage, never expose the device to any liquid or moisture. Avoid direct sunlight, heavy dirt, and strong vibrations. UA-2X2...
-
Page 12: Features
Features Features Receiver for the digital transmission of audio signals 2 × analogue microphone and line inputs as XLR / 1/4" combo sockets 2 × analogue line inputs as 1/4" phone sockets (balanced) Headphone phone as 1/4" phone socket Master volume control Supports Windows and macOS audio interface... -
Page 13: Installation And Starting Up
Use one of the following operating systems to enable the optimal use of the device: PC: Windows 7 / 8 / 8.1 or 10 (32- and 64-bit) Mac: macOS X / macOS 10.7 or higher The computer must have at least one free USB 2.0 port. UA-2X2... -
Page 14: Hardware Installation
Installation and starting up 4.2 Hardware installation The device is connected to a USB port on the computer with the supplied cable and run directly on the power delivered via the port. 4.3 Driver and software installation After it is connected to the computer, the operating system will automatically detect the device and usually install the correct USB audio driver. - Page 15 Start the installation programme ‘setup_UA-2X2_vX.YYYY.exe’ by double-clicking. The extension ‘vX.YYYY’ in the file name describes the current version number of the USB audio driver. When the installation programme starts, Window shows a safety notification. Click on [Next] to allow the installation. UA-2X2...
- Page 16 Installation and starting up Confirm the installation and click on [Install]. The USB audio driver data are copied onto the computer. The device driver installation wizard opens. Click on [Continue] to proceed. audio interface...
- Page 17 After the USB audio driver data are copied again, Window shows a safety notification. Confirm the safety notification and click on [Install]. ð The message that the USB audio driver has been successfully installed is displayed. Click on [Finish]. UA-2X2...
- Page 18 ð The computer reboots. The ‘swissonic’ symbol is displayed in the task bar. The installation is finished. Connect the device to the computer's USB port. After it is connected to the computer, the USB audio driver will automatically detect the device and make the necessary changes.
- Page 19 CD (macOS folder) and in the download area on our website. To install it, drag the control panel symbol from the file in your application folder Installation that is displayed next to it. It is also possible to steer some UA-2X2 options under macOS via the audio MIDI config- uration of the macOS. UA-2X2...
-
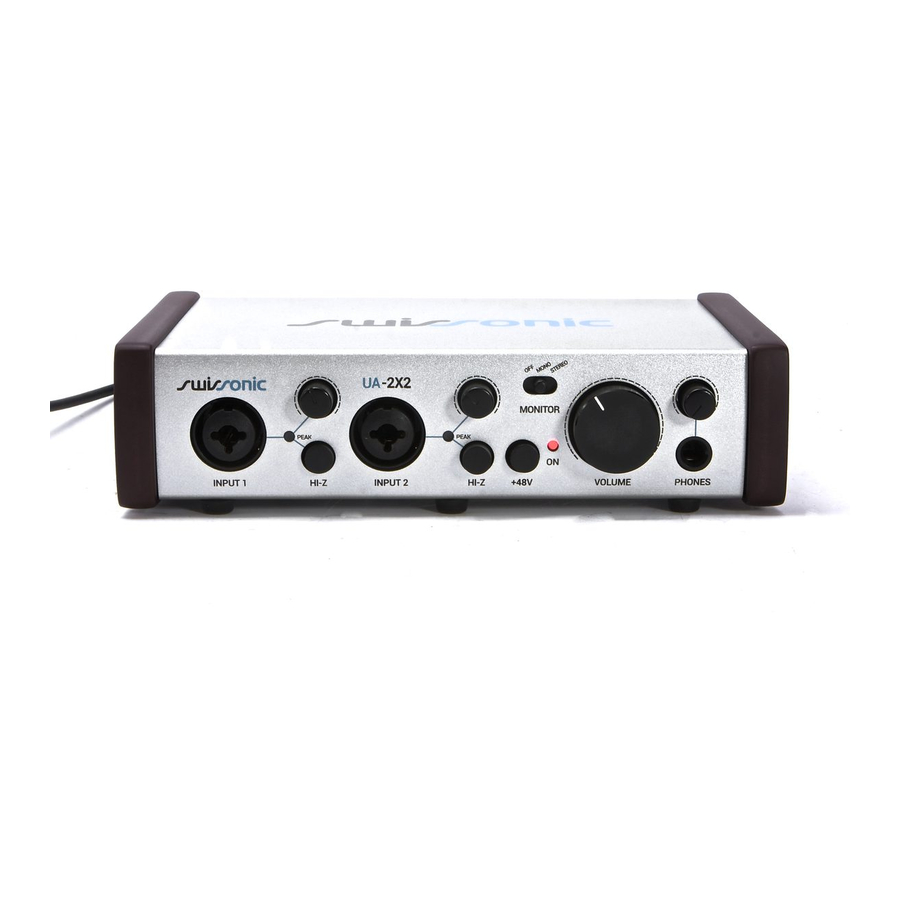
Page 20: Connections And Controls
Connections and controls Connections and controls audio interface... - Page 21 Switches the phantom power for the power supply for the condenser microphones on (button pressed) or off (button not pressed). The phantom power leads to damage to the device if unbalanced cables are connected. Only switch on phantom power while exclusively balanced cables are connected. UA-2X2...
- Page 22 Connections and controls 6 [MONITOR] Control for for adjusting input monitoring [OFF]: Incoming signals are muted [MONO]: Incoming signals are audibly separated to left and right [STEREO]: Incoming signals are audible left and right 7 [ON] The LED lights up when the device is supplied with power via the USB port. 8 [VOLUME] Control for adjusting the master volume 9 Control for adjusting the monitor volume for the headphones.
- Page 23 Connections and controls UA-2X2...
- Page 24 Connections and controls 11 [OUTPUT] Line outputs for connecting an amplifier or an active speaker box, designed with separate 1/4" phone sockets (bal- anced) for the left and right channel. 12 [USB] USB port for feeding in digital audio signals with the supplied cable. audio interface...
-
Page 25: Operating
To set the audio interface as the standard playback and recording device, proceed as follows: Open the ‘System control panel’ and select ‘Sound’ . In the ‘Playback’ bar, select the audio interface that is used by all audio applications and confirm with [OK]. UA-2X2... - Page 26 Operating In the ‘Record’ bar, select the audio interface and confirm with [OK]. audio interface...
-
Page 27: Control Panel In Windows
The audio interface is controlled via the control panel on the computer. Open the control panel by double-clicking on the ‘swissonic’ symbol in the task bar. The input volume level for the incoming signal is set in the [INPUT] area. The two sliders control one mono channel each or one stereo signal together depending on the cursor position. - Page 28 Operating 6.2.1 Latency setting Before the audio application is started, the latency period must be set to avoid undesired delays in the transmissions. In the [Config] menu item, the latency period for the US audio driver is set under [Latency]. A shorter latency period is achieved by selecting a smaller buffer.
-
Page 29: Control Panel In Macos
The colour of the slider is blue when adjusting the respective channel. The output signal is muted with [MUTE]. The switch is blue when muting is activated, and grey when it is inactive. UA-2X2... -
Page 30: Technical Specifications
Technical specifications Technical specifications Inputs 2 × XLR / 1/4" combo sockets (balanced): max. +22 dBu Outputs 3 × 1/4" phone socket (balanced) Gain –∞…+10 dBu Phantom power 48 V Digital signal processing Analogue-to-digital converter: 102 dB, Resolution: 24 bit Digital-to-analogue converter: 108 dB, Resolution: 24 bit Internal processor: 24 bit, floating point Dimensions (W ×... -
Page 31: Plug And Connection Assignment
In a professional environment, therefore, the balanced transmission is preferred, because this enables an undisturbed transmission of signals over long distances. In addition to the conduc- tors ‘Ground’ and ‘Signal’, in a balanced transmission a second core is added. This also transfers the signal, but phase-shifted by 180°. UA-2X2... - Page 32 Plug and connection assignment Since the interference affects both cores equally, by subtracting the phase-shifted signals, the interfering signal is completely neutralized. The result is a pure signal without any noise inter- ference. 1/4" TS phone plug (mono, unbalanced) Signal Ground, shielding 1/4"...
- Page 33 Plug and connection assignment XLR plug (balanced) Ground, shielding Signal (in phase, +) Signal (out of phase, –) Shielding on plug housing (option) UA-2X2...
-
Page 34: Protecting The Environment
Protecting the environment Protecting the environment Disposal of the packaging mate- rial For the transport and protective packaging, environmentally friendly materials have been chosen that can be supplied to normal recycling. Ensure that plastic bags, packaging, etc. are properly disposed of. Do not just dispose of these materials with your normal household waste, but make sure that they are collected for recycling. - Page 36 Musikhaus Thomann · Hans-Thomann-Straße 1 · 96138 Burgebrach · Germany · www.thomann.de...
Need help?
Do you have a question about the UA-2X2 and is the answer not in the manual?
Questions and answers