Table of Contents
Advertisement
We extend a warm welcome to you on becoming a part of the Copper Connections family.
Our service support Engineers shall be working hard through our channel partners to ensure your
satisfaction with the product and after sales services. We welcome your feedback / query at
service@copperconnections.com
.
Features
Siren Wireless Flashing Siren-Wireless with Tamper Protection (FSW-T) Registering
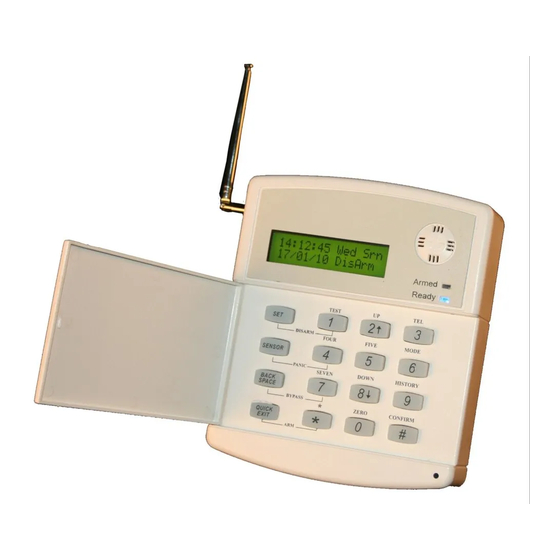
Burglar Alarm System Manual
Model: BAS-G
Contents
Make sure you get a
printed Index made
from the installer &
paste the same behind
Keyboard panel.
.
Advertisement
Table of Contents

Summary of Contents for CCL BAS-G
-
Page 1: Table Of Contents
Burglar Alarm System Manual Model: BAS-G Make sure you get a printed Index made from the installer & paste the same behind Keyboard panel. We extend a warm welcome to you on becoming a part of the Copper Connections family. - Page 2 SMS Text & Android Application for various programming Telephone Numbers Entry & SMS Controls Telephone Number Redial Times Telephone Number Display - ON / OFF Voice Message Recording for playing on Telephone calls during Intrusion - Optional Wireless Sensors, Remotes & Panic Keys Registering/Deletion Wireless Sensor –...
- Page 3 When the cell of any of the wireless Magnetic / Vibration Sensors goes low & the system is in DISARMED condition, the display gives a message and the display back light keeps getting ON for 10 secs and then OFF for 10 secs.
-
Page 4: Installation
Press “Quick Exit” to exit. Through SMS Through registered Mobile Numbers, user can send SMS to the SIM installed in BAS and get Reply with balance. Similarly various Programming can be done through SMS with Password. Refer heading “ SMS Text for various programming”... - Page 5 A GSM SIM card is to be provided by the user. Notes on Installation - Wireless Sensors can be placed within 300 ft distance from the Main Unit if there is no obstruction in between. They have to be registered in the Main Unit as explained under the heading “Wireless Sensors, Remotes & Panic Keys Registering/Deletion ”.
-
Page 6: Power On Procedure
There are 2 type of Wired Sensors – Normally Closed Type and Normally Open Type. They are respectively explained below: Normally Closed Type If more than one is to be connected in one Zone then they are connected in Series. Their contact points remain Closed in ARMED condition. -
Page 7: Sound Indications
Sound Indications During Intrusion the Siren sounds to its maximum power Whenever the system fails to get ARMED for any reason, the Siren sounds for a very short time with a long gap in between. This continues until DISARMED. Whenever a Sensor registered in TRAITOR mode is open, the speaker of the system would emit a low beep In case of Main System battery low, the speaker of the system would emit a low beep. -
Page 8: Arm
heading “Wired Sensor – Operating Mode” Operation: Whenever, the Sensor is triggered irrespective of the system being in ARMED or DISARMED condition, the Siren will starts hooting and the system will dial out the Telephone numbers You can ARM the system and leave the Remote inside the premises, if required. In this case close all the sensors, ARM the system. - Page 9 Enter Master Password (1234) + # Keep Pressing 2 to select “Auto ARM/DISARM” Press # Press 0 for Sunday 1 for Monday 2 for Tuesday 3 for Wednesday 4 for Thursday 5 for Friday 6 for Saturday 7 for All Days Press “UP”...
-
Page 10: Battery Mode - Power Switch Off In
Enter Master Password (1234) + # Keep Pressing 2 to select “Holidays” Press # Press “Up Arrow” key to select day 1, 2, 3, …… Press “#” Enter the date + Month + Year (All in 2 digits format) Here, “Back Space” key can be used to edit the entered digits. Press “#”... -
Page 11: Disarm
HH= Hours in 24 Hours mode. MT= Minutes d= Week Day from 0 to 6 (0= Sunday & 6= Saturday) Disarm While entering the premises, DISARM the system with any of the following methods within 10 secs of entering the premises: Press “SET”... -
Page 12: Password Operation On / Off
All programming are to be done in DISARM mode of the system. After entering the Master Password for the first time, the system remains in Programming mode for 60 secs. So, in case more than one programming is to be done, the system will not ask for Password again within 60 seconds of the first programming. -
Page 13: Remote Monitoring Through Telephone Line
= Sl Pan – Silent Panic = A.Fail (It means Auto ARM failed due to ZZ Sensor being Open. If ZZ= 00 that would mean that Auto ARM failed because of some condition like No Telephone Number stored, SIM Not connected, etc) = Faulty (HHW is not working) = Tel –... -
Page 14: Resetting Sim
Ringing time of an incoming call, after which the system picks up the call for remote Monitoring (Default = 6 Rings) Telephone Numbers = Clean. Time delay to ARM (Default = 00) Auto ARM/ DISARM (Default = Manual) OFF Procedure: Press BACK SPACE + Enter Master Password (1234) + # 11 # # (2 Beeps will indicate that the system has been reset) Resetting SIM In case System doesn’t get ARMED and shows “No Network”... - Page 15 Back Space + ABCDEFGH + # + Quick Exit Each alphabet of ABCDEFGH = 0 or 1 depending on the shorting of the Pads below the IC U2 on the PCB of Wireless Siren PCB. On the PCB these pads are marked as 12345678. Each Pad can either be shorted or left open.
-
Page 16: Signal Repeater - Wireless
of Adapter/BS-PS, the system will dial out and sound the internal siren of the unit & external Sirens if connected, in ARMED as well as DISARMED condition. Press # + Quick Exit Note: When the cell of FSW goes low & the system is in ARMED condition, it will dial the pre-fed Telephone number to inform the user with a Voice Message “Battery is Low + ID Number”. - Page 17 Date: DD/MM/YY Time: HH:MM in 24 Hours format Tel: X (X= no of Tel Numbers stored) Wired Zones Active: X (No of Wired Zones that are Enabled out of 8 Wired Zones) Wireless Sensor: X (No of Wireless Sensors Registered, except Remotes) Remote: X (No of Remotes registered) System details –...
- Page 18 : XXXX in the above table refers to 4 digit Password Programming by Android Application: The free android application named ‘BAS-G’ is available on Google Play Store. Steps to add your BAS-G panel in the application are as follows: Press ‘LOGIN’ displayed on home screen of app Press ‘ADD’...
- Page 19 Press # Press # again Press UP / DOWN Key to select the “All Cases” Press 6 to Enable / Disable (If enabled, SMS will be sent/received in all events. If Disabled then in no case SMS will be sent/received on that Telephone number) Press # Quick Exit Press “UP”...
- Page 20 Enter Master Password (1234) + # Keep Pressing 2 to select “V Recrdng” Press # Press 1 Now start speaking near the Mic of the Main Unit. The recording starts when the display shows 10 and ends at 1 i.e., total 10 secs of recording. Press # + Quick Exit Programming for Playback of recorded message: Press “SET”...
- Page 21 Press BACK SPACE + # + Quick Exit Deletion of All Wireless Sensor registration This process deletes all the Signal Repeaters & Wireless Remotes connected to the system. If only one is to be deleted then delete all the Remotes/Signal Repeaters and register the required ones again. Press “SENSOR”...
- Page 22 Traitor Mode Whenever any of the Magnetic Sensor of this Zone is open, system will give beeps. This would happen only when system DISARMED. Always ARMED All Sensors of this Zone will always remain in ARMED condition whether the system is ARMED or DISARMED.
- Page 23 - ID code not matching between the remote controllers and main unit. Delete the Wireless Remote and register again as explained in this manual. Problem: The Sensing Distance is too short between the Wireless Sensors and the Main Unit. Reasons could be: - Some other transmitting equipment in the area could be effecting the wireless range of the system - The Mains AC voltage is too low or the battery of the Wireless Sensor is low.
- Page 24 15. The decision of Copper Connections Pvt. Ltd on defects, damages etc shall be final and binding on the parties and no dispute regarding this, could be agitated before any civil court. Part No. CC-BAS-G-22 ___________________________________________ An ISO:9001:2008 Certified Company Copper Connections Pvt.
Need help?
Do you have a question about the BAS-G and is the answer not in the manual?
Questions and answers