Table of Contents
Advertisement
Advertisement
Table of Contents

Subscribe to Our Youtube Channel
Summary of Contents for WeatherSpy WS1066
- Page 1 Wireless Weather Station with Outdoor Sensor WS1066...
-
Page 2: Table Of Contents
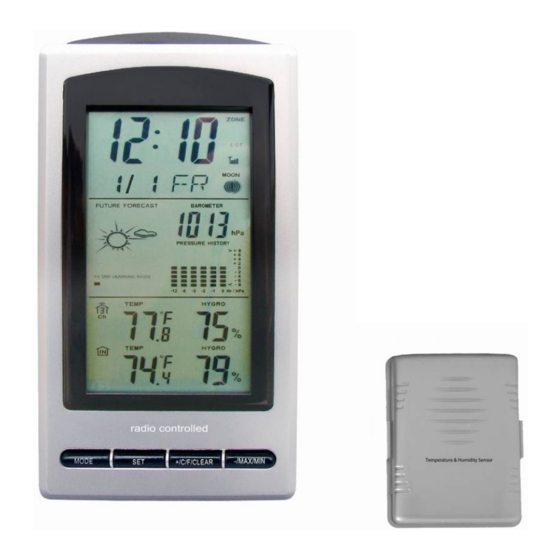
WIRELESS WEATHER STATION INSTRUCTION MANUAL MODEL: WS1066 Page 1 INTRODUCTION ............................- 4 - 1.1 PACKAGE CONTENTS ..........................- 4 - 1.2 FEATURES..............................- 4 - 2. OVERVIEW ..............................- 5 - 2.1BASE UNIT-LCD ............................- 5 - : 2.2 WEATHER FORCASTING DISPLAY .....................- 5 - 3. -
Page 3: Introduction
1. INTRODUCTION Thank you for purchasing WS1066 wireless weather station. Designed for everyday use, the weather station will prove to be an asset of great value for your personal use in the home or office. Please read this instruction manual thoroughly to fully understand the correct operation of your weather station and benefit from its unique features. -
Page 4: Overview
21) Valid keypad tone 22) Back light, press【CHANNEL/LIGHT/SZ】illumines the LCD screen for 10 seconds 2. OVERVIEW 2.1 BASE UNIT-LCD The base station has five keys for easy operation: ● MODE ● SET ● +/C/F/CLEAR ● -/MAX/MIN ● CHANNEL/LIGHT/SZ 2.2 WEATHER FORCASTING DISPLAY: 1.Sunny, 2.Cloudy, 3.Mixture of Sun and Cloudy,4. -
Page 5: Time Modes Display
All below instruction examples are 12 hours format. Time: AM 12:00 00,Tuesday ,1st Jan. 2013, (12/24 format depend on RCC) Clock alarm: AM 12:00,clock alarm, snooze closed Temperature unit: default value ℃ or ℉ ( up to RCC) 3.2 TIME MODES DISPLAY Operations: Press【MODE】enter into clock alarm mode Press【SET】for 2 seconds to enter into the time setting mode, and then set... -
Page 6: Clock Alarm Modes
Hr/Min/sec setting Barometric pressure unit setting Keys function Press【MODE】,exit time setting, enter into clock alarm mode. Press 【SET】 , DST ZONE 12/24Hr Hr Minutes Seconds barometric pressure unit exit Press 【+/C/F/CLEAR】,short press add 1,long press more than 2 seconds would be a progressive increase 8Hz, press this key you can ON/OFF alarm status. - Page 7 Operation: Press 【MODE】enter into date mode Press 【SET】,long press 2 seconds enter into clock setting mode Press 【+/C/F/CLEAR】invalidity Press 【-/MAX/MIN】,ON/OFF clock alarm Press 【CHANNEL/LIGHT/SZ】, back light 3.3.1 Clock alarm setting Hr. setting Min. setting Key function: Press 【MODE】 ,exit clock alarm setting, enter into barometric pressure alarm setting Press 【SET】,switch setting values: AL Hr.
-
Page 8: Barometric Pressure Modes
3.4 BAROMETRIC PRESSURE MODES 3.4.1 High/Low barometric pressure alarm setting Barometric pressure alarm status(OFF) Barometric pressure alarm status(ON) High barometric pressure data setting Low barometric pressure data setting Key function: Press 【MODE】,exit barometric pressure alarm setting, enter into outdoor high/low temperature alarm mode Press 【SET】,switch setting values: high barometric pressure alarm ON High kb High hundreds High decade High unit High decimal place... -
Page 9: Ambient Temperature&Humidity Alarm Modes
would be a progressive increase 8Hz, press this key you can ON/OFF alarm status. Press 【-/MAX/MIN】,short press reduce 1, long press more than 2 seconds have a progressive decrease 8Hz, press this key you can ON/OFF alarm status. Press 【CHANNEL/LIGHT/SZ】, back light Note: 1.The setting mode will return to normal display mode while key idle 60s. - Page 10 High temperature&humidity data setting Low temperature&humidity data setting Key function: Press 【 MODE 】 ,exit high/low temperature&humidity outdoor alarm setting,enter into high/low temperature&humidity indoor alarm mode. Press 【SET】,switch setting values:1 high temperature outdoor ON 1 high temperature outdoor alarm value 1 low temperature outdoor alarm ON low temperature outdoor value 1 high humidity outdoor alarm ON 1 high...
- Page 11 3.5.2 Temperature&humidity indoor alarm setting Temperature&Humidity alarm status(OFF) Temperature&Humidity alarm status(ON) High temperature&humidity data setting Low temperature&humidity data setting Key function: Press 【MODE】,exit High/low temperature&humidity indoor alarm setting, enter into date mode Press 【SET】,switch setting value: high/low temperature&Humidity indoor alarm (OFF) high temperature indoor alarm value high humidity indoor alarm value...
-
Page 12: Date Modes
Press 【CHANNEL/LIGHT/SZ】, back light Note: 1.The setting mode will return to normal display mode while key idle 60s. 2.The setting value flash with 1Hz. 3.When barometric alarm is triggered, the alarm will sound “BiBiBi”for 60seconds,the alarm icon and alarm character will flash with 1Hz, press any key to mute the alarm, show alarm icon and high/low alarm character accordingly on 4. - Page 13 Set year Set months Set days Key function Press 【MODE】, exit date setting,enter into time mode Press 【SET】,switch setting value:Year Months Day exit Press 【+/C/F/CLEAR】,short press add 1,long press more than 2 seconds would be a progressive increase 8Hz Press 【-/MAX/MIN】,short press reduce 1, long press more than 2 seconds have a progressive decrease 8Hz Press 【CHANNEL/LIGHT/SZ】, back light Note...
-
Page 14: Min/Max View Modes
3.7 MIN/MAX VIEW MODES: In/out MIN temperature/humity In/out MAX temperature/humidity Operation: Press 【MODE】,time mode clock alarm date mode repeat Press 【SET】, enter into all modes setting Press 【+/C/F/CLEAR】,switch temperature C/F;clear MIN,MAX temperature and humidity values when view. Press 【-/MAX/MIN】, view the MIN,MAX temperature and humidity values, MIN MAX exit Press 【CHANNEL/LIGHT/SZ】... -
Page 15: Rcc Modes
3.8 RCC MODES RCC function instruction: The conditions for the radio controlled time reception : a) Wait 3 minutes or until the outdoor temperature is displayed in the weather station. b) The receiver attempt to receive RCC signals on 12:00am, 1:00am, 2:00am and 3:00am. -
Page 16: Moon Phase
3.9 MOON PHASE 1、New Moon(First day of the Lunar month ) :0 degree; 2、Waxing Crescent(Second night of the Lunar month--Seventh day):0 degree---90 degree; 3、First Quarter(The 8th day of the Lunar month) :90 degree; 4、Waxing Gibbous(The 9th day of the Lunar month----14th day) :90 degree----180 degree;... - Page 17 No RCC function: Clock:2000-1-1,0:00:00 2099-1-1,23:59:59 (default value: 2013-1-1,AM 12:00:00) No time zone and DST function 12/24Hr format (default value: 12Hr) Temperature unit :C,F(default value:℉) Barometric pressure unit: default hPa, it can be setting manually B、Default parameter 1.Temperature&humidity indoor measuring: view one time every 30s 2.Temperature&humidity outdoor measuring:receiving 15seconds every 75s., the transmitter will transmit every 10s.
-
Page 18: Troubleshooting
situation, you can adjust time and date manually. To able ensure the data accuracy pls change the battery in time while low voltage icon appear. The wireless weather station can receive up to 3 temperature sensors.However, it should have three sensors work and each one only transmit one channel data, the channels for transmitter is setting by factory or users can stir the switch on battery compartment by selves.Besides, ensure that you leave 10 seconds in between the reception of the last sensor and the set-up of the following sensor, enable to 3 transmitters match code with... -
Page 19: Operation
humidity. Sensor error display --% on receiver. 5) Low voltage indication with flash icon show on receiver. 6) Max/Min value of temperature and humidity show on receiver. 7) 3 channel transmission.(factory setting or users can stir the switch on battery compartment by selves) 6.2 Operation 1.When the sensor powered up, it will enters into transmission mode after all LCD segments... -
Page 20: Attention
3. Put the receiver base station into the bottom case and make the ventage down. 6.5 ATTENTION 1、To able ensure the data accuracy and keep distance pls change the battery in time while low voltage icon appear. 2、Assembly as the order and instruction of above sketch. 3、The wireless weather station can receive up to 3 temperature sensors.However, it should have three sensors work and each one only transmit one channel data, the channels for transmitter is setting by factory or users can stir the switch on battery compartment by selves . - Page 21 FCC Statement Changes or modifications not expressly approved by the party responsible for compliance could void the user's authority to operate the equipment. This equipment has been tested and found to comply with the limits for a Class B digital device, pursuant to Part 15 of the FCC Rules.
Need help?
Do you have a question about the WS1066 and is the answer not in the manual?
Questions and answers