Table of Contents
Advertisement
User Manual
Please recycle this packaging responsibly.
Do not dispose of Lithium coin cell batteries with general waste.
Please return it to battery recycling collection point.
Your product and batteries must be recycled or disposed of properly.
Products showing the 'Crossed Through' wheelie bin symbol must be recycled separately from
household waste at the end of their useful life. Please DO NOT dispose of this appliance in normal
household waste. Your local appliance retailer may operate a 'take-back' scheme when you are ready to
purchase a replacement product, alternatively contact your local government authority for further help
and advice on where to take your appliance for recycling.
All trademarks are acknowledged as the property of their respective owners.
Unless otherwise stated their use does not imply that the trademark owner
is affiliated with Kondor or endorses the products herein.
Contents may vary to image shown.
JB. 6004 -A / ARCPCM20 / Made in China / © kit: is a trademark of Kondor Limited, 2017.
Christchurch, Dorset, BH23 4FL, UK
Advertisement
Table of Contents

Related Manuals for Arcade Pico CAM 2.0


Summary of Contents for Arcade Pico CAM 2.0
- Page 1 User Manual Please recycle this packaging responsibly. Do not dispose of Lithium coin cell batteries with general waste. Please return it to battery recycling collection point. Your product and batteries must be recycled or disposed of properly. Products showing the ‘Crossed Through’ wheelie bin symbol must be recycled separately from household waste at the end of their useful life.
-
Page 2: Table Of Contents
4 x Blade guards Surroundings Maintenance • 4 x Spare blades Replacing the blades Specifications • Screwdriver Flying your Pico Cam 2.0 • User manual Landing your Pico Cam 2.0 Emergency stop Basic flight controls Trimming the Drone Auto Trim calibration Speed settings... -
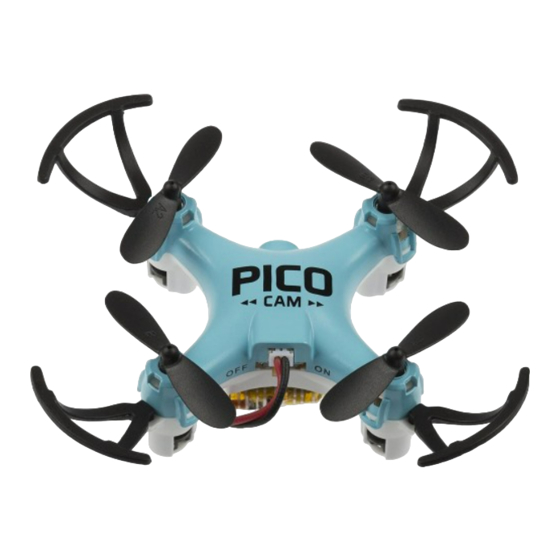
Page 3: Pico Cam 2.0 Functions
Pico Cam 2.0 functions: 1) Blade 5) Power switch 2) Blade guard 6) Battery cradle 3) LED indicators 7) Micro SD Card Slot* 4) Battery port 8) Camera side view *Micro SD card not included... -
Page 4: Controller Functions
Controller functions: Photo/Video button 10) One key take-off / Land / Emergency stop 11) Left throttle / Speed setting / Return home 12) Trim button (left spin) 13) Trim button (right spin) 14) Power LED indicator 15) Drone cover 16) Battery cover 17) Trim button (forward) 18) Trim button (backwards) 19) Right throttle / Flip / Headless mode... -
Page 5: Pre-Flight Preparation
Pre-flight preparation Remote controller 1) Carefully remove the Battery cover (16), using the Screwdriver provided Charging the battery and insert 4 x AA batteries*, according to indicated polarity. Then replace 1) Ensure the battery is removed from the Drone the back cover of the controller 2) Using the supplied USB charging cable, connect one end to the 2) Make sure the batteries (AA) are correctly installed under the supervision of battery and connect the USB end to a power supply... -
Page 6: Surroundings
Replacing the blades • The Pico Cam 2.0 Drone is fast, so when taking off, move the When replacing blades, take care to ensure that they are placed onto the Left throttle (11) upwards gradually to prevent rising too high, too quickly correct motor as shown in the diagram (using the screwdriver provided to remove and replace the holding screw). -
Page 7: Flying Your Pico Cam 2.0
Landing Flying your Pico Cam 2.0 To land the Drone, pull the Left throttle (11) downwards. Once the Drone lands Taking off on the surface, the motors will automatically turn OFF. You can also land the Drone by pressing One key land (10), and the Drone will land itself. -
Page 8: Basic Flight Controls
Trimming the drone Basic flight controls Sometimes you will find the Drone will start to drift in a particular direction of its own accord. To correct this, you can manually ‘trim’ the Drone to allow it to adjust its flight. Up/Down Below shows you how to rectify the drifting (Black arrows indicate drift direction;... -
Page 9: Auto Trim Calibration
Auto Trim calibration You can use this function to reset the Drone. Ensure the Drone Leftside Trim is on a level surface before Auto Trimming. Leftside trimmer Push both the Left throttle (11) and Right throttle (19) to the bottom left corners, at the same time. Once the lights stop flashing, the calibration is complete. -
Page 10: Speed Settings
Speed settings Flips and rolls The Pico Cam 2.0 has 3 different flight speeds to choose from; low, You can perform flips and rolls with your Drone in any of the speed settings. In order to safely perform these manoeuvres, ensure the medium and high. -
Page 11: Return Home
[…continued] To do a front flip: Press down on the Right throttle (19) Return home so that it clicks and then push it upwards. This function can be used as a tool to help you retrieve your Drone by sending it in a backwards direction from where it started facing. When the Drone first takes off, the way it is facing will act as its front direction as default. -
Page 12: Headless Mode
Return home Headless mode […continued] The Drone remembers which direction was originally forward. So, if you When first turning on the Drone, it will start with Headless mode turned off. were to take off and then spin the Drone 90 degrees to face to the right, This means that when you change direction on the controller, the Drone will when you press the Left throttle (11) for 3 seconds, the Drone will fly to respond by moving in relation to the way it is facing. -
Page 13: Using The Camera
Note: Your Micro SD Card will need formatting before use. Please refer to your PC/laptop instructions on how to do this. Note: The Pico Cam 2.0 records using FAT32 format. We recommend using a To turn OFF Headless mode, hold down Right throttle (19) for 3 seconds. -
Page 14: Troubleshooting
Troubleshooting Remote controlled aircraft: responsible flying The Drone doesn’t activate and Power LED indicator (14) keeps flashing. There are certain laws that you need to follow when you are using your Drone – for your own safety, and the safety of others: There is not enough battery power in either the Drone or the controller. -
Page 15: Safety Information
Remote controlled aircraft: responsible flying. Safety information […continued] Remember: UK Aviation Law is there to protect you and everyone else, • This product is intended for outdoor use (subject to suitable and there are severe repercussions if you break these laws, including the flying conditions) potential of criminal prosecution. -
Page 16: Maintenance
Get the Arcade Drone wet or use near water • the user or property Open up the Arcade Drone as there are no user serviceable parts inside • • Do not dispose of parts in your normal recycling bin. All parts should be Use any other mains adaptor than the one supplied •... -
Page 17: Specifications
If you experience any unusual issues with your Arcade Drone, bring it down Specifications safely, turn off the controller and the Drone immediately. Battery type and capacity 3.7 V, 150 mAh, LiPo The use and operation of this Drone is beyond our control. Warranty of the... - Page 18 Please do not attempt to open this product. There are no user serviceable parts inside, in particular if your product has an embedded, non-replaceable battery, do not attempt to access or remove the battery as this may cause personal injury and will damage the product. Making any attempt to open the product or carry out repair voids any and all warranties.
Need help?
Do you have a question about the Pico CAM 2.0 and is the answer not in the manual?
Questions and answers