Table of Contents
Advertisement
Advertisement
Table of Contents

Summary of Contents for Unihoist Ltd Graduate 150
- Page 1 Instruction Manual Graduate 150 Scholar 175 Master 200...
-
Page 2: Table Of Contents
Contents Unihoist Ltd Electric and Hydraulic illustrations ……..….. 2 - 3 Introduction ……………………………………………………….. Assembly and commissioning instructions …………....5 - 6 Safety precautions …………………..………………………. Electric hoist controls illustration ………………………………. Operating instructions ………………………………………..9 - 10 Charging instructions …………………………………………..11-12 Maintenance schedule & Daily check list …………………….. 13-15 Technical Specifications ……………………………………….. -
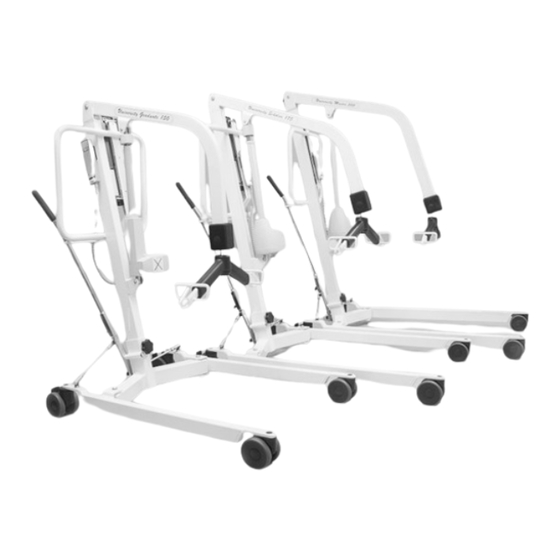
Page 3: Unihoist Ltd Electric And Hydraulic Illustrations
Unihoist Ltd Range – Graduate 150, Scholar 175 Master 200 SF25 Iss.5 July 2012... - Page 4 Unihoist Ltd Range – Graduate 150, Scholar 175 Master 200 Hydraulic Pump SF25 Iss.5 July 2012...
-
Page 5: Introduction
All patients lifted with these hoists should be assessed for suitability by trained, professional staff and be attended by a carer during use. The University Graduate 150, Scholar 175 and Master 200 are used in conjunction with a range of slings, sized to suit patients of varying builds. -
Page 6: Assembly And Commissioning Instructions
Assembly and Commissioning Instructions The packing carton contains: • Wheeled base • Mast and boom assembly • Leg opening handle • Document Wallet • Handcontrol (electric version only) • Battery charger/control box (electric version only) • Battery pack (electric version only) •... - Page 7 Assembly and Commissioning Instructions contd. 5. Remove the screw from the leg opening lever located at the rear of the chassis. Fit the leg opening handle through the gate on the mast and push the open end over the leg opening lever. Retain the handle with the screw removed earlier from the leg opening lever.
-
Page 8: Safety Precautions
Safety Precautions Please read and follow the safety precautions listed below. The operation and the use of the Unihoist patient lift is straightforward. These basic safety precautions will help make lifting operations easy and trouble free. • ALWAYS carry out the risk assessment and plan your lifting operations before commencing. -
Page 9: Electric Hoist Controls Illustration
Control Box , Battery Pack and Hand control (Pre July 2012) Control Box and Hand control (after July 2012) SF25 Iss.5 July 2012... -
Page 10: Operating Instructions
Operating a Unihoist Lift 1. Leg adjustment. The legs on a Unihoist lift can be opened for access around armchairs and wheelchairs etc. For transferring and negotiating narrow doorways and passages the legs should be in the closed position. The leg opening mechanism is located at the rear of the lift and leg adjustment is achieved by moving the leg opening handle to the left for open and the right for closed. - Page 11 Operating a Unihoist Lift contd. 8. Raising and lowering the boom (hydraulic models). The raising and lowering of the boom is achieved by a powerful hydraulic ram which is operated by two simple controls. The release valve, which is identified by an aluminium knurled knob, and the pump handle which is a long lever on the side of the hydraulic unit.
-
Page 12: Charging Instructions
Charging Instructions for the Unihoist Lift Two 12 vdc batteries are located in the power pack. They are charged through a figure of eight shaped socket in the base of the control unit. When charging is required the mains lead is plugged into a wall outlet and the socket in the base of the control box. - Page 13 Correct way to charge the battery SF25 Iss.5 July 2012...
-
Page 14: Maintenance Schedule & Daily Check List
The LOAD TEST and CERTIFICATION should only be carried out by qualified, competent personnel or an authorised service dealer. Daily Check List Unihoist Ltd strongly recommend the following daily checks are carried out before using the lift. • MAKE sure the Lift moves freely on it’s castors. - Page 15 Maintenance, Inspection and Test Unihoist Ltd recommend a through inspection and test of the Unihoist mobile lifting accessories, slings etc. is carried out every six months. The examination and test should be conducted according to the recommendations and procedures below.
- Page 16 Maintenance, Inspection and Test contd. • ENSURE all four castors are in contact with the floor when the hoist is moved. • EMERGENCY DOWN: Check emergency down functions - control box and actuator (on 2012 models). • HYDRAULIC UNIT: The hydraulic unit should require no maintenance other than checking for correct operation and leakage of hydraulic fluid.
-
Page 17: Technical Specifications
Technical Specifications SF25 Iss.5 July 2012... - Page 18 Technical Specifications Specifications are for reference only and may vary due to manufacturing tolerances Electrical Specifications • Batteries 2 x 12 volt Rechargeable sealed lead acid type • Battery Capacity 2.9 Ampere hours • Charger Rated Input 230Vac 50/60 Hz •...
-
Page 19: Slings For Use With The Unihoist
Slings for use with the Unihoist Ltd Mobile Hoist Range Unihoist Ltd has designed a range of slings to be used with the Unihoist Ltd mobile hoist range: • Easifit Sling • Easifit Deluxe Sling • Toileting Sling • Deluxe Hammock Sling Special requirement slings can be made to customers own specifications. -
Page 20: Sling Chart
Sling Chart SF25 Iss.5 July 2012... -
Page 21: Sizing And Washing Instructions
The maximum safe working load of the Easifit Sling is 210 kgs. Important: All slings in the Unihoist Ltd range are rated at a safe working load of 210kgs. This is to ensure that any of these slings can be used with safety. It is important to take the safe working load of the lift as the maximum permissible load of any lifting operation. -
Page 22: Instruction Guide For The Easifit Sling
RECUMBENT positions. The Easifit sling has been designed to fit on the standard six hook spreader bar. Unihoist Ltd recommend slings are checked regularly and before use for fraying and damage. DO NOT use any slings which are worn or damaged. - Page 23 S S i i t t t t i i n n g g , , S S i i t t t t i i n n g g / / R R e e c c l l i i n n i i n n g g P P o o s s i i t t i i o o n n Fig.
- Page 24 L L y y i i n n g g d d o o w w n n p p o o s s i i t t i i o o n n ( ( R R e e c c u u m m b b e e n n t t ) ) Fig.7 "Log roll"...
-
Page 25: Instruction Guide For The Easifit Deluxe Sling
The Easifit Deluxe sling has been designed for use with the six hook spreader bar. Unihoist Ltd recommend slings are checked regularly and before use for fraying and damage. DO NOT use any slings which are worn or damaged. SF25 Iss.5 July 2012... - Page 26 S S i i t t t t i i n n g g , , s s i i t t t t i i n n g g / / r r e e c c l l i i n n i i n n g g P P o o s s i i t t i i o o n n Fig.
- Page 27 A A l l t t e e r r n n a a t t i i v v e e s s i i t t t t i i n n g g , , s s i i t t t t i i n n g g / / r r e e c c l l i i n n i i n n g g Fig.
-
Page 28: Instruction Guide For The Trinity Toileting Sling
Toileting Sling The toileting sling has been designed for use with the six hook spreader bar. Unihoist Ltd recommend slings are checked regularly and before use for fraying and damage. DO NOT use any slings which are worn or damaged. - Page 29 S S i i t t t t i i n n g g p p o o s s i i t t i i o o n n Fig.19 Fig.20 Place the sling down the back to a position Raise the clients leg and feed the leg strap just beneath the shoulder blades and under and up between the legs.
-
Page 30: Instruction Guide For The Deluxe Hammock Sling
The Deluxe Hammock sling has been designed for use with the six hook spreader bar. Unihoist Ltd recommend slings are checked regularly and before use for fraying and damage. DO NOT use any slings which are worn or damaged. SF25 Iss.5 July 2012... - Page 31 S S i i t t t t i i n n g g P P o o s s i i t t i i o o n n Fig.23 Fig.24 Ensure the hand grips are on the outside, Raise the clients leg and feed the 1st leg away from the client.
-
Page 32: Trouble Shooting Guide
Trouble Shooting Guide Symptom Possible Cause Remedy Nothing happens when 1. Emergency stop 1. Reset emergency stop switch the handset buttons are button pressed in. pressed 2. Handset not plugged in 2. Plug in correctly 3. Actuator not plugged in 3. -
Page 33: Servicing, Repairs, Inspections And Testing
Included with each lift is a Customer Satisfaction card. Please take the time to fill it in and return it to Unihoist Ltd. Our products are guaranteed for a period of twelve months from the date of manufacture or twelve months from the date of purchase if commissioned by an authorised dealer. - Page 34 Unihoist Ltd Unit C, Anvil Court, Stanton Harcourt Road, Eynsham, Oxon. OX29 4UD Tel: 01865 881881 Fax: 01865 883434 Email: unihoistltd@btconnect.com or sales@unihoist.co.uk www.unihoist.co.uk SF25 Iss.5 July 2012...
Need help?
Do you have a question about the Graduate 150 and is the answer not in the manual?
Questions and answers