Table of Contents
Advertisement
Quick Links
Advertisement
Table of Contents

Subscribe to Our Youtube Channel
Summary of Contents for AVGO CR7002E-PA
- Page 1 CR7002E-PA Troubadour Turntable Instruction Manual...
-
Page 2: Safety Instructions
English Safety Instructions Read and understand this entire manual before using this product. Keep these instructions for future reference. 1. Read Instructions - All the safety and operating instructions should be read before the product is operated. 2. Retain instructions - The safety and operating instructions should be retained for future reference. - Page 3 English 17. Servicing - Do not attempt to service this product yourself as opening or removing covers may expose you to dangerous voltage or other hazards. Refer all servicing to qualified service personnel. 18. Damage Requiring Service - Unplug this product from the wall outlet and refer servicing to qualified service personnel under the following conditions;...
-
Page 4: Specifications
English Items in this package Before throwing away any packaging materials, please check thoroughly and make sure you find the following items that come along with this package: Turntable Remote Control 45 RPM adapter 3.5mm aux in cable ... -
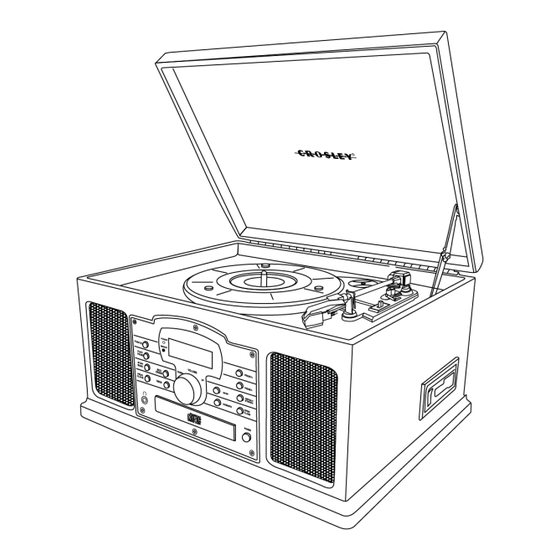
Page 5: Product Description
English Product Description... - Page 6 English...
-
Page 7: Initial Setup
English Initial Setup Essential Setup 1. Remove packing materials from unit. Note: Save all packing materials 2. AC adaptor and remote control are located on the outside of the styrofoam packaging. 3. Remove plastic bag covering radio and remote control. 4. -
Page 8: Aux Input Connection
English Aux Input Connection You can connect an audio device to this unit and play your music through its speakers. To do this, press the AUX button to set the unit to Aux In mode, connect the 3.5mm auxiliary cable between your audio device and the Line In Jack of this unit and start playing. - Page 9 English Setting The Timer The unit can be used as an alarm clock, whereby the selected source (CD, TUNER, OR PHONO) to start playback at a preset time. Make sure the clock is set before using the timer. 1. In the standby mode, press and hold Timer over 1 second, icon " " and message”...
- Page 10 English Sleep Sleep mode allows the unit to operate for a pre-set amount of time, and then automatically turns off. On the remote control, press SLEEP repeatedly to select the desired time period options (in minutes): Display shows in sequence: SLEEP 90, 80, 70, 60, 50, 40, 30, 20, 10 Display shows the selected option briefly and returns to its previous status.
-
Page 11: Bluetooth Operation
English Bluetooth Operation 1. Press the Function button to switch to Bluetooth mode. 2. The LED indicator will flash indicating that it is searching for a nearby Bluetooth enabled device to connect to. 3. On your Bluetooth enabled device, search for nearby devices. When your device finds “CR7002”... - Page 12 English 4. Track NO. 1 will be playback automatically after finish the reading CD disc contents. 5. Press FF or FB once or repeatedly until the desired track number appears in display. 6. Press Stop/Band to stop playback. CD-MP3 disc playback 1.
-
Page 13: Radio Operation
English 2. Press FF or FB once or repeatedly until the desired track number appears in the display. For MP3: press PRESET + or PRESET – to select the desired album. 3. Press Program to confirm, display shown stored track no. and next store position. - Page 14 English 1. Tune to your desired station. 2. Press PROGRAM to activate programming, icon “MEMORY” and P01 will start flashing. 3. Press PRESET + or PRESET – to allocate a number from 1 to 20 stations 4. Press PROGRAM to confirm, display shows the preset number waveband and the frequency of the preset station.
-
Page 15: Cassette Operation
English Cassette Operation 1. Press the Function button to set the unit to PHONO mode. 2. While in Phono mode, insert a prerecorded tape through the CASSETTE DOOR. 3. Adjust the volume level by turning the VOLUME DOWN/UP KNOB. 4. For fast forwarding, press the EJECT/F.F. halfway in. Pressing again will stop the fast forwarding and return the cassette to the playing mode. -
Page 16: Troubleshooting
English Troubleshooting There is no power Make sure radio is plugged in correctly. Look at the STAND BY INDICATOR and check to see if it is red. If the red light is on, press the POWER button to turn the unit on. There is no sound ...
Need help?
Do you have a question about the CR7002E-PA and is the answer not in the manual?
Questions and answers