Table of Contents
Advertisement
Quick Links
Advertisement
Table of Contents

Summary of Contents for BenQ T3300
- Page 1 T3300 Ultrasound System Basic Operating Instructions...
-
Page 2: Table Of Contents
Inserting a microSD Card ........................32 Using the Stand ........................... 33 Charging the System ........................... 33 Installing the Transducer Holder......................34 Connecting the Transducer ......................... 35 Removing the Transducer ........................36 Using the System On The Go......................37 T3300 Diagnostic Ultrasound System B00601-010 4/10/17... - Page 3 Splitting the Imaging Screen .......................63 Freezing an Image..........................65 Adding Annotations..........................65 Arrow ............................66 Annot ............................66 Label............................66 Body Mark ...........................67 Adding Measurements......................... 68 Measuring in B/Color/Power Modes....................69 Measuring in M-Mode........................70 Measuring in Spectral Doppler Mode ..................71 T3300 Diagnostic Ultrasound System B00601-010 4/10/17...
- Page 4 Selecting M Process........................84 Inverting the M-Mode Trace Display ...................84 Spectral Doppler Mode Image Controls....................85 Overview .............................85 Adjusting Baseline........................86 Adjusting Sample Volume (SV) Size ...................86 Adjusting Correction Angle......................86 Updating the 2D Display......................86 Chapter 8: System Customization......................87 T3300 Diagnostic Ultrasound System B00601-010 4/10/17...
- Page 5 P42B6 Transducer ........................118 Appendix D: Acoustic Output Reporting Tables for Track 3 .............. 119 Definition of Terms Used in Acoustic Output Tables ..............119 Acoustic Output Tables for T3300 Transducers ................121 Appendix E: FCC Statement......................155 Federal Communications Commission (FCC) Statement ............155...
-
Page 6: Chapter 1: Read This First
"Chapter 2 Safety Information". Copyright Copyright 2017 BenQ Medical Technology. All rights reserved. No part of this publication may be reproduced, transmitted, transcribed, stored in a retrieval system or translated into any language or computer language, in any form or by any means, electronic, mechanical, magnetic, optical, chemical, manual or otherwise, without the prior written permission of BenQ Medical Technology. -
Page 7: Intended Audience
Intended Use The T3300 is a general-purpose ultrasonic imaging instrument intended for use by a qualified physician for ultrasound evaluation/clinical analysis etc. It can be used in the following applications: Abdomen, Cardiology, Gynecology, Obstetric, Breast, Thyroid, Musculoskeletal, Vascular (Carotid, Venous, Arterial), Nerve, Renal, Urology and so on. -
Page 8: Warnings
Misuse or abuse could cause physical injury. • If embedded electrolyte leakage occurs, wash your skin with large amounts of water to prevent skin irritation and inflammation. T3300 Diagnostic Ultrasound System B00601-010 4/10/17... -
Page 9: Equipment List
• Warranty Card • Basic Operating Instructions (this document) • AC plugs • One or more BenQ Medical Technology Transducers WARNINGS • AC plug types vary by country/region. • Using accessories, transducers, or power supply units other than those specified may cause the warranty to void and result in increased emissions, decreased EMI immunity of the system, or even damages to the system and personal injuries. -
Page 10: System Warranty
"Contact Information" on page 2. This Device is for medical care person use only. Only Professionals can install it. To maintain the device operation during the line power off, the device is battery included. T3300 Diagnostic Ultrasound System B00601-010 4/10/17... -
Page 11: Chapter 2: Safety Information
"Biological Safety" on page 16 • "Operator Safety" on page 18 • "Waterproof and Dustproof Ratings" on page 19 • "Understanding the MI/TI Display" on page 19 • "Transducer Surface Temperature Rise" on page 22 T3300 Diagnostic Ultrasound System B00601-010 4/10/17... - Page 12 CAUTION Using accessories, transducers, peripherals, or cables not supplied with the system or recommended by BenQ Medical Technology can affect the system in the form of increased emissions or decreased immunity to external EMI/EMC occurrences. Non-specified peripherals, and cables in some cases, can also increase leakage current or compromise the safety of the grounding scheme.
-
Page 13: Symbols
IEC 60601-1. • Images printed on a report printer are intended only for reference and should not be used for diagnostic purposes. • For proper disposal of this system, contact your local BenQ Medical Technology representative. Symbols The following symbols provide information about the system’s labels and regulatory compliance. -
Page 14: System Label Icons
Include RF transmitters, apply RF electromagnetic energy for diagnosis Tablet IP Code, International Protection Marking 2.1.2 System Button Table 2 System Button Symbols Descriptions Power button Press and hold the Power button to turn on/off the system. T3300 Diagnostic Ultrasound System B00601-010 4/10/17... -
Page 15: Shipping Label Icons
Only trained medical personnel should operate this system. This system complies with the following standards: • Electrical: – IEC 60601-1:2005+AMD1:2012/EN 60601-1:2006+A1:2013+A12:2014 – IEC 60601-2-37:2008+AM1:2011 • EMC/EMI: – IEC 60601-1-2:2007/AC:2010, CISPR 11 Group I Class B T3300 Diagnostic Ultrasound System B00601-010 4/10/17... -
Page 16: Battery Usage/Disposal
• Incorrect use of the battery may cause a leak of chemicals or explosion. The leak of chemicals may harm the skin. If any chemicals leak from the device, use a dry cloth to wipe it clean and contact your local BenQ Medical Technology representative for help. CAUTION CAUTION Dispose of used batteries according to the instructions. -
Page 17: Electromagnetic Interference (Emi)
All Equipment The system is intended for use in the electromagnetic environment specified below. The customer or operator of the T3300 Diagnostic Ultrasound System should ensure that it is used in such an environment. Guidance and Manufacturer’s Declaration - Electromagnetic Emissions - All Equipment Table 4 Guidance and Manufacturer’s Declaration - Electromagnetic Emissions - All Equipment... - Page 18 IEC 60601 test level Compliance level Guidance Portable and mobile RF communications equipment should be used no closer to any part of the T3300 Diagnostic Ultrasound System, including cables, than the recommended separation distance calculated from the equation applicable to the frequency of the transmitter.
- Page 19 2.2.3.2 Separation Distances The T3300 Diagnostic Ultrasound System is intended for use in the electromagnetic environment in which radiated disturbances are controlled. The customer or operator of the system can help prevent electromagnetic interference by maintaining a minimum distance between portable and...
-
Page 20: Surges To Ac Power Mains
• When positioning the system, move it carefully to avoid pinching hands or extremities against other objects, such as a bed rail. • Do not roll the system over transducer cables or power cords. Equipment Protection Observe the following precautions to protect your system. T3300 Diagnostic Ultrasound System B00601-010 4/10/17... -
Page 21: Rf Safety
T3300 Diagnostic Ultrasound System B00601-010 4/10/17... -
Page 22: Heating
• Operators should continually monitor the on-screen thermal index (TI) and mechanical index (MI) values and use control settings that keep these settings as low as possible while still achieving diagnostically useful results. In obstetric examinations, TIS (soft tissue thermal index) T3300 Diagnostic Ultrasound System B00601-010 4/10/17... -
Page 23: Operator Safety
If you believe contamination of the system might occur during an exam, it is recommended that you take universal precautions and cover the system with a disposable drape. Consult your facility's rules regarding equipment use in the presence of infectious disease. T3300 Diagnostic Ultrasound System B00601-010 4/10/17... -
Page 24: Waterproof And Dustproof Ratings
Table 10 MI/TI generating from applicable transducer/mode combinations P42B6 Phased C62B Curved Mode / L154BH Linear Array 64 elements Linear Array 2- Transducer Array 4-12 MHz 2-4 MHz 6 MHz B+Color B+Power B+M-Mode PW Doppler T3300 Diagnostic Ultrasound System B00601-010 4/10/17... - Page 25 De-rating factor R for the various distances and frequencies with attenuation coefficient 0.3 dB cm in homogeneous soft tissue is listed in the following table. An example is if the operator uses T3300 Diagnostic Ultrasound System B00601-010 4/10/17...
- Page 26 Thermal Index (TI) consists of two indices: soft tissue (TIS) and bone (TIB). TIB is only displayed in non-scanning modes, such as M-mode, PW mode and CW mode. TIS is displayed in all scan T3300 Diagnostic Ultrasound System B00601-010 4/10/17...
-
Page 27: Display And Report In Different Modes
The temperatures were measured in accordance with EN 60601-2- 37 cl.201.11 and cl.201.13 with controls and settings positioned to give maximum temperatures. Table 12 Transducer surface temperature rise Test External use (°C) P42B6 C62B L154BH Simulated use Still air T3300 Diagnostic Ultrasound System B00601-010 4/10/17... -
Page 28: Chapter 3: Overview
This chapter covers the following topics: • "System Capabilities" on page 24 • "System Overview" on page 26 • "Transducer Overview" on page 29 • "Indications for Use and Supporting Transducers" on page 29 T3300 Diagnostic Ultrasound System B00601-010 4/10/17... -
Page 29: System Capabilities
Overview System Capabilities The T3300 Ultrasound System is intended for Obstetric imaging, Gynecology imaging, Cardiac imaging, Vascular imaging, and general imaging purpose, and related analysis. The system can be used for 2D grayscale (B-Mode), M-Mode, Color, Power, PW and CW imaging depending on the transducer. -
Page 30: Connectivity
• USB and Bluetooth connectivity to peripheral devices such as a Keyboard (not supplied with the system) • HDMI connectivity to secondary monitors • Printing to local/network printers • Wireless and Wired networking • DICOM networking • Patient data imported from MWL server • Image export to network storage T3300 Diagnostic Ultrasound System B00601-010 4/10/17... -
Page 31: System Overview
MicroSD card slot exchange data from/to the system. (See page 32) AUX port For use by authorized service personnel only Connect the system to an HDMI (High-Definition HDMI port Multimedia Interface) device. (See page 39) T3300 Diagnostic Ultrasound System B00601-010 4/10/17... - Page 32 The system supports access to only one external storage device at a time. If you connect more than one external storage device, they function in the following priority order: USB 3.0 > USB 2.0 > microSD card. T3300 Diagnostic Ultrasound System B00601-010 4/10/17...
-
Page 33: Rear And Top/Bottom Views
• Can be used as a handle to carry the system around. (See "Using the System On The Go" on page 37) Press and hold the Power button to turn Power button on/off the system. T3300 Diagnostic Ultrasound System B00601-010 4/10/17... -
Page 34: Transducer Overview
Orientation marker Transducer lens NOTE Use only transducers that are approved by BenQ Medical Technology for use with the system. 3.3.1 Clinical Applications and Transducers A clinical application, available for one or more transducers, optimizes the system for a specific application. - Page 35 Overview The following table provides Diagnostic Ultrasound Indications for Use Forms for the transducers offered with the T3300 Diagnostic Ultrasound System. Table 5 Indications for Use and Supporting Transducers Indications for Use Supporting Transducers Cardiac Adult P42B6 Obstetric C62B Musculoskeletal (Conventional)
-
Page 36: Chapter 4: Preparing The System
"Connecting the Transducer" on page 35 • "Removing the Transducer" on page 36 • "Using the System On The Go" on page 37 • "Outputting the System Display to an HDMI-Enabled TV or Monitor" on page 39 T3300 Diagnostic Ultrasound System B00601-010 4/10/17... -
Page 37: Inserting A Microsd Card
• The system supports access to only one external storage device at a time. If you connect more than one external storage device, they function in the following priority order: USB 3.0 > USB 2.0 > microSD card. T3300 Diagnostic Ultrasound System B00601-010 4/10/17... -
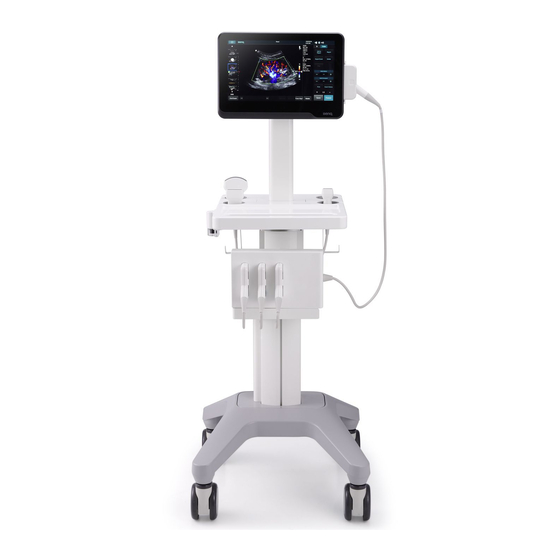
Page 38: Using The Stand
3. Insert the matching AC plug fully into the power adapter. 4. Plug the AC plug of your power adapter into an electric outlet to start charging. The battery indicator lights up in solid orange. WARNINGS T3300 Diagnostic Ultrasound System B00601-010 4/10/17... -
Page 39: Installing The Transducer Holder
2. Align the hole on the transducer holder with the hole patterns of the system. 3. Rotate the screw clockwise through the upper hole of the transducer holder to tighten the transducer holder to the system. T3300 Diagnostic Ultrasound System B00601-010 4/10/17... -
Page 40: Connecting The Transducer
2. Place the transducer in the transducer holder and ensure that the cable hangs down smoothly from the opening of the transducer holder. T3300 Diagnostic Ultrasound System B00601-010 4/10/17... -
Page 41: Removing The Transducer
Preparing the System Removing the Transducer Press and hold the release latch, and carefully pull out the transducer. T3300 Diagnostic Ultrasound System B00601-010 4/10/17... -
Page 42: Using The System On The Go
1. Lift the stand by 180 degrees. 2. Use the stand as a handle to carry the system around. 3. To release the handle from 180 degrees, apply a pulling force to overcome the resistance in the magnetic field. T3300 Diagnostic Ultrasound System B00601-010 4/10/17... -
Page 43: Wall-Mounting Your Tablet
To facilitate your operation without scratching the touch screen, lay the system face-down on a cushioned surface before fixing the stand. 2. Position the system precisely to the front of the mount plate where the hole patterns on both the back of the system and the plate meet. T3300 Diagnostic Ultrasound System B00601-010 4/10/17... -
Page 44: Outputting The System Display To An Hdmi-Enabled Tv Or Monitor
• We suggest using a monitor or TV which supports 1080p (1920x1080) resolution as an external display for your system. • See the documentation of your HDMI-enabled TV or monitor for detailed information on connections and settings. T3300 Diagnostic Ultrasound System B00601-010 4/10/17... -
Page 45: Chapter 5: Using The System
"Managing the System Power" on page 52 • "Managing Disk Space" on page 53 • "Network Configuration" on page 54 • "DICOM Configuration" on page 55 • "Casting the System Screen to an External Display" on page 57 T3300 Diagnostic Ultrasound System B00601-010 4/10/17... -
Page 46: Turning On/Off The System
After turning on the system, one of the following main screens appears. • If no transducer is connected, the system enters the system menu screen. No probe is connected Patient Worklist Exam History Report Preset Review Settings T3300 Diagnostic Ultrasound System B00601-010 4/10/17... -
Page 47: Setting The System Time And Date
– To set the time, scroll to select the hours, minutes, and AM or PM. 3. Touch Done. Touch to leave the setting. NOTE Check and correct current system time and date based on your location every month to ensure the accuracy. T3300 Diagnostic Ultrasound System B00601-010 4/10/17... -
Page 48: Controlling The System
Alternatively, you can add pointing or input devices by connecting them to the USB ports on the system. Table 1 Gestures Touch Touch and Hold Drag Double-Tap Press and Tap Two-Finger Tap Flick Pinch Spread T3300 Diagnostic Ultrasound System B00601-010 4/10/17... -
Page 49: Gestures For Controlling The Real-Time/Frozen Imaging Screens
1. Touch and hold one finger on the Spectral Doppler cursor. correction angle 2. Flick another finger to the left or right. 1. Touch and hold on the baseline. Adjust the PW/CW baseline 2. Flick vertically to change the baseline position. T3300 Diagnostic Ultrasound System B00601-010 4/10/17... -
Page 50: Gestures For Controlling The Frozen Imaging Screen
Table 5 Function and Description of System Menu NO. Function Description Patient Edit current or add new patient information. Load the DICOM Modality Worklist (MWL) that contains patient Worklist information as well as the requested procedure electronically via the MWL query. T3300 Diagnostic Ultrasound System B00601-010 4/10/17... -
Page 51: Imaging Screen (Real-Time)
Gain Depth Focus Full Screen Color Power Save Freeze Fn Key Tuning Home Penetration General Resolution End Exam Table 6 Real-time Imaging No. Function System menu button Enter the system menu screen. Depth scale T3300 Diagnostic Ultrasound System B00601-010 4/10/17... - Page 52 Touch this button to enable optimizing the image quality during a real-time scan. To turn it off, press and hold the button. Fn Key button Assign this button as a shortcut to perform a function. T3300 Diagnostic Ultrasound System B00601-010 4/10/17...
-
Page 53: Imaging Screen (Frozen)
Control panel Control panel Transducer Distance Depth Ellipse Trace Angle Calc Erase Measure Annot Label Arrow BDMK Play Erase Annot Freeze Save Set start Set end Fn Key Home End Exam T3300 Diagnostic Ultrasound System B00601-010 4/10/17... - Page 54 During playback of the image loop, touch this button to set the start point of the image loop. The progress bar Used to track the frames (in a continuous image loop) just scanned and the number of the current frame. Image loop. This image is added to a report. T3300 Diagnostic Ultrasound System B00601-010 4/10/17...
-
Page 55: Quick Setup
Check and manage outgoing queues to the DICOM server. (See page 55) • : DICOM Disconnected • : DICOM Connected Set current date and time. (See page 42) Adjust the volume. Adjust the brightness. T3300 Diagnostic Ultrasound System B00601-010 4/10/17... -
Page 56: Virtual Keyboard
Table 9 Scan Properties Display No. Function Transducer type Thermal index/Mechanical index Depending on the transducer connected and the scan mode selected, corresponding scan parameters are displayed. (See "Using Image Controls" on page 78) Color/Power wedge Grayscale wedge T3300 Diagnostic Ultrasound System B00601-010 4/10/17... -
Page 57: Switching The Control Panel
(See page 53) along with the percentage of battery power remaining are shown on the system toolbar (See page 50). Always monitor the power level of the battery when you operate the system on battery power. T3300 Diagnostic Ultrasound System B00601-010 4/10/17... -
Page 58: Battery Status Icons
The system sends warning messages when its available disk space reaches any of the following level: • The image storage is low: The disk space available for storing images is low. Delete some stored exams to ensure that there will be enough room for new images. T3300 Diagnostic Ultrasound System B00601-010 4/10/17... -
Page 59: Network Configuration
(See page 50). Touch Wifi to go to Wifi settings. 2. On the available network list, select an access point on an existing wireless network with your DICOM server, and enter the required settings. T3300 Diagnostic Ultrasound System B00601-010 4/10/17... -
Page 60: Connecting The System To A Bluetooth Device
– Worklist SCP: Contain scheduled patient procedure data and is used to import the data into the patient information form. 2. Assign a name to the server and enter it in the Name field. T3300 Diagnostic Ultrasound System B00601-010 4/10/17... -
Page 61: Local Host
In the Outgoing Queue section, touch Edit. • To re-send the task to the DICOM server, touch Retry. • To cancel the ongoing task, touch Stop. • To clear all tasks from the outgoing queue, touch Clear all history. T3300 Diagnostic Ultrasound System B00601-010 4/10/17... -
Page 62: Casting The System Screen To An External Display
NOTE To disable the casting display function: On the system, open the Quick Setup menu and touch Cast Display Off > the device name > Forget. T3300 Diagnostic Ultrasound System B00601-010 4/10/17... -
Page 63: Chapter 6: Performing An Exam
72). 9. (Optional) Review the images (See page 72), generate a report and export the exam (See page 75). 10. End the exam (See page 77). Refer to the following sections for detailed instructions. T3300 Diagnostic Ultrasound System B00601-010 4/10/17... -
Page 64: Starting A New Exam
> Patient. Existing information of the current patient displays on the Patient screen. 2. Enter the new information in the desired fields. 3. The patient information is saved automatically. Proceed with real-time scanning of this patient by touching Start Exam. T3300 Diagnostic Ultrasound System B00601-010 4/10/17... -
Page 65: Loading A Worklist
The system provides predefined presets for all supported transducers. Choosing an exam loads optimized presets for image control settings, based on the anatomy to be scanned, the transducer used, and the scan mode. The presets also specify the measurements appropriate for the exams. T3300 Diagnostic Ultrasound System B00601-010 4/10/17... -
Page 66: Customizing A Preset
2. Touch Save to save changes. 6.4.4 Exporting and Importing Customized Presets On the Preset screen, touch Export/Import to export/import customized presets to/from your external storage. T3300 Diagnostic Ultrasound System B00601-010 4/10/17... -
Page 67: Setting The Transducer Orientation
Use the image control settings to further optimize the image. (See "Using Image Controls" on page 78) You can also perform the following operations to adjust the contents of the imaging window. T3300 Diagnostic Ultrasound System B00601-010 4/10/17... -
Page 68: Enlarging An Area Of The Image
On the real-time imaging screen, touch Dual. The system immediately freezes the current scan, and copies the current settings for the image to the second screen. Two yellow bars will be added to the T3300 Diagnostic Ultrasound System B00601-010 4/10/17... - Page 69 2D real-time scan and turns it into a frozen B+Color or B+Power mode image. To leave the dual screen, touch Dual, or touch Home to return to the real-time B-mode. NOTE To enable dual screen when the scan is frozen, touch > Compare. T3300 Diagnostic Ultrasound System B00601-010 4/10/17...
-
Page 70: Freezing An Image
NOTE You can select whether to keep or erase the annotations added after you return to the live scan by touching > Settings > Workflow > (Auto-clear Annotation after Unfreeze) > select an option. T3300 Diagnostic Ultrasound System B00601-010 4/10/17... -
Page 71: Arrow
Touch anywhere on the imaging area to finish editing. • To restore the annotated texts or text labels to the default text home position, simply touch a set of texts, touch to close the keyboard, then touch home. T3300 Diagnostic Ultrasound System B00601-010 4/10/17... -
Page 72: Body Mark
Repeat this action, if needed, to continue erasing annotations. • To directly erase all annotations, touch and hold Erase Annot. • To delete the body mark added, touch BDMK > Erase. T3300 Diagnostic Ultrasound System B00601-010 4/10/17... -
Page 73: Adding Measurements
• You can select whether to keep or erase the measurements added after you return to the live scan by touching > Settings > Workflow > (Auto-clear Measurement after Unfreeze) > select an option. T3300 Diagnostic Ultrasound System B00601-010 4/10/17... -
Page 74: Measuring In B/Color/Power Modes
2. Drag the first target cursor along one side of the desired area, and release it to draw the first line. 3. Drag the second target cursor along the other side of the area, and release it to draw the second line. The angle between the two lines is then formed T3300 Diagnostic Ultrasound System B00601-010 4/10/17... -
Page 75: Measuring In M-Mode
1. Touch Slope. A crosshair cursor with horizontal and vertical axes appears on the time series window. Drag the cursor to a desired start point and release it. 2. A second cursor appears. Drag it to the end point then release it to complete measurement. T3300 Diagnostic Ultrasound System B00601-010 4/10/17... -
Page 76: Measuring In Spectral Doppler Mode
3. A third cursor appears. Drag it to the second peak of the graph and release it to complete the trace. 6.10.3.3 Auto Trace Trace the spectrum of Doppler waveforms. Touch Auto Trace. The trace for the Doppler spectrum will be performed automatically with measurements calculated and displayed on the screen. T3300 Diagnostic Ultrasound System B00601-010 4/10/17... -
Page 77: Saving And Printing The Image
On the frozen imaging screen, touch Print to print out the current image. 6.12 Reviewing the Image On the frozen imaging screen, flick vertically on the thumbnail list to view the thumbnails of all the saved images/loops. T3300 Diagnostic Ultrasound System B00601-010 4/10/17... -
Page 78: Performing Multiple Selections
2. Flick vertically on the thumbnail window and touch to select multiple images/loops as expected. – To quickly select all images, touch Select All. – To cancel all selections, touch Deselect All. 3. Touch an action button. For example, touch Delete to delete all selected images/loops. T3300 Diagnostic Ultrasound System B00601-010 4/10/17... -
Page 79: Comparing Images
You can still add/remove images to/from the report without going back to the Review screen. Touch Add Image to display the image editing screen. Check/uncheck the desired images and touch Report. 5. Touch Image Layout +/- to select the number of columns for placing the images on a report. T3300 Diagnostic Ultrasound System B00601-010 4/10/17... -
Page 80: Exporting The Exam
Exam) > Yes. • To configure DICOM settings, see "DICOM Configuration" on page 6.14 Managing the Exam History You can check and update status of all the stored exams from the Exam History screen. T3300 Diagnostic Ultrasound System B00601-010 4/10/17... -
Page 81: Resuming An Exam
To start a new exam from a patient with an existing exam, check the exam and touch Exam. 6.14.3 Finishing Exams To update the exam status as “Complete”, multi-check the exams and touch Complete. 6.14.4 Deleting Exams Multi-check the exams and touch Delete Exam to delete exams. T3300 Diagnostic Ultrasound System B00601-010 4/10/17... -
Page 82: Exporting Exams
• To export exams to the DICOM server, you need to configure the DICOM settings first. (See "DICOM Configuration" on page 55) • To check the exam status, touch > Exam History. (See "Managing the Exam History" on page 75) T3300 Diagnostic Ultrasound System B00601-010 4/10/17... -
Page 83: Chapter 7: Using Image Controls
All of the information in this chapter pertains to real-time imaging. Many of the controls and functions change when you freeze the scan. For information on using functions when the scan is frozen, see "Adding Annotations" on page 65 "Adding Measurements" on page T3300 Diagnostic Ultrasound System B00601-010 4/10/17... -
Page 84: B-Mode Image Controls
(based on travel time). Touch to display the TGC sliders on the screen. To increase/decrease the gain at the desired section (depth) of the image, drag the corresponding slider to the right/left. T3300 Diagnostic Ultrasound System B00601-010 4/10/17... -
Page 85: Adjusting The Scan Depth
Chroma +/- to adjust the tone. 7.1.13 Adjusting Steer Angle Optimize the viewing area by adjusting the steer angle. This function works only with linear array transducers. Touch Steering +/- to adjust the angle. T3300 Diagnostic Ultrasound System B00601-010 4/10/17... -
Page 86: Adjusting The Sector Width And Position
NOTE The system does not support the biopsy guide function. Do not use nor assemble any kind of needle guide kits/brackets on the transducer supported to avoid transducer damage or hurting the patient. T3300 Diagnostic Ultrasound System B00601-010 4/10/17... -
Page 87: Color/Power Mode Image Controls
Color Power mode image Power controls Save Freeze Tuning Home End Exam Penetration General Resolution Fn Key Both Color and Power modes can work with other scan modes to form duplex and triplex modes. T3300 Diagnostic Ultrasound System B00601-010 4/10/17... -
Page 88: Adjusting Pulse Repetition Frequency (Prf)
M-Mode Image Controls 7.3.1 Overview M-Mode imaging is used simultaneously with 2-dimensional (B-mode) imaging to determine patterns of motion for objects within the ultrasound beam. M-Mode displays scan data of the anatomy in the T3300 Diagnostic Ultrasound System B00601-010 4/10/17... -
Page 89: Using Steer M
M Process +/- to select a desired method. 7.3.5 Inverting the M-Mode Trace Display Invert the M-Mode trace display in relation to brightness. Touch Video Invert to swap the colors on the M-Mode trace display. T3300 Diagnostic Ultrasound System B00601-010 4/10/17... -
Page 90: Spectral Doppler Mode Image Controls
CW mode examines the flow data along the Spectral Doppler cursor rather than a small region. Cardiac Gain Spectral Doppler cursor Steering CW cursor Angle Invert -60,0,60 CW mode image information Color Update Power Freeze Save End Exam Home Fn Key Tuning T3300 Diagnostic Ultrasound System B00601-010 4/10/17... -
Page 91: Adjusting Baseline
7.4.5 Updating the 2D Display Select whether or not to continue scanning the anatomy while acquiring PW Doppler scan data. Touch Duplex Triplex to enable/disable this function. T3300 Diagnostic Ultrasound System B00601-010 4/10/17... -
Page 92: Chapter 8: System Customization
Use the setup tools to adjust sets of controls for defaults and other settings.This chapter covers the following topics: • "Customizing Your System" on page 88 • "Servicing your system" on page 90 T3300 Diagnostic Ultrasound System B00601-010 4/10/17... -
Page 93: Customizing Your System
Auto-add BDMK after Live Scan: Enable adding a body mark each time you start a new scan. 8.1.5.2 Annotation • Auto-clear Annotation after Unfreeze: Enable clearing all the annotations added automatically after returning to the real-time scan. T3300 Diagnostic Ultrasound System B00601-010 4/10/17... -
Page 94: Imaging
List: Touch Edit, select an application and check/uncheck each label to re-arrange the label list, then touch Save. 8.1.8 BDMK (Body Mark) • Default BDMK for Application: Touch Edit, select an application and touch a desired body mark to set it as default, then touch Save. T3300 Diagnostic Ultrasound System B00601-010 4/10/17... -
Page 95: Measurement
If you encounter any problem using the system, need to update software, backup and restore data or use the on board diagnostic tools, select the service tools. Some functionality may require access keys and consultation available from technical support. T3300 Diagnostic Ultrasound System B00601-010 4/10/17... -
Page 96: Reinstalling Software
Performing this action will reset all system settings of the current user and is irreversible. Consider backing up your settings to an external storage device first. Touch System Management > (System Configuration) > (Reset System Settings) > Reset. T3300 Diagnostic Ultrasound System B00601-010 4/10/17... -
Page 97: Backing Up System Settings And Patient Data
Performing this action will restore your system to its factory state and erase all your user settings and patient data from the system storage, except the tablet serial number. Touch System Management > (System Configuration) > (Factory Reset) > Erase. T3300 Diagnostic Ultrasound System B00601-010 4/10/17... -
Page 98: Chapter 9: Transducer And System Maintenance
"Transducer Care Method" on page 97 • "Transducer and Cable Cleaning" on page 97 • "Ultrasound Transmission Gels" on page 98 • "Compatible Disinfectants and Cleaning Solutions" on page 99 • "System Maintenance" on page 99 T3300 Diagnostic Ultrasound System B00601-010 4/10/17... -
Page 99: Transducer Maintenance
Reasonable care includes inspection, cleaning, and disinfection or sterilization, as necessary. Inspect the transducer, cable, and lens before each use. Check for cracks or other damage that jeopardizes the integrity of the transducer. Report any transducer damage to your BenQ Medical Technology representative, and discontinue use of the transducer. -
Page 100: Transducer Care
Be sure to follow the manufacturer’s instructions. WARNING Attempting to clean or disinfect a transducer, cable, or connector by using a method other than the procedures provided here can damage the device and voids the warranty. T3300 Diagnostic Ultrasound System B00601-010 4/10/17... -
Page 101: Inspecting The Transducer
Do not use the transducer if it is damaged. If the transducer is dropped, examine it immediately for signs of damage. Perform a sample scan to make sure it operates correctly. Contact BenQ Medical Technology for service or replacement if any abnormalities are found. -
Page 102: Transducer Care Method
Enzymatic cleaners are generically approved for use. 4. When cleaning the lens, use a blotting motion rather than a wiping motion. 5. To remove remaining particulate and cleaning residue, use cleaning wipes according to the manufacturer’s instructions. T3300 Diagnostic Ultrasound System B00601-010 4/10/17... -
Page 103: Ultrasound Transmission Gels
7. Wipe with a dry cloth if necessary. To dry the lens, use a soft cloth and a blotting motion instead of a wiping motion. 8. Examine the device and cable for damage such as cracks, splitting, sharp edges, or projections. If damage is evident, discontinue use of the device and contact your BenQ Medical Technology representative. NOTE The cable and connector are not waterproof. -
Page 104: Compatible Disinfectants And Cleaning Solutions
Check the system carefully and see if there are cracks, cuts, or any other damages which may admit fluids. If the system is dropped, examine it immediately for signs of damage. Perform a sample scan to make sure it operates correctly. Contact BenQ Medical Technology for service or replacement if any abnormalities are found. 9.9.2 Cleaning the System The system and peripherals are medical electrical equipment and require thorough cleaning. - Page 105 The following products are compatible with the external plastic and painted surfaces of system. • Cleaning solutions for all surfaces: – Mild soap solution • Cleaning solutions for the touch screen: – Mild soap solution – Cleaners designed for touch screens – Purified water T3300 Diagnostic Ultrasound System B00601-010 4/10/17...
- Page 106 • damage the system surfaces. • When cleaning the system surface with cleaning solutions or disinfectants, take care not to wipe repeatedly or rub heavily on the BenQ Medical Technology logo and model name. The printing inks may start to appear faded or stained.
- Page 107 3. Remove any solid matter with a cotton swab or toothpick to ensure that solids are not pushed into the adapter. 4. Wipe off any excess moisture then leave the power adapter completely dry before plugging it into the system or power outlet. T3300 Diagnostic Ultrasound System B00601-010 4/10/17...
-
Page 108: Chapter 10: Troubleshooting
Observe the following table containing a list of symptoms and the actions to take to solve the problems. If a problem persists after performing the following actions, contact technical support (See "Contact Information" on page T3300 Diagnostic Ultrasound System B00601-010 4/10/17... - Page 109 > Remove the power adapter and other external devices (if Image Artifacts occur on any) from the system while keeping the transducer plugged the imaging screen for inspection. • The transducer connected is damaged. > Replace current transducer with another for inspection. T3300 Diagnostic Ultrasound System B00601-010 4/10/17...
- Page 110 > Connect another Bluetooth device to the system for inspection. The DICOM server is not responding or the DICOM settings are not correct. DICOM connection failed > Go to > Settings > DICOM > Storage SCP touch Edit > Test for verification. T3300 Diagnostic Ultrasound System B00601-010 4/10/17...
- Page 111 *The system supports access to only one external storage device at a time. If you connect more than one external storage device, they function in the following priority order: USB 3.0 > USB 2.0 > microSD card. T3300 Diagnostic Ultrasound System B00601-010 4/10/17...
-
Page 112: Chapter 11: Appendices
"Appendix B: Connectivity and Security" on page 112 • "Appendix C: System Acoustic Output Default Tables" on page 115 • "Appendix D: Acoustic Output Reporting Tables for Track 3" on page 119 • "Appendix E: FCC Statement" on page 155 T3300 Diagnostic Ultrasound System B00601-010 4/10/17... -
Page 113: Appendix A: Specifications
• Input: AC 100 ~ 240V, 50 ~ 60Hz, Max 1.6A Accessory • Output: +19Vdc, 3.43A Transducer: C62B, L154BH, P42B6 Temperature: -20 ~ 60°C Storage/transport Humidity: 20% ~ 95% RH Air pressure: 700 ~ 1060hPa T3300 Diagnostic Ultrasound System B00601-010 4/10/17... -
Page 114: Transducer
• Renal • Urology • Carotid • Arterial Linear wideband array transducer • Venous L154BH with a maximum depth of 150 mm and • Thyroid a user-controllable field-of-view • Breast • MSK • Nerve T3300 Diagnostic Ultrasound System B00601-010 4/10/17... -
Page 115: Adapter
Mean operation voltage during rate discharge Nominal voltage 10.8 V after rate charge Maximum charge 12.6 V CV mode charging voltage voltage Voltage at end Stop discharge when any cell reaches tc 2.7 ± 9.0 V discharge 0.02 V T3300 Diagnostic Ultrasound System B00601-010 4/10/17... - Page 116 1 min condition 0 ~ 45°C Standard charging Operating 10 ~ 45°C In max. charging temperature -0 ~ 60°C Standard discharging Power consumption 620 A Normal mode Sleep mode 120 A Shutdown mode 5.42 A T3300 Diagnostic Ultrasound System B00601-010 4/10/17...
-
Page 117: Appendix B: Connectivity And Security
– Port for DICOM communication (typically port 104, 2762 or 11112; to specify the port, on the system’s imaging screen, touch > Settings > DICOM. – Port 80 for HTTP web servers (not supported by the system) – Anti-virus software is not installed on the system T3300 Diagnostic Ultrasound System B00601-010 4/10/17... - Page 118 Any connection of the equipment, this system (T3300) or/and other systems, to the IT network risks the unidentified data leakage of the patients, operators or third parties. It is recommended to set up the device in a secure network and behind the firewall.
- Page 119 IT network. • Changes in the network configuration (IP address, router, proxy, and so on) • Connection of additional items • Disconnection of items • Equipment update • Equipment upgrade T3300 Diagnostic Ultrasound System B00601-010 4/10/17...
-
Page 120: Appendix C: System Acoustic Output Default Tables
0.845 Renal 0.229 0.735 0.988 0.715 Color-Triplex 1.296 0.721 Power-Triplex 1.225 0.804 TIS=TIB 0.037 0.704 Color TIS=TIB 0.250 0.950 Power TIS=TIB 0.247 0.945 Urology 0.153 0.724 0.969 0.716 Color-Triplex 1.550 0.734 Power-Triplex 1.473 0.803 T3300 Diagnostic Ultrasound System B00601-010 4/10/17... - Page 121 0.208 1.039 0.213 0.798 0.746 0.701 Color-Triplex 1.476 0.805 Power-Triplex 1.399 0.801 TIS=TIB 0.012 0.619 Color TIS=TIB 0.271 0.825 Power TIS=TIB 0.249 0.823 Nerve 0.164 0.643 1.131 0.686 Color-Triplex 1.627 0.754 Power-Triplex 1.566 0.748 T3300 Diagnostic Ultrasound System B00601-010 4/10/17...
-
Page 122: L154Bh Transducer
1.123 Thyroid 0.530 0.614 0.322 0.596 Color-Triplex 0.721 0.572 Power-Triplex 0.583 0.564 TIS=TIB 0.004 0.681 Color TIS=TIB 0.148 1.232 Power TIS=TIB 0.138 1.140 Breast 0.181 0.611 0.309 0.595 Color-Triplex 0.589 0.576 Power-Triplex 0.562 0.566 T3300 Diagnostic Ultrasound System B00601-010 4/10/17... -
Page 123: P42B6 Transducer
Table 8 System Acoustic Output Default Table (P42B6 transducer) Preset Mode TI Label Default TI Default MI TIS=TIB 0.193 1.280 Color TIS=TIB 0.764 1.282 Power TIS=TIB 0.874 1.282 1.079 1.386 Cardiac 1.127 0.697 1.761 0.062 Color-Triplex 2.261 0.994 Power-Triplex 2.245 0.992 T3300 Diagnostic Ultrasound System B00601-010 4/10/17... -
Page 124: Appendix D: Acoustic Output Reporting Tables For Track 3
Due to the complexities of the system user interface, it may be difficult to exactly replicate the declared condition. For more information, contact BenQ Medical Technology. 11.4.1 Definition of Terms Used in Acoustic Output Tables... - Page 125 : Depth for MI. : Depth for peak attenuated pulse-intensity integral. pii, : Depth for peak sum of pulse-intensity integrals. : Depth for peak sum of attenuated pulse-intensity integrals. sii, : Depth for TIS. T3300 Diagnostic Ultrasound System B00601-010 4/10/17...
-
Page 126: Acoustic Output Tables For T3300 Transducers
Appendices 11.4.2 Acoustic Output Tables for T3300 Transducers 11.4.2.1 Acoustic Output Reporting Table for Track 3 for the C62B Transducer (B- Mode) Table 9 Acoustic Output Reporting Table for Track 3 for the C62B Transducer (B-Mode) Index label Below Below... - Page 127 Control 2: Abdominal, B/Color mode, ROI box minimized @ min depth, Focus 14.0, 2D/Color Density High, FQBeam off, SQBeam off,2D Depth 15, 2D Gain 44, Sector Width 46, Power 100, Freq 2D Pen/ ColorRes, Color Scale 42cm/ss T3300 Diagnostic Ultrasound System B00601-010 4/10/17...
- Page 128 Control 2: Abdominal, B/Power mode, ROI box minimized @ min depth, Focus 14.0, Density 2D Low/CPA High, FQBeam off, SQBeam off,2D Depth 15, 2D Gain 44, Sector Width 46, Power 100, Freq 2D Gen/ ColorRes, CPA Scale PRF3 T3300 Diagnostic Ultrasound System B00601-010 4/10/17...
- Page 129 5.5, 2D Gain 44, Sector Width 128, Power 100, Freq Gen Control 2: Abdominal, M mode, 2D Focus 5.0, Density Low, FQBeam off, SQBeam off, 2D Depth 5.5, 2D Gain 44, Sector Width 46, Power 100, Freq Pen T3300 Diagnostic Ultrasound System B00601-010 4/10/17...
- Page 130 5.5, 2D Gain 44, Sector Width 70, Power 100, Freq Pen, Filter 65Hz Control 2: Abdominal, PW mode, 2D Focus 9, Density Low, FQBeam off, SQBeam off,2D Depth 10, 2D Gain 44, Sector Width 128, Power 100, Freq Res, Filter 200Hz T3300 Diagnostic Ultrasound System B00601-010 4/10/17...
- Page 131 Control 1: Abdominal, Triplex mode, ROI box flat wide @ max depth, Focus 5.0, SV 5.0, 2D/Color Density High, FQBeam off, SQBeam off, Depth 5.5, Gain 44, Sector Width 46, Power 100, 2D/Color/PW Freq Pen, Color Scale 26cm/s, Wall Filter 65Hz T3300 Diagnostic Ultrasound System B00601-010 4/10/17...
- Page 132 Control 2: Abdominal, Triplex mode, ROI box minimized @ min depth, Focus 13.0, SV 13.0, 2D/ Color Density High, FQBeam off, SQBeam off, Depth 14, Gain 44, Sector Width 46, Power 100, 2D/Color/PW Freq Gen/Res/Gen, Color Scale 28cm/s, Wall Filter 100Hz T3300 Diagnostic Ultrasound System B00601-010 4/10/17...
- Page 133 Control 1: Abdominal, THI mode, Focus 5.0, Density Low, FQBeam off, SQBeam off, Depth 5.5, Gain 44, Sector Width 70, Power 100, Freq Gen Control 2: Abdominal, THI mode, Focus 8.0, Density Low, FQBeam off, SQBeam off, Depth 9, Gain 44, Sector Width 46, Power 100, Freq Res T3300 Diagnostic Ultrasound System B00601-010 4/10/17...
- Page 134 Control 2: Abdominal, THI/Color mode, ROI box minimized @ min depth, Focus 14.0, THI/Color Density High, FQBeam off, SQBeam off,2D Depth 15, 2D Gain 44, Sector Width 46, Power 100, Freq 2D Pen/ ColorRes, PRF Scale 42cm/s T3300 Diagnostic Ultrasound System B00601-010 4/10/17...
- Page 135 Control 2: Abdominal, THI/Power mode, ROI box minimized @ min depth, Focus 14.0, Density 2D Low/CPA High, FQBeam off, SQBeam off,2D Depth 15, 2D Gain 44, Sector Width 46, Power 100, Freq 2D Gen/ ColorRes, CPA Scale PRF3 T3300 Diagnostic Ultrasound System B00601-010 4/10/17...
- Page 136 5.5, 2D Gain 44, Sector Width 128, Power 100, Freq Gen Control 2: Abdominal, THI/M mode, 2D Focus 5.0, Density Low, FQBeam off, SQBeam off,2D Depth 5.5, 2D Gain 44, Sector Width 46, Power 100, Freq Pen T3300 Diagnostic Ultrasound System B00601-010 4/10/17...
- Page 137 Control 1: Carotid, B mode, 2D Focus 2.5, Density Low, SQBeam off, 2D Depth 3, 2D Gain 64, Sector Width 46, Power 100, Freq Pen Control 2: Carotid, B mode, 2D Focus 5.5, Density High, SQBeam off, 2D Depth 6, 2D Gain 64, Sector Width 46, Power 100, Freq Pen T3300 Diagnostic Ultrasound System B00601-010 4/10/17...
- Page 138 Control 2: Carotid, B/Color mode, ROI box minimized @ min depth, Focus 7.5, 2D/Color Density High, SQBeam off, 2D Depth 8, 2D Gain 64, Sector Width 46, Power 100, Freq 2D Pen/ ColorGen, Color Scale 46cm/s, Steer 0 T3300 Diagnostic Ultrasound System B00601-010 4/10/17...
- Page 139 Control 2: Carotid, B/Power mode, ROI box minimized @ min depth, Focus 7.5, Density 2D Low/ Color High, SQBeam off, 2D Depth 8, 2D Gain 64, Sector Width 46, Power 100, Freq 2D Pen/ CPA Pen, CPA Scale PRF 4, Steer 0 T3300 Diagnostic Ultrasound System B00601-010 4/10/17...
- Page 140 Control 1: Carotid, M mode, 2D Focus 2.5, Density Low, SQBeam off, 2D Depth 3, 2D Gain 64, Sector Width 128, Power 100, Freq Pen Control 2: Carotid, M mode, 2D Focus 7.5, Density High, SQBeam off, 2D Depth 8, 2D Gain 64, Sector Width 46, Power 100, Freq Pen T3300 Diagnostic Ultrasound System B00601-010 4/10/17...
- Page 141 Control 1: Carotid, PW mode, 2D Focus 3, Density Low, SQBeam off, 2D Depth 3.5, 2D Gain 64, Sector Width 128, Power 100, Freq Res Control 2: Carotid, PW mode, 2D Focus 8.5, Density High, SQBeam off, 2D Depth 9, 2D Gain 64, Sector Width 256, Power 100, Freq Res T3300 Diagnostic Ultrasound System B00601-010 4/10/17...
- Page 142 Control 1: Carotid, Triplex mode, ROI box flat wide @ max depth, Focus 2.5, SV 2.5, 2D/Color Density High, SQBeam off, Depth 3, Gain 64, Sector Width 46, Power 100, 2D/Color/PW Freq Pen/Res/Pen, Color Scale 8cm/s, Wall Filter 39Hz, Steer 0 T3300 Diagnostic Ultrasound System B00601-010 4/10/17...
- Page 143 Control 2: Carotid, Triplex mode, ROI box minimized @ min depth, Focus 7.5, SV 7.5, 2D/Color Density High, SQBeam off, 2D Depth 8, 2D Gain 64, Sector Width 46, Power 100, 2D/ Color/PW Freq Pen/Gen/Gen, Color Scale 10cm/s, Wall Filter 39Hz, Steer 0 T3300 Diagnostic Ultrasound System B00601-010 4/10/17...
- Page 144 Control 1: Carotid, THI mode, 2D Focus 2.5, Density Low, SQBeam off, 2D Depth 3, 2D Gain 64, Sector Width 46, Power 100, Freq Pen Control 2: Carotid, THI mode, 2D Focus 6.5, Density High, SQBeam off, 2D Depth 7, 2D Gain 64, Sector Width 46, Power 100, Freq Pen T3300 Diagnostic Ultrasound System B00601-010 4/10/17...
- Page 145 Low/High, SQBeam off, Depth 3, Gain 64, Sector Width Control 2: Carotid, THI/Color mode, ROI box minimized @ min depth, Focus 8.5, 2D/Color Density High, SQBeam off, 2D Depth 9, 2D Gain 64, Sector T3300 Diagnostic Ultrasound System B00601-010 4/10/17...
- Page 146 Control 2: Carotid, THI/Power mode, ROI box minimized @ min depth, Focus 8.5, Density 2D High/ Color High, SQBeam off, 2D Depth 9, 2D Gain 64, Sector Width 46, Power 100, Freq THI Gen/ CPA Res, CPA Scale PRF 4, Steer 0 T3300 Diagnostic Ultrasound System B00601-010 4/10/17...
- Page 147 Control 1: Carotid, THI/M mode, 2D Focus 2.5, Density Low, SQBeam off, 2D Depth 3, 2D Gain 64, Sector Width 128, Power 100, Freq Pen Control 2: Carotid, THI/M mode, 2D Focus 7.5, Density High, SQBeam off, 2D Depth 8, 2D Gain 64, Sector Width 46, Power 100, Freq Pen T3300 Diagnostic Ultrasound System B00601-010 4/10/17...
- Page 148 Control 1: Cardiac, B mode, 2D Focus 6.0, Density Low, FQBeam off, 2D Depth 6.5, 2D Gain 45, Sector Width 62, Power 100, Freq Gen Control 2: Cardiac, B mode, 2D Focus 5.0, Density Low, FQBeam off, 2D Depth 6, 2D Gain 45, Sector Width 70, Power 100, Freq Res T3300 Diagnostic Ultrasound System B00601-010 4/10/17...
- Page 149 Control 2: Cardiac, B/Color mode, ROI box minimized @ min depth, Focus 8.0, 2D/Color Density High, FQBeam off, 2D Depth 9, 2D Gain 45, Sector Width 86, Power 100, Freq 2D Gen/ ColorGen, Color Scale 61cm/s T3300 Diagnostic Ultrasound System B00601-010 4/10/17...
- Page 150 Control 2: Cardiac, B/Power mode, ROI box minimized @ min depth, Focus 10.0, Density 2D Low/ CPA High, FQBeam off, 2D Depth 11, 2D Gain 45, Sector Width 86, Power 100, Freq 2D Gen/ CPARes, CPA Scale PRF 4 T3300 Diagnostic Ultrasound System B00601-010 4/10/17...
- Page 151 Operating Control 2 control Control 3 conditions Control 4 Control 1: Cardiac, CW mode, 2D Focus 6.0, Density Low, FQBeam off, 2D Depth 6.5, 2D Gain 45, Sector Width 128, Power 100, Freq Gen T3300 Diagnostic Ultrasound System B00601-010 4/10/17...
- Page 152 Control 1: Cardiac, M mode, 2D Focus 6.0, Density Low, FQBeam off, 2D Depth 6.5, 2D Gain 45, Sector Width 128, Power 100, Freq Gen Control 2: Cardiac, M mode, 2D Focus 7.0, Density Low, FQBeam off, 2D Depth 8, 2D Gain 45, Sector Width 70, Power 100, Freq Gen T3300 Diagnostic Ultrasound System B00601-010 4/10/17...
- Page 153 Control 1: Cardiac, PW mode, 2D Focus 6.0, Density Low, FQBeam off, 2D Depth 6.5, 2D Gain 45, Sector Width 128, Power 100, Freq Pen Control 2: Cardiac, PW mode, 2D Focus 8.0, Density Low, FQBeam off, 2D Depth 9, 2D Gain 45, Sector Width 70, T3300 Diagnostic Ultrasound System B00601-010 4/10/17...
- Page 154 (MPa) 2.237 Control 1 Operating Control 2 control Control 3 conditions Control 4 Control 1: Cardiac, Triplex mode, ROI box flat wide @ max depth, Focus 6, SV 6, 2D/Color Density T3300 Diagnostic Ultrasound System B00601-010 4/10/17...
- Page 155 Control 2: Cardiac, Triplex mode, ROI box minimized @ min depth, Focus 9, SV 9, 2D/Color Density High, FQBeam off, 2D Depth 10, 2D Gain 45, Sector Width 46, Power 100, 2D/Color/PW Freq Res/Gen/Pen, Color Scale 30cm/s, Wall Filter 140Hz T3300 Diagnostic Ultrasound System B00601-010 4/10/17...
- Page 156 Control 1: Cardiac, THI mode, 2D Focus 6.0, Density Low, FQBeam off, 2D Depth 6.5, 2D Gain 45, Sector Width 62, Power 100, Freq Gen Control 2: Cardiac, THI mode, 2D Focus 6.0, Density Low, FQBeam off, 2D Depth 7, 2D Gain 45, Sector Width 70, Power 100, Freq Res T3300 Diagnostic Ultrasound System B00601-010 4/10/17...
- Page 157 Control 2: Cardiac, THI/Color mode, ROI box minimized @ min depth, Focus 8.0, 2D/Color Density High, FQBeam off, 2D Depth 9, 2D Gain 45, Sector Width 86, Power 100, Freq 2D Gen/ ColorGen, Color Scale 61cm/s T3300 Diagnostic Ultrasound System B00601-010 4/10/17...
- Page 158 Control 2: Cardiac, THI/Power mode, ROI box minimized @ min depth, Focus 8.0, Density 2D Low/ CPA High, FQBeam off, 2D Depth 9, 2D Gain 45, Sector Width 86, Power 100, Freq 2D Res/ CPAGen, CPA Scale PRF 4 T3300 Diagnostic Ultrasound System B00601-010 4/10/17...
- Page 159 Control 1: Cardiac, THI/M mode, 2D Focus 6.0, Density Low, FQBeam off, 2D Depth 6.5, 2D Gain 45, Sector Width 128, Power 100, Freq Gen Control 2: Cardiac, THI/M mode, 2D Focus 7.0, Density Low, FQBeam off, 2D Depth 8.0, 2D Gain 45, Sector Width 70, Power 100, Freq Gen T3300 Diagnostic Ultrasound System B00601-010 4/10/17...
-
Page 160: Appendix E: Fcc Statement
Statement regarding the disposal of T3300 products containing electronic components: As a company, T3300 is committed to sustainable business practices, which are aimed to preserve, protect and improve the quality of the environment. We apply these to product technologies, design and the selection of the materials used in our products. - Page 161 Radio: EN300328,EN301893,EN301489-1,EN301489-17, EN62311 Medical: IEC 60601-1, EN60601-1-2, IEC 60601-1-6, IEC 60601-2-37, IEC 62304, EN ISO10993-1, EN ISO10993-5, EN ISO10993-10, EN ISO 14971 ROHS: EN50581 The following CE marking is valid for EU harmonized telecommunications products. T3300 Diagnostic Ultrasound System B00601-010 4/10/17...
- Page 162 BenQMedicalTech.com © 2017 BenQ Medical Technology Corporation. All rights reserved. Rights of modification reserved. B00601-010 4/10/17...
Need help?
Do you have a question about the T3300 and is the answer not in the manual?
Questions and answers