Table of Contents

Subscribe to Our Youtube Channel
Related Manuals for 509 Fabrication 509-1 OPTIMUM

Summary of Contents for 509 Fabrication 509-1 OPTIMUM
- Page 1 OPTIMUM UL 1482 STANDARD FOR SOLID-FUEL TYPE ROOM HEATERS- UL-1482-2011 (R2015) ULC S627-00 SPACE HEATERS FOR USE WITH SOLID FUELS- Edition 3 - Issue Date 2000/06/01 OMNI PROJECT NUMBER: 0559WS001E 0559WS001S MANUAL REVISION DATE: 01-12-2019...
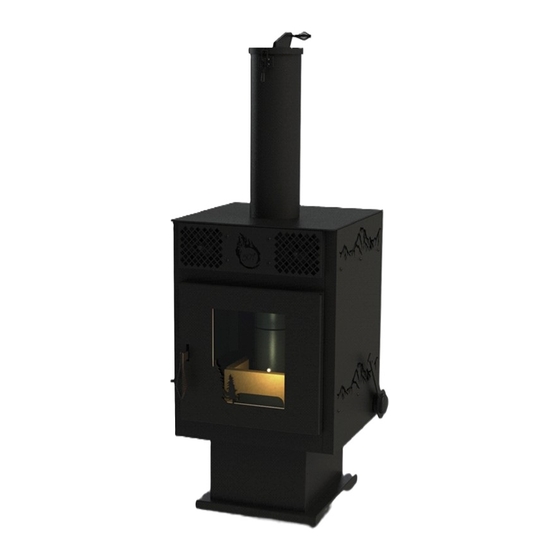
- Page 2 MODEL 509-1 OPTIMUM...
-
Page 3: California Prop 65 Warning
CAUTION!!! IMPORTANT OPERATING AND MAINTENANCE INSTRUCTIONS INCLUDED. DO NOT DISCARD. LEAVE THIS MANUAL WITH THE HOMEOWNER. CAUTION DO NOT RUN THE UPPER STOVE BLOWER ON LOW FOR EXTENDED PERIODS OF TIME D0 NOT RUN THE STOVE ON LOW FOR EXTENDED PERIODS OF TIME Failure to follow the information in this manual may result in a fire;... -
Page 4: Important Warnings
IMPORTANT WARNINGS CAUTION: Read this manual thoroughly before starting installation. For your safety, follow the installation, operation and maintenance instructions exactly without deviation. Failure to follow these instructions may result in a possible fire hazard and will void the warranty. If this appliance is not properly installed, a house fire may result. - Page 5 509 Fabrication Thank you for purchasing our 509 Fabrications, Inc Densified Fuel Log Stove. This manual is designed to be simple. After reading through it if you have any questions, please feel free to email me anytime at Dusty@509Fab.com <mailto:Dusty@509Fab.com>. I will respond to you as soon as possible.
- Page 6 How to Install the stove The stove should be installed by a licensed stove company or a licensed HVAC Technician. Some states and counties require permits be obtained before you install your stove. The outlet on the bottom combustion blower motor is 3” in diameter. Double wall pipe with stainless steel for the inner liner must be used in all installs. It is most commonly called Pellet Pipe.
-
Page 7: Do Not Burn
How to Power the stove The stove has one plug-in, 3 prong 6 Ft. cord. Plug it into a 3-prong dedicated outlet. The stove should be plugged into its own outlet for safety and power surges. The Fan and Igniter switches are on the left side of the stove on the base. The upper convection fan is plugged into the outlet under the stove. -
Page 8: Operation - Start Up
How to Light the stove DO NOT USE ANY TYPE OF FIRE STARTING LIQUIDS LIKE CHARCOAL LIGHTER FLUID, GAS, OR ANY OTHER COMBUSTIBLE FOR ANY REASON. 1. Open the door and make sure there is not a log left in the firebox. You can do this by looking at the bottom of the feed tube and down inside the square box. - Page 9 How to Operate the stove and Problem Solving The stove is very easy to operate as it does not have moving parts, and only the 2 fan motors. The biggest mistake to be made on this stove is to not let it burn for at least 25 minutes on high after lighting it.
-
Page 10: Very Important
GLASS REPAIR / REPLACEMENT CAUTION: Follow instructions completely and always wear leather gloves when removing the glass or removing broken glass. CAUTION: NEVER OPERATE THE STOVE WITH BROKEN GLASS CAUTION: NEVER USE ABRASIVE CLEANERS CAUTION: DO NOT CLEAN GLASS WHEN HOT. WARNING: Never Use Substitute Materials WARNING: Never slam the door shut, strike the glass, or abuse the glass in any way. - Page 11 GLASS REPAIR / REPLACEMENT CAUTION: Follow instructions completely and always wear leather gloves when removing the glass or removing broken glass. CAUTION: NEVER OPERATE THE STOVE WITH BROKEN GLASS CAUTION: NEVER USE ABRASIVE CLEANERS CAUTION: DO NOT CLEAN GLASS WHEN HOT. WARNING: Never Use Substitute Materials WARNING: Never slam the door shut, strike the glass, or abuse the glass in any way.
- Page 12 FIRE ROPE / REPLACEMENT CAUTION: Follow instructions completely and always wear leather gloves when removing the glass or removing broken glass. CAUTION: NEVER OPERATE THE STOVE WITH BROKEN GLASS CAUTION: NEVER USE ABRASIVE CLEANERS CAUTION: DO NOT CLEAN GLASS WHEN HOT. WARNING: Never Use Substitute Materials WARNING: Never slam the door shut, strike the glass, or abuse the glass in any way.
-
Page 13: Lid - Assembly
How to Clean the stove FOR YOUR SAFETY, IT IS IMPERATIVE TO MAKE SURE THE STOVE IS OFF AND COLD FOR ANY CLEANING PROCEDURE. The glass is NORMALLY easy to clean. The best way to clean the glass is to take a razor blade with a built in safety handle and scrape the glass and then clean it with a product like “Simple Green”... -
Page 14: Maintenance
Maintenance 1. Normal cleaning should be all that is necessary. Make sure to clean the radiant heat tubes with the scraper rod and wrench handle every day. This is a 30 second procedure. One time a year the Lower Combustion motor should be removed and cleaned. The blades will have buildup on them from regular burning. This buildup needs to be removed and cleaned by a professional and the motor re-installed, making sure all nut fasteners and lock washers are used for re-install and tightened down securely. -
Page 15: Vertical Vent
Vertical Install Always follow standard Pellet Pipe Install Guidelines. A 509-1 Optimum Elbow (Part # 5091-219) will NEED to be attached and sealed to the 3” round exhaust motor fitting with High-Temp RTV sealant and 3 self-drilling / tapping screws. -
Page 16: Replacement Parts And Accessories
Replacement Parts and Accessories Call 509 Fabrication for Price and Aviability IGNITER DRAFT FAN BLOWER GLASS, DOOR MAIN FIRE TAPE FIRE ROPE CUT TO LENGTH CUT TO LENGTH DOOR WRENCH-PULLER SCRAPER, ASSEMBLY BRICK #7 BRICK #3 FULL BRICK BRICK #11... -
Page 17: Wiring Diagram
Wiring Diagram 5091-912 - BLOWER DNF14-250FIB 16g BLACK 5091-909- FAN DNF14-250FIMB DNF14-250FIB SS202P-BG DNF14-250FIB DNF14-250FIB BLOWER DNF14-250FIMB HARNESS 16g WHITE BSV18X-LY 16g WHITE BSV18X-LY 5091-909C - FAN- VARIABLE SPEED 16g BLACK 16g BLACK HARNESS 2-PRONG-PLUG 16g BLACK PV14-8RB-3K IGNITER PV14-8RB-3K OUTLET PV14-8RB-3K DNF18-250FIB... -
Page 18: Warranty
Warranty These stoves are all built by hand and Made in America by 509 Fabrications, Inc. Post Falls, ID. They have been made with the finest parts and materials available and metal thicknesses that will last a lifetime. 1. The stove body itself is warranted for a period of 10 years by the original owner. 2.
Need help?
Do you have a question about the 509-1 OPTIMUM and is the answer not in the manual?
Questions and answers