Table of Contents
Advertisement
COMPACT DISHWASHER
INSTRUCTION MANUAL
CATALOG NUMBER
BCD6W
Thank you for choosing BLACK+DECKER!
PLEASE READ BEFORE RETURNING THIS PRODUCT FOR
ANY REASON.
If you have a question or experience a problem with your BLACK+DECKER
purchase, go to www.blackanddecker.com/instantanswers
If you can't find the answer or do not have access to the Internet, call
844-299-0879 from 10:30 a.m. to 6:30 p.m. EST Mon. - Fri. to speak with an
agent. Please have the catalog number available when you call.
SAVE THIS MANUAL FOR FUTURE REFERENCE.
Advertisement
Table of Contents
Troubleshooting

Related Manuals for Black+Decker BCD6W

Summary of Contents for Black+Decker BCD6W
- Page 1 PLEASE READ BEFORE RETURNING THIS PRODUCT FOR ANY REASON. If you have a question or experience a problem with your BLACK+DECKER purchase, go to www.blackanddecker.com/instantanswers If you can’t find the answer or do not have access to the Internet, call 844-299-0879 from 10:30 a.m.
- Page 2 Page 2...
-
Page 3: Table Of Contents
Before You Call For Service ..........................26 Customer Service ..............................26 Troubleshooting .............................. 27-29 Limited Warranty ..................................30 PRODUCT REGISTRATION Thank you for purchasing our BLACK+DECKER product. This Model number easy-to-use manual will guide you in getting the best use of your product. Serial number Remember to record the model and serial numbers. -
Page 4: Important Safety Instructions
SAFETY INFORMATION DANGER WARNING CAUTION DANGER - Immediate hazards WARNING - Hazards or unsafe CAUTION - Hazards or unsafe which WILL result in severe practices which COULD result in practices which COULD result in personal injury or death severe personal injury or death minor personal injury IMPORTANT SAFETY INSTRUCTIONS WARNING... -
Page 5: Save These Instructions
SAFETY INFORMATION 11. Dishwasher detergents are strongly alkaline, they can be extremely dangerous if swallowed. Avoid contact with skin and eyes and keep children away from the dishwasher when the door is open. 12. The door should not be left in the open position since this could present a tripping hazards. -
Page 6: Electrical Requirements
NOTE: Neither BLACK+DECKER nor the dealer can accept any liability for damage to the product or personal injury resulting from failure to observe the electrical connection procedures. -
Page 7: Installation Instructions
SET UP & USE INSTALLATION INSTRUCTIONS WARNING Electrical Shock Hazard - Disconnect electrical power before installing dishwasher. Failure to do so can result in death or electrical shock. CAUTION: The installation of the pipes and electrical equipment should be done by professionals. - Page 8 SET UP & USE 21-21/32” 17-1/4” 19-11/16” 31-31/32” Height 17-1/4” (43.8 cm) Width 21-21/32” (55 cm) Depth 19-11/16” (50 cm) Voltage connected load See Rating Label Water pressure 5.8 psi - 14.5 psi (0.04 MPa - 1.0 MPa) Hot water connection should be 120˚...
-
Page 9: Water Connection
SET UP & USE WATER CONNECTION Your dishwasher comes equipped with a ‘quick connect’ assembly (includes inlet and drain hose). The faucet adapter must be installed on the faucet before you can connect the dishwasher. This adapter is included inside your dishwasher. The faucet adapter is compatible with faucets inclusive of either male (outside) or female (inside) threaded faucet connections. - Page 10 SET UP & USE QUICK CONNECT ASSEMBLY Drain Hose: Quick Connect 1. Drain port connection 7. Pressure relief valve 2. Quick connect connection 8. Faucet adapter connection 9. Locking collar Inlet Hose: 10. Inlet hose connection 3. Inlet port connection 11.
-
Page 11: Disconnecting Your Dishwasher
SET UP & USE IMPORTANT! 1. Once you open the water supply line, (even if it is closed immediately thereafter), the inlet hose will be pressurized. 2. To relieve water pressure from inside the inlet hose, (make sure the water line (faucet) is closed): press and hold the red pressure relief button on the quick connect until the flow of water stops. -
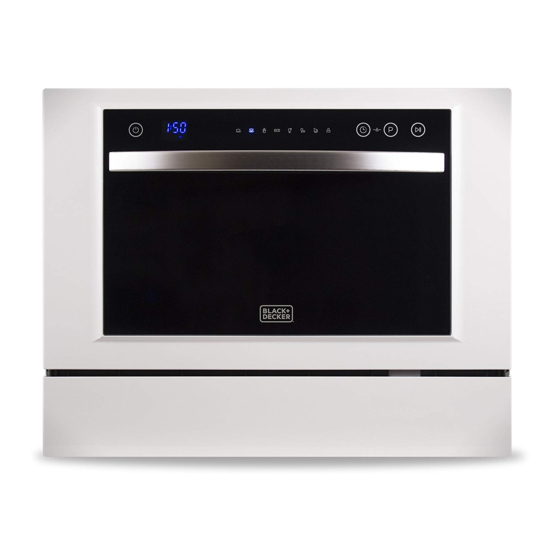
Page 12: Control Panel
SET UP & USE CONTROL PANEL 1. Power Button: To turn on/off the power supply. 2. Display: To show delay time, rinse-aid warming and Error codes. 3. Program indicator lights: Identifies the selected program. 4. Child lock indicator light: To press Delay Button and Washing Program Selector Button at the same time. -
Page 13: Parts & Features
SET UP & USE PARTS AND FEATURES 1. Cup shelf 6. Rinse aid dispenser 2. Basket 7. Spray arms 3. Detergent dispenser 8. Power cord 4. Filter assembly 9. Inlet pipe connector 5. Cutlery basket 10. Drain pipe connector Page 13... -
Page 14: Rinse Aid Dispenser
SET UP & USE RINSE AID DISPENSER The rinse aid is released during the final rinse to prevent water from forming droplets that can leave spots and streaks on your dishes. It also improves drying by allowing water to sheathe off the dishes. Your dishwasher is designed to use liquid rinse aids. The rinse aid dispenser is located inside the door next to the detergent dispenser. -
Page 15: Adjusting Rinse Aid Dispenser
SET UP & USE 1. To open the dispenser, turn the cap to the “open” (left) arrow and lift it out. 2. Pour the rinse aid into the dispenser, being careful not to overfill. 3. Replace the cap by inserting it aligned with “open” arrow and turning it to the closed (right) arrow. -
Page 16: Amount Of Detergent To Use
SET UP & USE AMOUNT OF DETERGENT TO USE NOTE: If the lid is closed: press release button. The lid springs open. Always add the detergent just before starting each wash cycle. Only use branded detergent aid for dishwasher. FILL IN DETERGENT Fill the detergent dispenser with detergent. -
Page 17: Loading The Dishwasher Baskets
SET UP & USE LOADING THE DISHWASHER BASKETS RECOMMENDATIONS 1. Consider buying utensils which are identified as dishwasher-proof. 2. Use a mild detergent that is described as ‘kind of dishes’. If necessary, seek further information from detergent manufacturers. 3. For particular items, select a programme with as low a temperature. 4. -
Page 18: Loading The Basket
SET UP & USE • Load hollow items such as cups, glasses, pans etc. With the opening downwards so that water cannot collect in the container or a deep base. • Dishes and items of cutlery must not lie inside one another, or cover each other. •... -
Page 19: Cutlery Basket
SET UP & USE CUTLERY BASKET Cutlery should be placed in the cutlery basket with handles at the bottom. If the rack has side baskets, the spoon should be loaded individually into the appropriate slots, especially long utensils should be placed in the horizontal position at the front of the upper basket as shown. -
Page 20: Wash Cycle Table
SET UP & USE WASH CYCLE TABLE Pre-wash Pre-wash 50 For the heaviest soiled loads, " Wash (55 such as pots,pans,casserole " Wash (50 0.635 oz dishes and dishes that have 0.49 12.5 " Heavy Rinse been sitting with dried food (18g) Rinse (68 on them for a while. -
Page 21: Change The Program
SET UP & USE CHANGE THE PROGRAM You can modify the washing program, When the dishwasher just runs for a short time. Otherwise, the detergent may have already been released, and the appliance may have already drained the wash water. If this is the case, the detergent dispenser must be refilled (see the section entitled “Loading the Detergent”). -
Page 22: Filtering System
SET UP & USE CLEANING & MAINTENANCE FILTERING SYSTEM The filter prevents larger remnants of food or other objects from getting inside the pump. The filter system consists of a coarse filter, a flat (Main filter) and a micro filter (fine filter). - Page 23 SET UP & USE WARNING: Never run the dishwasher without the filters in place. The dishwasher must never be used without the filters. Improper replacement of the filter may reduce the performance level of the appliance and damage dishes and utensils. STEP 1: Rotate the filter assembly(A,B and C) counter-clockwise,...
-
Page 24: Cleaning The Filter
SET UP & USE CLEANING THE FILTER To clean the coarse filter and the fine filter, use a cleaning brush. Reassemble the filter parts as shown in the figures in the last page and reinsert the entire assembly in the dishwasher, positioning in its seat and pressing downward. -
Page 25: Cleaning The Spray Arms
SET UP & USE CLEANING THE SPRAY ARMS The spray arms can be easily removed for periodic cleaning of the nozzles, to prevent possible clogging. Wash them under running water and carefully replace them in their seats, checking that their rotary movement is in no way impeded. -
Page 26: Before You Call For Service
TROUBLESHOOTING & WARRANTY BEFORE YOU CALL FOR SERVICE IF THE APPLIANCE FAILS TO OPERATE: A) Check to make sure that the appliance is plugged in securely. If it is not, remove the plug from the outlet, wait 10 seconds and plug it in again securely. B) Check for a blown circuit fuse or a tripped main circuit breaker. -
Page 27: Customer Service
TROUBLESHOOTING & WARRANTY Troubleshoot your problem by using the chart below. If the appliance still does not work properly, contact W Appliance Co. customer service center or the nearest authorized service center. Customers must never troubleshoot internal components. TROUBLE POSSIBLE CAUSE POSSIBLE REMEDY Replace fuse or reset circuit breaker. - Page 28 TROUBLESHOOTING & WARRANTY TROUBLE POSSIBLE CAUSE POSSIBLE REMEDY Knocking noise The spray arm is knocking Interrupt the program, and rearrange the in the wash against an item in a basket. items which are obstructing the spray arm. cabinet Rattling noise Item of crockery are insecure Interrupt the program and rearrange the in the wash...
-
Page 29: Troubleshooting
TROUBLESHOOTING & WARRANTY TROUBLE POSSIBLE CAUSE POSSIBLE REMEDY Load the dishwasher as suggested in the Improper loading directions. Increase the amount of rinse-aid/Refill the Too little rinse-aid rinse-aid dispenser. Do not empty your dishwasher immediately after washing. Open the door slightly so that the steam can escape. -
Page 30: Limited Warranty
TROUBLESHOOTING & WARRANTY LIMITED WARRANTY Any repair, replacement, or warranty service, REPAIR OR REPLACEMENT AS PROVIDED UNDER THIS WARRANTY IS THE EXCLUSIVE REMEDY OF and all questions about this product should be THE CUSTOMER; W Appliance Co. SHALL NOT BE directed to W Appliance Co. - Page 31 Page 31...
- Page 32 BLACK & DECKER, BLACK+DECKER, the BLACK & DECKER and BLACK+DECKER logos and product names and the orange and black color scheme are trademarks of The Black & Decker Corporation, used under license. All rights reserved. Product in this box may differ slightly from that pictured. Does not affect function.
Need help?
Do you have a question about the BCD6W and is the answer not in the manual?
Questions and answers
Why is Amazon advertising there are 2 spray arms when there are only one ?
Why is Black and Decker compact dishwasher advertising two spray arms when there is only one ?