Table of Contents
Advertisement
Quick Links
Download this manual
See also:
Owner's Manual
Advertisement
Table of Contents

Related Manuals for Wadia di122


Summary of Contents for Wadia di122
- Page 1 Wadia Digital, LLC. 2 Chambers Street Binghamton, New York 13903-2699 Phone: 607-723-3539 Fax: 607-724-0549 www.wadia.com di122 digital audio decoder Owner’s Manual...
-
Page 2: Safety Instructions
The lightning flash with arrowhead, within an equilateral The exclamation point within an equilateral triangle is triangle, is intended to alert the user to the presence of intended to alert the user to the presence of important uninsulated “dangerous voltage” within the product’s en- operating and maintenance (servicing) instructions in the closure that may be of sufficient magnitude to constitute literature accompanying the appliance. -
Page 3: Battery Installation And Replacement
Lithium Batteries listed below. tery disposal. Batteries should never be Points thrown away or incinerated. Battery Installation The Wadia di122 Remote Control uses a long life Lith- CR2032 ium Coin Cell type battery. The di122 may be sup- Figure 4 Figure 5... -
Page 4: Table Of Contents
Thank You Table of Contents Safety Instructions ............. 2 All of us at Wadia Digital would like to say thank you, The serial number, purchase date and Wadia Dealer and congratulations for deciding to own this Wadia name are important to you for possible insurance Battery Installation and Replacement ...... -
Page 5: General Information
Below is the Pin configuration for the XLR Balanced to the di122 Digital Audio Decoder. Output Connectors on the di122. Refer to the diagram 2. The Main AC Power going to the di122 and any for connections: other Wadia Component(s) should not be applied... -
Page 6: Introduction
Input process PCM Digital Signals up to 192kHz with cate when the di122 is in the Standby Mode. Note: The Wadia di122 is designed to be compatible with the majority of Audio Power Amplifiers. However, due to a • Die Cast Aluminium Chasiss wide range of Power Amplifier Designs it is important the input sensitivity of the amplifier be at least 2 Volts. -
Page 7: Dimensions
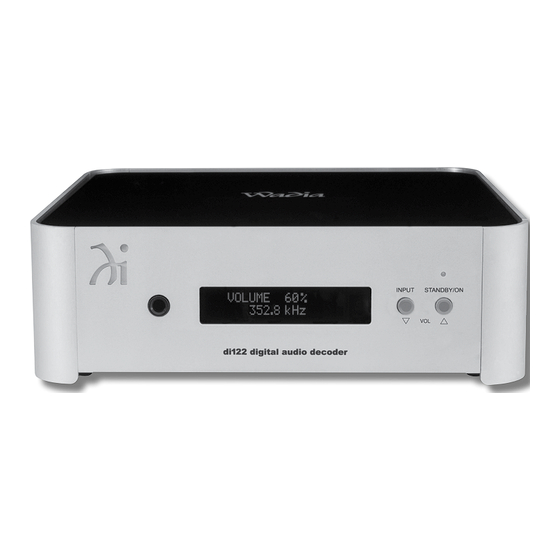
Dimensions Dimensions The following dimensions can assist in determining the best location for your di122. There is additional information on the next page pertaining to installing the di122 into cabinets. Front View of the di122 10" 25.4cm " 5/32 V O L U M E 3 5 % 3 5 2 . -
Page 8: Installation
2.5cm 2.5cm above the top, 5/8 inches (1.6cm) below the bottom and 1 inch (2.5cm) on each side of the di122, so that di122 Front View airflow is not obstructed. Allow 20 inches (50.8cm) of V O L U M E 3 5 % depth for airflow and cable connections. -
Page 9: Ac/Dc Adapter And Rear Panel Connections
UNBALanced AUDIO OUTPUTS Connect to the DC IN 5V connector with control signal for analog audio output signals to a Pre- on the Rear Panel of the di122 Digital connection to a computer amplifier or Power Amplifier Audio Decoder Connect to a live AC outlet (always On) -
Page 10: Connecting To A Preamplifier
Connecting to a Preamplifier 6. Connect a Control Cable from the Wadia di122 There are two different ways the di122 may be oper- TRIGGER OUT Jack to the CD ated in an audio system. The first way is as a Digital Player Trigger In Jack. -
Page 11: Connecting To A Power Amplifier
Connecting to a Power Amplifier Connecting to a Power Amplifer The di122 may also be used as the Main Audio Pre- amplifier connected directly to a Power Amplifier. Follow the connection instructions below and diagram Power Amplifier on this page. -
Page 12: Remote Control Push-Buttons
Mutes the audio Press the (+) or (-) to adjust the Volume Level Up or Down Press to adjust the Channel Balance Note: Push-buttons whose function is not identified above are for use with other Wadia Products. -
Page 13: Front Panel
IR Sensor receives commands from a Remote Control Connection for dynamic STANDBY/ON Push-button with indicator, switches the di122 ON or OFF (Standby). It type headphones, for private listening will also increase the volume level when the Volume Adjust Mode is active. -
Page 14: How To Operate The Di122
“VOLUME MUTE”. Refer to figure 54. Press- The Red LED above the STANDBY/ON Push-button To change the Volume Level of the Wadia di122, use ing the MUTE Push-button a second time or adjust the (Volume Down) Push-button or the lights to indicate the di122 is connected to AC Power. - Page 15 Display of Sampling Rate Under “Products” select “Wadia di122” then Figure 60 scroll down to the bottom of the Wadia di122 to the The Wadia di122 indicates the digital sampling rate “DOWNLOAD AREA”. Select the “WADIA di122 for all of the Input Sources connected to the Digital 3.
- Page 16 Windows Sound Settings: USB Music Playback 1. Click on the “Sound” (located in the Windows When the USB Input is selected on the Wadia di122, Control Panel), then select the Digital Output the Front Panel Display indicates the Sampling Rate “WADIA DIGITAL USB Driver _._.__”...
-
Page 17: Photos
Sample Rate of the music recording being played back. There are many third party Windows Applications (besides Windows Media Player) for steaming music from the computer to Wadia di122 USB Input. An example of just one of the available applications is “JRiver Media Center”. -
Page 18: Specifications
USB Input - PCM , DSD Standby: Less than 0.5 watt Total Harmonic Distortion Note: Only use the AC/DC Power Adapter supplied with the Wadia di122. Digital Input Sample Rate 0.005% Coaxial and Optical: 44.1kHz to 192kHz, 24-Bit Overall Dimensions Variable Output level USB: 44.1kHz to 384kHz, 32-Bit (PCM) -
Page 19: Packing Instruction
If a shipping carton or any of the interior part(s) are needed, please call or write Customer Service Depart- ment of Wadia. Refer to page 4. Please see the Part List for the correct part numbers. Quantity... - Page 20 Wadia Digital, LLC 2 Chambers Street Binghamton, NY 13903 www.wadia.com The continuous improvement of its products is the policy of Wadia Digital who reserve the right to improve design without notice. Printed in the U.S.A. Wadia Digital Part No. 04152300...
Need help?
Do you have a question about the di122 and is the answer not in the manual?
Questions and answers