
Related Manuals for auto maskin DCU 410

Summary of Contents for auto maskin DCU 410
- Page 1 Manual# 1100269 Installation and Configuration Manual DCU 410/408 – Engine Control Unit RP 410 – Remote Panel FW 2.11...
-
Page 3: Table Of Contents
ONFIGURATION OF THE ......7 Configuration- and Firmware files ....30 RECAUTIONS IN LASSED YSTEMS Connecting to the DCU ........ 31 DCU 410 ENGINE PANEL INSTALLATION ....8 Further connection settings ......32 ........8 ........ 35 ECHANICAL NSTALLATION ERVER ONFIGURATION Location ............ -
Page 4: Document Information
Document Information Valid Versions This Installation Manual is valid for the following firmware releases of the DCU 410/408, and the RP 410. Panel Firmware Release DCU 410 2.11 June 2014 DCU 408 2.11 June 2014 RP 410 2.11 June 2014... - Page 5 2 400 Series Overview 400 Series Installation and Configuration...
-
Page 6: Ordering Information
Ordering Information The following parts are available in Marine Pro. Item Part # DCU 410 Engine Control Unit 1006450 DCU 408 Engine Control Unit 1006455 RIO 410 I/O Expansion Unit 1006453 RIO 425 Generator Interface Unit 1006409 RIO 412 Exhaust Monitoring Unit... - Page 7 Note! Auto-Maskin continuously upgrades its products and reserves the right to make changes and improvements without prior notice. All information in this manual is based upon information at the time of printing. For updated information, please contact your local distributor. 4 ...
-
Page 8: 400 Series Overview
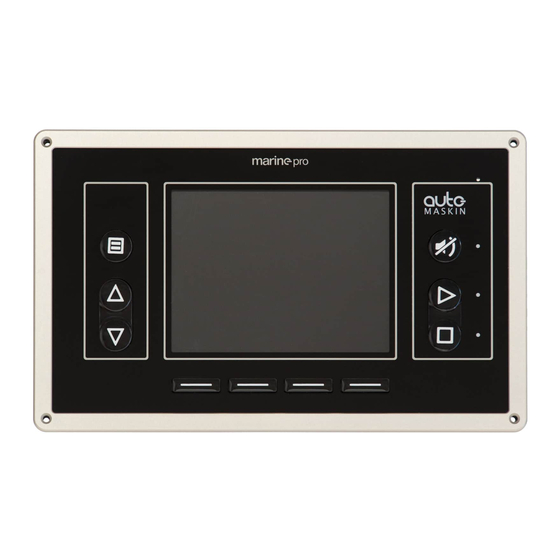
DCU 410 and DCU 408 Engine Control Units DCU 410 and DCU 408 are the engine monitoring and control units. One panel is required for each engine. The DCU 410 has a colour screen and buttons for user interaction. 400 Series Overview 5... - Page 9 The DCU 408 is the low cost version of the DCU 410, without a user interface, and intended for use with remote panels. The DCU 410 and DCU 408 are hereafter referred to as the “DCU”. SDU 410 Safety Unit The SDU 410 (hereafter referred to as the “SDU”) is the...
-
Page 10: Precautions In Classed Systems
Requirements In a classed and type approved installation, the following is required: The DCU 410 and DCU 408 engine control units requires: o Separate power supplies to its primary and secondary supply inputs. o An engine speed sensor connected to the DCU. -
Page 11: Dcu 410 Engine Panel Installation
The DCU should be mounted so that easy access to the cable connections at the back is ensured. This might for instance be accomplished by mounting it in a cabinet with a hinged front panel. 8 DCU 410 Engine Panel Installation 400 Series Installation and Configuration... -
Page 12: Wire Terminal Layout Overview
#4 Switch Input 24V #5 Switch Input 24V #6 Switch Input 24V #7 Switch Input 24V #8 Switch Input 24V 0V Opto For Switch Input 0V For Switch Input DCU 410 Engine Panel Installation 9 400 Series Installation and Configuration... - Page 13 CANJ1939 interface (COM 4) #1 CAN J1939 Shield #1 CAN J1939 L #1 CAN J1939 H MODBUS RTU (COM 3) Modbus 0V Modbus Shield Modbus L Modbus H 10 DCU 410 Engine Panel Installation 400 Series Installation and Configuration...
- Page 14 #6 Configurable Output 24VDC #7 Configurable Output 24VDC Fixed 24VDC Outputs Energize to Shutdown 24VDC Energize to Stop (ETS) 24VDC Energize to Run (ETR) 24VDC Engine Running 24VDC Crank (Start) 24VDC DCU 410 Engine Panel Installation 11 400 Series Installation and Configuration...
- Page 15 In/Out Console (COM 7) COM 7 DSUB-9 (RS-232) serial port In/Out MK-14 Relay Expansion Module Link (COM 8) COM 8 DSUB-15 In/Out USB Interface USB Memory Interface In/Out 12 DCU 410 Engine Panel Installation 400 Series Installation and Configuration...
-
Page 16: Electrical Connections
NOT from the starter of the engine, as the voltage drop over the latter is significantly higher. Power Supply Requirements Valid full functionality range: 18-32VDC. DCU 410 Engine Panel Installation 13 400 Series Installation and Configuration... -
Page 17: Secondary Power Supply [3 - 4]
DCU into System Off mode. Activate Switch 25-26 Disconnect this jumper if Inputs an external 24V supply (not terminal 16) is used to activate the switch inputs. 14 DCU 410 Engine Panel Installation 400 Series Installation and Configuration... -
Page 18: Auxiliary Power Output [5 - 6]
The Auxiliary Power Output is intended to drive auxiliary instruments, relays, Ethernet switches, etc. that should be powered together with the DCU. The Auxiliary supply is secured with an automatic fuse. DCU 410 Engine Panel Installation 15 400 Series Installation and Configuration... -
Page 19: System On/Off [7 - 10]
No connection to these terminals. Switch Input Channels [16 – 26] There are eight configurable switch input channels which can be used to detect the status of switches in the installation. 16 DCU 410 Engine Panel Installation 400 Series Installation and Configuration... -
Page 20: Ma Input Channels [27 - 31]
PT100 sensors with two or three wires. Note! If connecting a two-wire PT100 sensor, then strap the two wire terminals A and B at the DCU end. DCU 410 Engine Panel Installation 17 400 Series Installation and Configuration... -
Page 21: Magnetic Pickup (Speed) Sensor
Terminal 51 - CAN High MODBUS RTU, RS-485 (COM 3) [52 – 56] The MODBUS RTU may be connected either with common 0V or electrically isolated with an optocoupler. 18 DCU 410 Engine Panel Installation 400 Series Installation and Configuration... -
Page 22: Rio 410 Link (Com 2) [57 - 59]
If enabled, operation is controlled by selecting one of the many possible events available through the configuration web server. The relay contact centre tap is secured with a 1A automatic fuse. DCU 410 Engine Panel Installation 19 400 Series Installation and Configuration... -
Page 23: Configurable 24Vdc Outputs [69 - 72, 76-78]
The ETR deactivates on any stop command. Running [82] This output activates when the engine is running. This is normally when the engine has reached the running setpoint, typically set at 400 rpm. 20 DCU 410 Engine Panel Installation 400 Series Installation and Configuration... -
Page 24: Crank [83]
In this mode, the DCU will also react to an automatic stop signal on terminal 90. Automatic Start [89] Apply this signal to start the engine according to the DCU start configuration. DCU 410 Engine Panel Installation 21 400 Series Installation and Configuration... -
Page 25: Automatic Stop [90]
On the SDU, the SO is activated by closing a switch over terminals 50 and 51. Note that the switch requires a 10k resistor connected across it. 22 DCU 410 Engine Panel Installation 400 Series Installation and Configuration... -
Page 26: In Gear [95]
RJ45 port (COM 6). The IP setting of the DCU and/or the local PC’s need to be set in order to access the DCU configuration from a PC. DCU 410 Engine Panel Installation 23 400 Series Installation and Configuration... - Page 27 Load/Save a configuration file Load a firmware file It can also be used to load a new firmware file to any connected RP 410 remote panel. 24 DCU 410 Engine Panel Installation 400 Series Installation and Configuration...
- Page 28 DCU 410 Engine Panel Installation 25 400 Series Installation and Configuration...
-
Page 29: Rear Lid Graphical Layout
Rear Lid Graphical Layout Back lid of the DCU 410 seen below. First Power-On Preparations Installation Install the DCU according to guidelines and suggestions, see page 8. Connections Connect power according to guidelines and suggestions, see page 13. 26 DCU 410 Engine Panel Installation... -
Page 30: First Power-On Wizard
DCU. System Type Press down arrow to select Engine Application. Press Edit enter Engine Application menu. Choose between: Auxiliary Combined Propulsion Emergency DCU 410 Engine Panel Installation 27 400 Series Installation and Configuration... - Page 31 Press right arrow to select Third RPM Source. Press edit to enter Third RPM Source selection menu. Not Used CAN J1939 DCU TACHO SDU TACHO DCU Pickup pulses/revolution 28 DCU 410 Engine Panel Installation 400 Series Installation and Configuration...
- Page 32 Press OK to choose configuration. Press Next to go to the next step. Done Press Finished. The DCU will proceed with the new settings and display the main menu. DCU 410 Engine Panel Installation 29 400 Series Installation and Configuration...
-
Page 33: Configuration Of The Dcu
Insert a USB memory with the configuration file(s) and follow the guidelines appearing on the DCU screen. Note! The configuration file name can only contain the following characters: 30 DCU 410 Engine Panel Installation 400 Series Installation and Configuration... -
Page 34: Connecting To The Dcu
It is possible to connect to the DCU either directly or through a LAN (Local Area Network) Ethernet network. Note! For use in an existing Ethernet, check the configuration of the LAN with the LAN manager. DCU 410 Engine Panel Installation 31 400 Series Installation and Configuration... -
Page 35: Further Connection Settings
The DCU has a fixed IP-address that is set during the first power-on set up. The IP-address may also be changed later, in the DCU panel menu: Menu / Settings / Administration (locked/open) / Miscellaneous / Network 32 DCU 410 Engine Panel Installation 400 Series Installation and Configuration... - Page 36 IP-address in the same subnet as the DCU. For instance, if the DCU’s IP-address is 192.168.0.101, the PC may use any IP-address starting with 192.168.0 except 192.168.0.101. DCU 410 Engine Panel Installation 33 400 Series Installation and Configuration...
- Page 37 The result may be that a PC or RP 410 remote panel will be able to address one of the DCU units only. 34 DCU 410 Engine Panel Installation 400 Series Installation and Configuration...
-
Page 38: Web Server Configuration
Home When logged in, the browser displays the following. The Home screen lists the following menu items. This is the top level menu for the entire DCU 410 (or DCU 408) configuration. The configuration is saved in the configuration file, located in the DCU. - Page 39 Outputs (functional 24V outputs and relays) Inputs (functional inputs) Run sources (engine running indications) RPM sources (which sources are in use) and their priority 36 DCU 410 Engine Panel Installation 400 Series Installation and Configuration...
- Page 40 The following can be verified for the RIO: Versions Supplies Switch inputs 4-20 mA inputs PT100 inputs 0-5V Outputs DCU 410 Engine Panel Installation 37 400 Series Installation and Configuration...
-
Page 41: Home - Dcu
From here, a predefined factory configuration file can be opened. User Uploaded This lists the files previously uploaded to this DCU. Pick a file to select a new configuration for the DCU. 38 DCU 410 Engine Panel Installation 400 Series Installation and Configuration... - Page 42 2.11. In which case this 2.11 firmware is compatible with all RP firmware down to 2.5 For instance, DCU 2.2p2 is a match with RP 2.2, but DCU 2.3 is not a match with RP 2.2. DCU 410 Engine Panel Installation 39 400 Series Installation and Configuration...
-
Page 43: Home - Dcu - I/O Configuration
Note! Always remember to press the Submit button after each change on the configuration pages. No changes will be saved until this button is pressed! 40 DCU 410 Engine Panel Installation 400 Series Installation and Configuration... - Page 44 SDU 404 Magnetic pickup locally connected to SDU. Priorities The engine speed sources are prioritized. The DCU will use the sensor assigned as the primary source first. DCU 410 Engine Panel Installation 41 400 Series Installation and Configuration...
- Page 45 The values here define how the instrument widget is presented. Display Unit is the signals unit, here RPM. Display Range Min is the minimum value displayed, normally 0 (zero). 42 DCU 410 Engine Panel Installation 400 Series Installation and Configuration...
- Page 46 Select Yes for the DCU to shutdown the engine. Select No to disable overspeed shutdown. Note! Disabling DCU overspeed is valid for the DCU only. The SDU is able to shutdown the engine. DCU 410 Engine Panel Installation 43 400 Series Installation and Configuration...
- Page 47 Engine Speed (DCU) Engine Speed (J1939) Engine Speed (J1939):2 (If enabled) Engine Speed (SDU 410) Engine Speed (SDU 404) 44 DCU 410 Engine Panel Installation 400 Series Installation and Configuration...
- Page 48 First, configure either a 4-20mA, 0-5V input or the J1939 PGN 0Xf003, SPN 92. Select then the engine load source from the dropdown menu. Engine load can now be used as an additional setting when configuring alarms. DCU 410 Engine Panel Installation 45 400 Series Installation and Configuration...
- Page 49 Gear First select gear source from the dropdown menu. In Gear Switch This is fixed input 95 on the DCU 410 Ahead/Astern Switches Configure 2 switch inputs as functions Ahead and Astern. J1939 Transmission Current Gear (SPN 523) The gear settings can now be used as additional settings for alarms, or shown directly on the DCU.
- Page 50 Delay Before Event Choose the desired persistence time before the event triggers. Typical values: Engine Oil Pressure Low: 2 seconds. Engine Coolant Temp. High: 5-10 seconds. DCU 410 Engine Panel Installation 47 400 Series Installation and Configuration...
- Page 51 Note! Available only if On Run Only is selected. The switch event is disabled for this many seconds after the engine is running. After the timer has elapsed, the channel is enabled. Typical value: 5-10 seconds. 48 DCU 410 Engine Panel Installation 400 Series Installation and Configuration...
- Page 52 An engine speed source can be the magnetic pickup connected to the DCU, the J1939 CAN bus signal connected to the DCU, or the speed signal coming from the connected SDU 410 safety unit. DCU 410 Engine Panel Installation 49 400 Series Installation and Configuration...
- Page 53 It is also possible to suppress the alarm events, as can be seen in the following table overview. Config. outputs Display Event Display Event Not in use Event DCU + Event 50 DCU 410 Engine Panel Installation 400 Series Installation and Configuration...
- Page 54 US and Metric values. Display Range Min and Max For the above sensor, select the desired minimum and maximum values displayed in the instrument, for US and Metric values. DCU 410 Engine Panel Installation 51 400 Series Installation and Configuration...
- Page 55 Alarm Threshold [unit] Type in the alarm threshold value, in the correct units. Delay After Crossing Alarm Threshold Set the persistence time before the event. Value is in seconds. 52 DCU 410 Engine Panel Installation 400 Series Installation and Configuration...
- Page 56 Note! Do not use any other pressure sensors – or any other signals – as the engine running indication! o Typical setting: DCU 410 Engine Panel Installation 53 400 Series Installation and Configuration...
- Page 57 An engine speed source can be the magnetic pickup connected to the DCU, the J1939 CAN bus signal connected to the DCU, or the speed signal coming from the connected SDU 410 safety unit. 54 DCU 410 Engine Panel Installation 400 Series Installation and Configuration...
- Page 58 4-20 mA section, page 50. Differential differential logical channel is a (not physical) channel, made up by two physical channels. The physical channels may be hardwired or from the J1939 CAN bus. DCU 410 Engine Panel Installation 55 400 Series Installation and Configuration...
- Page 59 Select one of the five differential channels. Then, select two signals of the same unit type. The differential channel result can be assigned to an instrument widget. 56 DCU 410 Engine Panel Installation 400 Series Installation and Configuration...
- Page 60 Select one of the three differential channels. DCU 410 Engine Panel Installation 57 400 Series Installation and Configuration...
- Page 61 Supply Supply 2, whichever the DCU chooses. Set the desired ranges for use in a gauge or bargraph. For an alarm, set an event and complete the dialog. 58 DCU 410 Engine Panel Installation 400 Series Installation and Configuration...
- Page 62 DCU. The appearance of the counter is configured in this dialog. It is possible to set an alarm or other event connected to the engine hours. DCU 410 Engine Panel Installation 59 400 Series Installation and Configuration...
- Page 63 The values can be used as signal sources, and set up in the same way as switch sensors. Please see the communication manual for further technical description of the registers. 60 DCU 410 Engine Panel Installation 400 Series Installation and Configuration...
- Page 64 Select one of the seven 24V output channels. Then, for each channel, select the desired function. Relays The DCU has two inbuilt potential free relay contacts, which can be assigned a function. DCU 410 Engine Panel Installation 61 400 Series Installation and Configuration...
- Page 65 J1939 outputs. Each channel can be configure to transmit different SPN/PGN signals. Special Transmit Nominal speed to engine (SPN 515) Start Stop over J1939 (SPN 3452) 62 DCU 410 Engine Panel Installation 400 Series Installation and Configuration...
-
Page 66: Home - Dcu - Interface Design
Insert a new Page Choose whether the new page is to appear before or after an existing page, then press the Insert Page button. The pages will be renumbered. DCU 410 Engine Panel Installation 63 400 Series Installation and Configuration... - Page 67 If the chosen signal is not correctly configured, press Edit Signal to edit it. RP Home View Configuration The RP 410 home page displays certain parameters from each connected DCU. This is configured in each DCU. 64 DCU 410 Engine Panel Installation 400 Series Installation and Configuration...
-
Page 68: Home - Dcu - Start/Stop/Prelube
No warnings will be given for unexpected state changes. Deactivated, the DCU is not in control of the engine start/stop. No warnings will be given for unexpected state changes. DCU 410 Engine Panel Installation 65 400 Series Installation and Configuration... - Page 69 If setting is No, local start/stop will work in any mode of operation. Allow Automatic Start/Stop in All Operation Modes: Default setting NO. Prohibit Crank Above RPM Threshold [RPM] Select between Not in use 66 DCU 410 Engine Panel Installation 400 Series Installation and Configuration...
- Page 70 Prelube Complete signal on terminal 86. Prelube Timeout The DCU expects to receive the Prelube Complete signal on terminal 86 within this timer period. Typical setting: 5-30 seconds DCU 410 Engine Panel Installation 67 400 Series Installation and Configuration...
- Page 71 Typical setting: 60 minutes Oscillating Feedback Set this if a feedback from the oscillating feedback is required. The feedback will have to be connected to prelube complete. 68 DCU 410 Engine Panel Installation 400 Series Installation and Configuration...
- Page 72 5-7 seconds Delay Between Start Attempts If the engine did not start after the previous attempt, it will delay this many seconds until it does the next start attempt. DCU 410 Engine Panel Installation 69 400 Series Installation and Configuration...
- Page 73 After the previous timer has elapsed, the engine will continue to run (with no load) for this amount of time to cool down. When the timer has elapsed, the DCU will stop the engine. Typical setting: 70 DCU 410 Engine Panel Installation 400 Series Installation and Configuration...
- Page 74 Safety Stopping Time is the timer for the duration of safety stopping, where the DCU/SDU has lost the running state via either Pickup/J1939 or other additional run signals. DCU 410 Engine Panel Installation 71 400 Series Installation and Configuration...
-
Page 75: Home - Dcu - User Interface
(column 1) will be used. Select any [default] text to change the signal text description. Enabled Signals Only This is the same as All Signals, except that only signals that are in use are listed. 72 DCU 410 Engine Panel Installation 400 Series Installation and Configuration... -
Page 76: Home - Dcu - Engine Model
“Auxiliary #10”. Home – DCU – Service Interval View Service Status This will list the number of hours until next service is due. DCU 410 Engine Panel Installation 73 400 Series Installation and Configuration... -
Page 77: Home - Dcu - Communication
The first service notification will appear in 27 hours, then every 250 hours. All hours are engine running hours. Home – DCU – Communication Network Communication Set the IP-address for the DCU. 74 DCU 410 Engine Panel Installation 400 Series Installation and Configuration... - Page 78 Download EDS file Select this to download an EDS file. Modbus RTU The DCU has an inbuilt Modbus RTU communication interface. Power Power the optocoupled interface with 24VDC. DCU 410 Engine Panel Installation 75 400 Series Installation and Configuration...
- Page 79 Setting for which addresses the DCU will use to present the DM1 fault messages. Default setting is Show All. By selecting No, the user can define up to 10 addresses to be used by the DCU. 76 DCU 410 Engine Panel Installation 400 Series Installation and Configuration...
- Page 80 Setting for which addresses the DCU will use to present the DM1 fault messages. Default setting is Show All. By selecting No, the user can define up to 10 addresses to be used by the DCU. DCU 410 Engine Panel Installation 77 400 Series Installation and Configuration...
-
Page 81: Home - Dcu - Miscellaneous
J1939 CAN bus Broken Wire Alarm When Engine Not Running Default setting is No. J1939 CAN bus Nodes Lost Warning Enabled: Default setting is No. Erratic J1939 Data Warning Enabled: Default setting is No. 78 DCU 410 Engine Panel Installation 400 Series Installation and Configuration... - Page 82 RP Lost Warning Enabled Configure if the DCU is to give an alarm if the DCU loses network connection to an RP panel. Default setting is No. DCU 410 Engine Panel Installation 79 400 Series Installation and Configuration...
- Page 83 DCU receives new data on the J1939 CAN bus. Fuel Consumption By inputting the Nominal RPM, Nominal Consumption, Boost Pressure and Idle/No-Load Constant, the DCU can calculate an estimated fuel consumption value. 80 DCU 410 Engine Panel Installation 400 Series Installation and Configuration...
- Page 84 This displays a list of all warning, alarm and autostop (shutdown) events. User Interaction Only This displays a list of all button presses. • Local Start/Stop Button • Local Alarm List Button DCU 410 Engine Panel Installation 81 400 Series Installation and Configuration...
- Page 85 The current list of events can be saved into a text file. Suppress DM1 Fault The ability to suppress combinations of SPN and FMI appearing on the J1939 interface. 82 DCU 410 Engine Panel Installation 400 Series Installation and Configuration...
- Page 86 Transmits the shutdown override command from the DCU to the SDU, does not affect the transmitting of shutdown override from SDU to DCU. Shutdown Override from J1939 The parameter to enable shutdown override from J1939. DCU 410 Engine Panel Installation 83 400 Series Installation and Configuration...
-
Page 87: Home - Dcu - Language
Factory Reset Command for factory resetting the DCU. Home – DCU – Language This is a shortcut link to the Language section. 84 DCU 410 Engine Panel Installation 400 Series Installation and Configuration... -
Page 88: Communication Interface List
Internal web server for configuration and support Password protected configuration User selectable units (U.S. / Metric) True multilingual Sophisticated alarm configuration Supply voltage monitoring and alarm DCU 410 Engine Panel Installation 85 400 Series Installation and Configuration... -
Page 89: Total I/O Capacity
RIO units, see page 100. Signal type Standard 4-20 mA PT100 Switch Inputs 24+16 Thermocouple K-type 8+20 Configurable Relays Configurable 24V Out 0-5V Inputs J1939 Channels 20 pages 20 pages 86 DCU 410 Engine Panel Installation 400 Series Installation and Configuration... -
Page 90: Rp 410 Remote Panel Installation
RP 410 Remote Panel Installation Location The RP is normally located in the engine control room and wheelhouse. The RP should be mounted at about eye level and the user should have easy access to the touch screen and buttons on the panel. -
Page 91: General Overview
General Overview The RP 410 is the remote panel for the DCU engine control unit. It is connected to the Ethernet network together with the DCU unit, and will – after a network search – locate all connected DCU units, and update its configuration accordingly. -
Page 92: Electrical Connections
Electrical Connections A minimum installation requires only power supply to terminals 1-2, and an Ethernet cable to the Ethernet switch. Wire Terminal Layout Overview Power supply input /auxiliary power output +24VDC Primary Supply, 1A 0V Primary Supply Switch Inputs +24VDC Switch Power output, 0.2A Global Acknowledge Local Silence Switch 3 <reserved>... -
Page 93: Rear Lid Graphical Layout
GPS Interface – COM 2 Protective Earth Rear Lid Graphical Layout RP 410 rear lid layout System Configuration Icon selections To get to the system configuration, do as follows. 1. Press the Home button 2. Select the Menu touch button 3. - Page 94 Type the password to get access to the submenu. Note! The factory default password is 1234. If this password does not work, a new password has been set. Lost Password The RP will issue an encrypted code if a wrong password is entered.
- Page 95 RP Priority Summary The following table summarizes the priority scheme. Priority 1 Priority 2 Priority 3 Typically highest priority Typically lower priority control Typically in a possible public control station, like the engine station or wheelhouse. area, or where commands shall control room.
- Page 96 DCU Alarms If disabled, no alarms will be present on this RP station. This is typically use in the wheelhouse, if there is another RP panel in a manned engine control room. DCU Acknowledge If disabled, alarms cannot be acknowledged on this RP station.
- Page 97 DCU Connections This lists the currently connected DCU’s. Press Search to make the RP search for all connected DCU units on the network. When an RP is correctly connected to one or more DCU units, the RP is automatically updated with the same instruments and pages as in the DCU.
- Page 98 Note! If the System Configuration section is not manually locked, the RP will lock it automatically anyway after a timeout. Reset to Factory Defaults Select this to reset the RP panel to its factory default values. Note! After reset, the factory default password is set to 1234.
-
Page 99: Add-On Modules
Add-On Modules Different expansion units are available, as follows below. SDU 410 Safety Unit The SDU 410 Safety Unit operates fully independent from the DCU, but has a communication link. Note! The SDU is mandatory in type approved installations. The SDU has a built-in web server and can be configured independently, or it can be configured using the web- server in the DCU. -
Page 100: Wire Terminal Layout Overview
Wire Terminal Layout Overview Power supply inputs +24VDC Ground Shutdown Coil +24VDC +24VDC, Supply 0V, Supply Pickup input (Tacho / Speed input) Shield #1 Pickup A #1 Pickup B Shield #2 Pickup A #2 Pickup B Shutdown Relay Shutdown NC Shutdown Common Shutdown No Crank Cut-off Relay... - Page 101 Running Relay Running Relay NC Running Relay Common Running Relay NO Com Interface Com #1 DCU Link High Com #1 DCU Link Low Shield Com #2 RS485 MODBUS High Com #2 RS485 MODBUS Low Shield Switch Inputs Switch # 1 (Wire Break Detection) Switch # 1 (Wire Break Detection) Switch # 2 (Wire Break Detection) Switch # 2 (Wire Break Detection)
-
Page 102: Configuration Of The Sdu 410
Configuration of the SDU 410 The SDU 410 is being configured on the DCU web server interface. The configuration is stored in the DCU active configuration file, as well as in the SDU. Note! The SDU 410 can also be configured directly (not via the DCU interface), but this topic is not covered in this manual. - Page 103 Switch This displays the settings for shutdown switch inputs 1- Enabled: Yes = channel enabled On RUN Only: Yes = channel is active only when engine is running. Shutdown Override Disabled: Yes = channel is disabled when the Shutdown Override input is active.
-
Page 104: Rio 410 Expansion I/O
RIO 410 Expansion I/O The RIO 410 is an optional expansion unit, which increases the overall I/O capacity of the DCU. It can be mounted in a separate location than the DCU, and communicates with it on a communication link. Capacity The RIO has the following I/O channel capacity. - Page 105 Switch # 1 Switch # 2 Switch # 3 Switch # 4 0V In (Opto.) 0V Out (Opto.) 4-20 mA inputs +24VDC 0.2A 4-20 mA Supply +24VDC 0.2A 4-20 mA Supply 4-20 mA # 1 4-20 mA # 2 4-20 mA # 3 4-20 mA # 4 4-20 mA # 5 4-20 mA # 6...
- Page 106 TC #2 B TC #2 A PT100 Inputs PT100 #1 C PT100 #1 B PT100 #1 A PT100 #2 C PT100 #2 B PT100 #2 A PT100 #3 C PT100 #3 B PT100 #3 A PT100 #4 C PT100 #4 B PT100 #4 A PT100 #5 C PT100 #5 B...
-
Page 107: Rio 410 Addressing
RIO 410 Addressing A maximum of four RIO units can be connected to one DCU. Each connected RIO must have a unique address. The address is set by two DIP-switches located under the rubber cap. DIP setting Unit # Comment Factory default Example: If there are two RIO 410 units being used in the application, leave unit #1 set to factory default address... - Page 108 Then, configure the RIO channels just like configuring the DCU channels, see page 40. Add-On Modules 105 400 Series Installation and Configuration...
-
Page 109: Rio 425 Generator Interface Unit
RIO 425 Generator Interface Unit The RIO 425 is an interface for the generator on a DCU 410 or DCU 408 being used on an engine connected to a generator. Capacity The RIO 425 reads certain parameters from the generator. The below list of parameters are displayed on the DCU 410 screen, and on the RP 410 screen. - Page 110 Installation Connect the unit according to its manual. Make sure the communication link is connected to the RIO link on the DCU. Add-On Modules 107 400 Series Installation and Configuration...
-
Page 111: Mk-14 Relay Expansion
MK-14 Relay Expansion The MK-14 is an optional relay expansion unit, which can be connected to the DCU engine panel and the RP remote panel. The function on each relay is configured, from a range of available functions, and this is easily configured from the DCU or RP web-server.
Need help?
Do you have a question about the DCU 410 and is the answer not in the manual?
Questions and answers