
Subscribe to Our Youtube Channel
Related Manuals for KUHN TKS

Summary of Contents for KUHN TKS
- Page 1 User’s manual User’s manual Controller Program version: V1.8X FeedMixer EN, V1.8X, 2018-04 988924...
-
Page 2: General Safety Instructions
T. Kverneland & Sønner AS, Kvernelandsvegen 100 N-4355 Kverneland Norway declare that the product: TKS Kuhn - FeedMixer has been built in conformity with the Machine Directive and meets the relevant fundamental health and safety requirements. Kverneland, 2 May 2018 Tønnes Helge Kverneland... -
Page 3: Guarantee
Claims must be reported within the guarantee period. The dealer must complete a claims form for each case covered by a guarantee and send it to TKS or TKS’s distributor/ importer within the 10th of the month following the one in which the defect was reported. -
Page 4: Table Of Contents
User’s manual Content 1 GENERAL SAFETY INSTRUCTIONS....... . . 2 2 USING THE SCREEN AND PLC . - Page 5 User’s manual 3 Operation ............14 3.1 Activate FeedMixer .
-
Page 6: Introduction
A network of helpful dealers will be able to advise you on its use, as well as provide servicing and spare parts. All TKS products are designed, tested and built in close cooperation with farmers and machine workshops to ensure optimal effi ciency and reliability. -
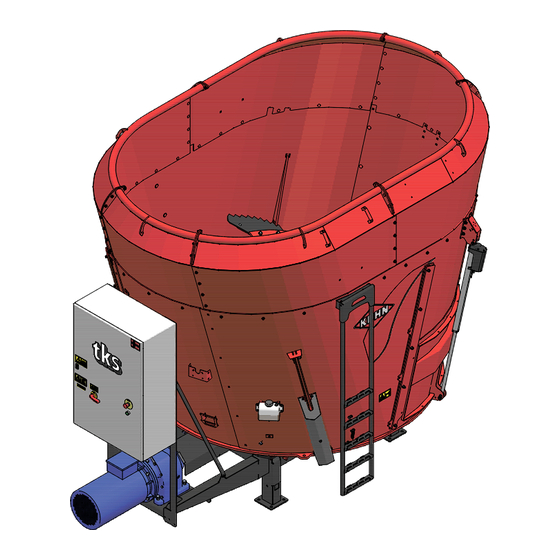
Page 7: Machine Identifi Cation
User’s manual 1.4 Machine identifi cation The machine’s serial number and the address of the manufacturer are written on the machine. See the illustration on this page. Please use the information on the name plate when making any enquiries about spare parts or servicing. -
Page 8: Safety
User’s manual Please pay particular attention to this symbol. It Safety designates a safety risk, and describes precautions that must be taken to avoid accidents. The control cabinet must be powered off and locked with padlock when maintenance is performed. Before operating, adjusting or repairing the machine, the user, technician or owner should familiarise himself with the safety instructions... - Page 9 User’s manual Automation The machine is equipped with devices to automate the entire operation or select parts of the operation for this purpose. The machine can operate based on a preset schedule set in the software by the operator, and start at certain times without human presence. The area in which the machine is operating Must be physically sealed off...
-
Page 10: Additional Safety Instructions
User’s manual 1.5.2 Additional safety The machine is marked with a warning signs. If these signs are damaged, they must instructions be replaced. Warning sign UH220532 (Fig. 1) Be careful! Ensure that you read and understand the instruction manual before using the machine, and before making any adjustments or performing any maintenance. -
Page 11: The Control Cabinet Must Be Secured With Padlock
User’s manual 1.5.3 The control cabinet must be secured with padlock Important! The control cabinet must be powered off and locked with padlock when maintenance is performed, especially when knives are sharpened or beeing replaced. The padlock can be found inside the control cabinet. Enter your personal code: 1. -
Page 12: Using The Screen And Plc
User’s manual 2 Using the screen and PLC 2.1 Screen The control system has a touchscreen, meaning that you can control it by touching the screen directly. Touch the screen with your fi ngers or use a soft-touch stylus located in the control cabinet. -
Page 13: Selecting A Value
User’s manual 2.3 Selecting a value Selecting pre-programmed values from a list. • Open the list – Press the value or the down arrow • Select a value from the list Picture 2 2.4 On / off key Enable or disable a function using the on/off key. -
Page 14: Operation
User’s manual 3 Operation 3.1 Activate FeedMixer When FEEDMIXER is switched on, or when the emergency stop button is pressed, screen picture will display. Read the instructions on the screen and make sure that the machine can be used properly. Release the emergency stop button if it has been tripped. -
Page 15: Perform A Mixing Operation
User’s manual 3.2.2 Perform a mixing operation • Load FeedMixer with feed • Feed weight shows the number of kg loaded • Adjust desired mixing time • Tap the number on the START MIXING key • Enter the number of minutes and then press Enter •... -
Page 16: Settings
User’s manual 3.2.4 Settings Open the settings using Settings in the menu. Twelve sub-menus display for FeedMixer settings: • Mixing – settings for mixing • Feedout – settings for feedout • Manual control – control seperate functions • Activation – settings for remote control •... - Page 17 User’s manual Operation of motor • In manual operation, the motor rotates in the forward direction. • Start motor at pre-defi ned speeds • Lo = low speed • M = medium speed • Hi = high speed • The motor runs for as long as the key is held down, and stops when it is released.
-
Page 18: Recipe Fi Lling
User’s manual 3.2.6 Recipe fi lling Open Recipe fi lling in the menu Recipe fi lling can be used manually or automatically. For manual use, this is a guide to help fi ll in the correct quantity of each feed component based on weight. - Page 19 User’s manual Recipe fi lling • Write the name of the recipe. • Enter the types of feed. Press on the fi elds. Select from the list in the next window. (Programming of fi lling sources must be done in advance in Menu-> Settings-> Filling sources) •...
- Page 20 User’s manual Recipe fi lling in progress • This window shows the recipe fi lling in progress. • The current recipe is shown at the top. • The status indicator shows in per cent how much of the feed component has been fi lled. •...
-
Page 21: Settings
User’s manual 3.3 Settings 3.3.1 Settings for mixing Choose mixing speed by setting a predefi ned motor speed. • Low – Low • Med – Medium • High – High • Auto – Automatically adjusts the engine speed between low and high. FeedMixer always adjusts to the lowest load. -
Page 22: Settings For Activation
User’s manual Conveyor It is possible to connect up to two conveyors to FeedMixer. The conveyors start each time discharging, and stop after the specifi ed length of time when the auger has stopped. • Specify stop delay (time for emptying the conveyors) Level of empty containers •... - Page 23 User’s manual Activation by pulse signal FeedMixer can start the feedout process in response to machines with a pulse signal. This means that FeedMixer starts with one signal and stops with another. In order to prevent FeedMixer from starting in response to the wrong signal, the signals must have a minimum duration.
-
Page 24: Settings For Fi Lling Sources
Output Select whether the fi lling source will be manual or automatic (PLC A3:). For automatic, separate electrical equipment must be connected to the electrical cabinet. A3:02 refers to the circuit diagram. Contact TKS for installation and connection. Picture 26... -
Page 25: Automatic Fi Lling
User’s manual Maximum fi lling time Specifi es how long the fi lling source will be active before it stops and moves on to the next fi lling source. Weight timeout error When the weight does not increase in this time, the fi... -
Page 26: Settings Options
User’s manual 3.3.6 Settings options Other settings and enabling/disabling of various functions can be performed here. • Door enabled/disabled – Enable the door to allow FeedMixer to automatically open/close the door when feeding. If disabled, the door must be controlled manually. •... -
Page 27: Door Settings
User’s manual • External alarm input Off / NO / NC – Used when a connected machine may give an error message. This signal causes FeedMixer to stop. (Connected to -X3:4). NO - normally open signal NC - normally closed signal •... -
Page 28: Weigt Settings
User’s manual 3.3.8 Weight settings The window shows settings for the weighing system. • Automatically resets weight when the mixer is empty. Activate/disable. The mixer is empty when the motor stops after any high-speed cleaning. Any feed residue in the container is then ignored. -
Page 29: Maintenance/Energy
User’s manual 3.3.9 Maintenance/Energy The window has two tabs for information on maintenance hours and energy consumption. Maintenance FeedMixer has a maintenance timer that generates a message on the screen when maintenance needs to be performed. • Lubrication must be applied every month or every 50 hours. -
Page 30: Feedout Timer
User’s manual 3.3.10 Feedout timer FeedMixer can be set to dispense feed automatically according to a time schedule. Up to 16 diff erent times can be confi gured individually. It is appropriate to use this function if a feed dispensing machine does not have a separate feedout timer. -
Page 31: Alarms
User’s manual 3.4 Alarms FeedMixer stops when an alarm is triggered. The screen shows the alarm window and which alarm was triggered. The window can be closed by pressing the X in the upper right-hand corner. A yellow symbol displays on the Home screen. Touch the symbol to open the alarm window again. -
Page 32: Doors 2 And 3 (Option)
User’s manual 3.5 Doors 2 and 3 (Option) FeedMixer can be equipped with the operation of up to three doors. Dispensing with multiple doors is appropriate where several feed dispensing machines are connected. All the doors can be controlled automatically from the connected machine or they can be operated manually. -
Page 33: Troubleshooting
User’s manual 4 Troubleshooting Fault Causes Procedure – error correction • The shear bolt in the bolt- • Replace the shear bolt. Auger does not rotate connection in front of the planet gear has sheared. • Voltage too high. • Check the fuses. Weight system, door or con- •... - Page 34 User’s manual...
-
Page 35: Notes
User’s manual Notes... - Page 36 User’s manual TKS is a family owned company TKS is a family owned company with a strong brand name. with a strong brand name. We are providing our customers with a We are providing our customers with a unique and complete range and high unique and complete range and high quality products.
Need help?
Do you have a question about the TKS and is the answer not in the manual?
Questions and answers