Table of Contents
Advertisement
Advertisement
Table of Contents

Related Manuals for Whirlpool MWX303 ES


Summary of Contents for Whirlpool MWX303 ES
- Page 1 Model: MWX303 ES Microwave Oven User's manual Please read these instructions carefully before installing and operating the oven. Record in the space below the SERIAL NO. which found on the nameplate on your oven and retain this information for future reference.
-
Page 2: Table Of Contents
Do not attempt to operate this oven with the door-open since open-door operation can result in harmful exposure to microwave energy. It is important not to defeat or tamper with the safety interlocks. Do not place any object between the oven front face and the door or allow soil or cleaner residue to accumulate on sealing surfaces. -
Page 3: Important Safety Instructions
When using electrical appliances, basic safety precautions should be followed, including the following: WARNING - To reduce the risk of burns, electric shock, fire, and injury to persons or exposure to excessive microwave energy: Read all instructions before using the appliance. Read and follow the specific "PRECAUTIONS TO AVOID POSSIBLE EXPOSURE TO EXCESSIVE MICROWAVE ENERGY"... - Page 4 12. The contents of feeding bottles and baby jars should be stirred or shaken and the temperature should be checked before serving in order to avoid burns. 13. Cooking utensils may become hot because of heat transferred from the heated food. Potholders may be needed to handle the utensil.
-
Page 5: Installation Guide
Make sure that all the packing materials For correct operation, the oven must are removed from the inside of the door. have sufficient airflow. Allow 20cm of space above the oven, 10cm at back Check the oven for any damage, such and 5cm at both sides. -
Page 6: Utensils Guide
Power Supply Cord A short power supply cord is provided to reduce the risks resulting from becoming entangled in or tripping over a longer cord. Longer cord sets or extension cords are available and may be used if care is exercised in their use. -
Page 7: Cooking Techniques
Thermometers — Use only those labeled "Microwave Safe" and follow all directions. Check the food in several places. Conventional thermometers may be used on microwave food once the food has been removed from the oven. LIMITED USE Aluminum foil — Use narrow strips of foil to prevent overcooking of exposed areas. Using too much foil can damage your oven, so be careful. -
Page 8: Specifications
overcooking, place delicate areas, such as asparagus tips, toward the center of the turntable. HIELDING Shield food with narrow strips of aluminum foil to prevent overcooking. Areas that need shielding include poultry wing tips, the ends of poultry legs, and corners of square baking dishes. Use only small amounts of aluminum foil. -
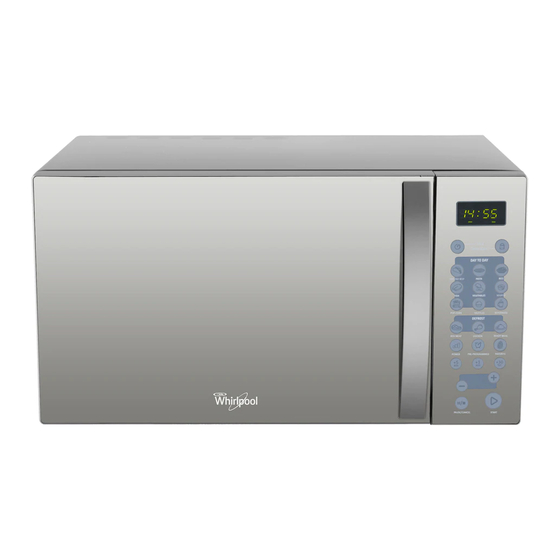
Page 9: Part Names
Door Safety Lock System Oven Window Roller Ring Shaft Control Panel Wave Guide (Please do not remove the mica plate covering the wave guide) Glass Tray... -
Page 10: Control Panel
Display Screen Cooking time, power, indicators and present time are displayed. Clock Press to set the oven clock. Child Lock Press to set the child lock. Auto Menu Press to cook the food of auto menu. Defrost Press to select one of the three defrost programs based on the weight you set. -
Page 11: Operation Instructions
ETTING THE CLOCK The clock works in 24 hour cycle. Suppose you want to set the time of 8:30. Touch Clock button once. Touch +/- to set the hour digit. Press Clock to confirm. Touch +/- to set the minute digit Touch Clock button again to confirm. -
Page 12: My Way
NOTE: You can check the power while cooking is in progress by pressing the Power button. After the cooking time ends, the system will beep once and End is displayed. Before starting another cooking session, press Pause/Cancel pad to clear the display and reset the system. This function helps you to start a usual setting program quickly. -
Page 13: Setting Child Lock
ETTING CHILD LOCK Use to prevent unsupervised operation of the oven by little children. The CHILD LOCK indicator will show on display screen, and the oven cannot be operated while the CHILD LOCK is set. To set the CHILD LOCK: Press the CHILD LOCK button once, a beep sounds and LOCK indicator lights. - Page 14 Menu Cook model popcorn (3 :30) MICRO. truffles (7 :00) MICRO. beverages (1 :30) MICRO. Notes: 1. The above foods have different default cooking time which has shown above. If you want to set your own cooking time for popcorn and beverages, you can press the individual food pad, then press +/-,+5 min, +1 min, +30sec to enter the cooking time before pressing Start to start cooking.
-
Page 15: Cleaning And Care
Turn off the oven and remove the power plug from the wall socket before cleaning. Keep the inside of the oven clean. When food splatters or spilled liquids adhere to oven walls, wipe with a damp cloth. Mild detergent may be used if the oven gets very dirty. Avoid the use of spray and other harsh cleaners as they may stain, streak or dull the door surface.
Need help?
Do you have a question about the MWX303 ES and is the answer not in the manual?
Questions and answers