Table of Contents
Advertisement
Quick Links
Advertisement
Table of Contents

Related Manuals for Limbic Media Aurora Pro


Summary of Contents for Limbic Media Aurora Pro
- Page 1 USER MANUAL AUR-R2-P8D-00-US AUR-R2-P8D-00-EU Oct 2018 v1...
-
Page 3: Table Of Contents
Set Up Aurora Pro Using Built-In RGB connectors (with Power Top-Ups) Configure a Network Distribution Box (NDB) Set Up Aurora Pro with a Single Network Distribution Box (NDB) Set up Aurora Pro with Multiple Network Distribution Boxes (NDBs) Set up Aurora Pro with Network Distribution Boxes (NDBs) - Page 4 Factory Reset and Upgrade Software Factory Reset Aurora Pro Upgrade Aurora Pro Software Appendices Aurora Terminology Troubleshooting Aurora Pro Patterns and Lighting Parameter Effects Aurora DMX Specification Extended Modes of Interaction Aurora Pro (AUR-R2-P8D-00-US/AUR-R2-P8D-00-EU) Specifications Aurora Pro Power Best Practices Electrical Safety...
-
Page 5: Introduction
App. Reconfigure the platform to reinvent displays year after year. The Aurora Pro Manual is designed for non-technical users installing interactive lighting for the first time, as well as experienced technicians integrating Aurora Pro with protocols like DMX, KiNET or Art-Net. -
Page 6: Guide Overview
How to navigate the Aurora Pro connector interface • Basic installation preparations • How to set up typical Aurora Pro lighting configurations • How to connect to and configure the Aurora Mobile App • How to upgrade Aurora Pro firmware and software •... -
Page 7: About Aurora Pro
25,000 LED pixels using network protocols like DDP, Art-Net and KiNET LED Fixture Types Supported Aurora Pro directly controls RGB and RGB LEDs with 8 built-in RGB connectors. Installers can take advantage of our extensive catalog of LED fixtures and accessories to scale up installations. -
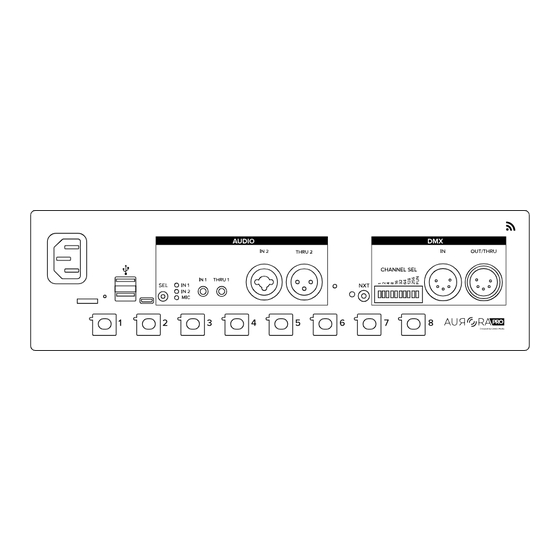
Page 8: Aurora Pro Connector Interface
Aurora Product Guide for a catalog of available LED fixtures and accessories. 3. Reset button The reset button restores Aurora Pro to its default system settings. A paper clip or pin is required to press the button. 4. USB A connectors Two USB A connectors connect a USB audio interface, USB-to-Ethernet adapter, or USB data stick to Aurora Pro. - Page 9 DMX control. 11. DMX IN OUT/THRU³ (IN OUT/THRU) DMX IN OUT/THRU (IN OUT/THRU) connects DMX controllers, consoles and fixtures to Aurora Pro. Refer to Set Up DMX and Other Ethernet-Based Protocols for details. ³ LED pixels stay ON when the system is paused in Show or Live Control Mode. LED pixels turn OFF...
-
Page 10: Prepare For An Installation
Warning: Do not hang Aurora Pro by the built-in RGB connectors. Use proper mounting features and strain relief on light runs longer than 25 LED pixels. Included Components •... -
Page 11: Connect Led Pixels To Built-In Rgb Connectors
Each built-in LED connector supports up to 500 LED pixels with additional Power Top-Ups, for a total of 4000 LED pixels across all 8 built-in RGB connectors. Refer to Configure Aurora Pro for details on how to set up Aurora Pro with additional components, such as Power Top-Ups. - Page 12 4. Connect the male end of each LED pixel strand or leader cable to each built-in LED connector. Ensure the O-ring on the male connector is present to retain the waterproof seal. 5. Hand-tighten the locking mechanisms. RGB fixtures requires a half-turn to tighten. (Fig.
-
Page 13: Configure Aurora Pro
Ups. Each Aurora Pro built-in LED connector supports a maximum of 75 LED pixels without Power Top-Ups. Aurora Pro supports up to 4000 LED pixels with Power Top-Ups. Refer to Set Up Aurora Pro Using Built-In RGB connectors (with Power Top-Ups) for details. -
Page 14: Set Up Aurora Pro Using Built-In Rgb Connectors (With Power Top-Ups)
4. Power Aurora Pro ON. 5. Connect Aurora Pro to the Aurora Mobile App. Refer to Connect to Aurora Pro in AP Mode for details. 6. Set the number of LED pixels per port using the Aurora Mobile App. Refer to Configure the Aurora Mobile App for details. -
Page 15: Configure A Network Distribution Box (Ndb)
80-100 LED pixels per Power Top-Up or 500 LED pixels per port. 7. Power Aurora Pro ON. 8. Connect Aurora Pro to the Aurora Mobile App. Refer to Connect to Aurora Pro in AP Mode for details. 9. Set the number of LED pixels per port, including LED pixels added with Power Top-Ups, using the Aurora Mobile App. - Page 16 Contacting Limbic Media for support is recommended if a driver download is necessary. Configure Multiple NDBs NDBs communicate with Aurora Pro via IP address. NDBs have a default IP address of 10.0.0.100. If you are using multiple NDBs, each NDB must be configured with a unique IP address.
- Page 17 Fig. 7: NDB configuration page 5. Select DDP as the protocol, and under LED chip settings, load defaults for RGB+. To use any of the other protocols listed, please contact Limbic Media for support. 6. Refer to steps 5-9 under Set the Number of LED Pixels Per NDB Port below.
- Page 18 Method Connect an NDB to your computer via Cat 5/6 network cable and power the NDB ON. 2. Set your computer’s IP address to match the NDB, except for the last number. Unless NDBs have been previously reconfigured, their default IP address should be 10.0.0.100—so setting your computer’s IP address to 10.0.0.2, for example, should work.
- Page 19 Fig. 9: NDB configuration page 5. Select DDP as the protocol, and under LED chip settings, load defaults for RGB. To use any of the other protocols listed, please contact Limbic Media for support. 6. Select the number of NDB ports used under Outputs. For example, a 16-port NDB can be used in 16-port mode or 8-port mode.
-
Page 20: Set Up Aurora Pro With A Single Network Distribution Box (Ndb)
A Network Distribution Box (NDB) increases the number of LED pixels supported by Aurora Pro and localizes the system’s power to each NDB. A single NDB supports 1000 LED pixels maximum. Each NDB port supports 100 LED pixels (or 80 LED pixels of Triklit-style fixtures). - Page 21 • NDB outdoor enclosure (optional) Method Power Aurora Pro OFF. Aurora Pro and NDBs must be contained in outdoor enclosures for outdoor installations. Refer to the Aurora Product Guide for outdoor accessories. 2. Connect an NDB to an NDB power supply.
-
Page 22: Set Up Aurora Pro With Multiple Network Distribution Boxes (Ndbs)
8. Power Aurora Pro and the NDB power supply ON. NDBs must be powered ON either before or at the same time as Aurora Pro to load configuration data properly. NDBs cannot be powered ON after Aurora Pro. - Page 23 9. Power Aurora Pro and any NDB power supply ON. NDBs must be powered ON either before or at the same time as Aurora Pro to load configuration data properly. NDBs cannot be powered ON after Aurora Pro.
-
Page 24: Set Up Aurora Pro With Network Distribution Boxes (Ndbs) And Power Top-Ups
2. Configure the NDBs. See Configure a Network Distribution Box (NDB) above for details. 3. Power Aurora Pro and any power supply OFF. Connect the Power-T(s) to each 5 A Power Top-Up. 4. Connect the Power-T/5 A Power Top-Up(s) to the end of each LED pixel strand installed in step 1. -
Page 25: Connect And Configure The Aurora Mobile App
Fig. 14: Aurora Mobile App store Connect to Aurora Pro in AP Mode In AP Mode, Aurora Pro acts like a Wi-Fi hotspot. Devices connect to Aurora Pro over its own one-to-one Wi-Fi network. Connecting to Aurora Pro in AP Mode disconnects a mobile device from its current network. -
Page 26: Connect To Aurora Pro In Station Mode
Connect to Aurora Pro in Station Mode In Station Mode, Aurora Pro connects to an existing Wi-Fi network (e.g. your home router). Aurora Pro connects to the Aurora Mobile App once your phone is connected to the same existing network. - Page 27 Fig. 18: Audio Control screen Pro-Tip: You can also cycle through audio inputs on Aurora Pro’s connector interface by pressing the audio select button (SEL). Switching between audio inputs from the Aurora Mobile App is ideal if Aurora Pro is out of reach.
- Page 28 Change Aurora Pro’s Password Change Aurora Pro’s password in the Security tab. Changing the Aurora Pro password from the default “aurora” is strongly recommended. (Fig. 19) Review Device Information Device Information displays information about the Aurora Mobile App and the Aurora Pro software build.
-
Page 29: Adjust Live Control Mode
Method Download and install the Aurora Mobile App and connect to Aurora Pro. 2. Connect to Aurora (see Connect to Aurora Pro in AP Mode above) and select Live Control in the main menu 3. Select Pattern, Palette, and Transition Type from the drop-down menus to change. - Page 30 9. Select to perform the following actions in Global Settings and Show Settings: • Audio Reactivity (Global)—Turn ON/OFF. Aurora Pro generates random patterns without audio input. • Brightness (Global)—Adjust overall LED pixel brightness. • Advance Cue on Silence (Show Mode only)—Silence triggers the following cue in Show Mode.
-
Page 31: Connect And Calibrate Audio Inputs
Live Control Mode and Show Mode. Press and hold the next mode/pattern button (NXT) for 5 seconds to switch Aurora Pro between Live Control Mode or to move to the next cue in Show Mode. -
Page 32: Connect Pro Audio Equipment
Method Download and install the Aurora Mobile App and connect to Aurora Pro. 2. Connect an audio input source to your Aurora Pro installation. Refer to Connect and Calibrate Audio Inputs for details. 3. Press the audio select button (SEL) until the IN 1 status LED is selected. You can also select IN 1 as the audio input source in the Aurora Mobile App. -
Page 33: Connect A Microphone
IN 2 as the audio input source in the Aurora Mobile App. Refer to Configure the Aurora Mobile App for details. Connect a Microphone Aurora Pro has 2 USB A ports to connect a USB audio interface with a ⅛” microphone. Required Components •... -
Page 34: Calibrate Auto And Manual Gain
CALIBRATE AUTO AND MANUAL GAIN Calibrate Auto Gain Aurora Pro’s audio input level should be between -3 - 0 dB for optimal lighting performance. The audio select status LED color indicates the dB range of a selected audio input. Refer to the Aurora Pro Connector Interface for audio select LED (SEL) colors and corresponding audio levels. -
Page 35: Calibrate Manual Gain
Manual Gain is recommended for non-musical audio input such as environmental sounds or MIC input. Calibrate Manual Gain Manual Gain is recommended for non-musical audio input such as environmental sounds or MIC input. It gives users full control over Aurora Pro’s sensitivity to audio input. Required Components •... -
Page 36: Set Up Non-Audio Reactive Mode
Pro with DMX. Set Up DMX IN Aurora Pro’s DMX IN function allows Aurora to act as a DMX fixture. Aurora Pro has 9 DMX parameter channels. Refer to the Aurora DMX Specification Appendix for details on each channels’ parameter controls. -
Page 37: Set Up Dmx Out
Refer to a dip switch calculator (http://bit.ly/2RNmWSC) to help set Aurora Pro’s base channel. 5. Use the DMX controller or console to adjust Aurora Pro’s library of lighting parameters. Refer to the Aurora DMX Specification Appendix for details. Fig. 33: Connect a DMX controller to Aurora Pro’s 5-pin DMX IN port. -
Page 38: Factory Reset And Upgrade Software
4. Put the .aur file on the USB drive. 5. Power Aurora Pro OFF and insert the USB drive in either of its USB A Ports. 6. Power Aurora Pro ON and wait until the audio select LEDs stop cycling white. -
Page 39: Appendices
LED pixels refer to the RGB LED fixtures used in Aurora installations. Mobile App Connection Modes AP Mode AP Mode establishes a one-to-one Wi-Fi connection between Aurora Pro and a mobile device. Station Mode Station Mode establishes a Wi-Fi connection between Aurora Pro and an existing external Wi-Fi network that a mobile device is connected to. -
Page 40: Troubleshooting
Connecting to Android devices Android-specific connection Turn mobile data ON/OFF. Turn issues Bluetooth ON/OFF Live Control Mode/Show Mode Wrong mode Ensure that Aurora Pro is not in not working DMX mode (next mode/pattern status LED is yellow in DMX Mode). Lighting Issue... -
Page 41: Aurora Pro Patterns And Lighting Parameter Effects
AURORA PRO PATTERNS & LIGHTING PARAMETER EFFECTS Parameter Effects Use the following table as a general guideline for parameter effects—Aurora patterns respond to each parameter differently. Parameter Effect Brightness Adjusts LED brightness from 0—100% Transition Transition time until next cue... - Page 42 PATTERN: SPECTRUM Ideal For: • Dynamic music, such as • Color sweep in non-audio classical, jazz, and folk reactive mode • Loud voices/yelling • Reacting sensitively to low audio • Abstract visualization of frequencies PARAMETER CONTROL EFFECT Non-Audio Reactive Parameter Audio Reactive Pixel mapping Sweep speed...
- Page 43 PATTERN: PLASMA Ideal For: • Evoking moving shapes • 2D and 3D fixture configurations • Bass • Frequencies <2000 Hz PARAMETER CONTROL EFFECT Parameter Audio Reactive Non-Audio Reactive Speed Movement speed Movement speed Energy Brightness Brightness Variance Shape Shape Decay Audio input to light mapping smoothness PATTERN: TWINKLE...
- Page 44 PATTERN: FLASH BANG Ideal For: • Music with a strong beat • High impact displays • Strobe lights in a non-audio reactive environment PARAMETER CONTROL EFFECT Audio Reactive Non-Audio Reactive Parameter Speed Strobe rate Color and brightness Color and brightness Energy Variance Decay of flashes...
-
Page 45: Aurora Dmx Specification
AURORA DMX SPECIFICATION Pro-Tip: Both Channels 0 and 1 set the DMX base address of Aurora Pro to 1 DMX Channel Value Function 0-255 Brightness 0-255 Color Palette Select For an up-to-date list of color palette values refer to latest DMX... -
Page 46: Extended Modes Of Interaction
Coin Box Integration Integrate an Aurora Pro system with a coin box for charity-based or fundraising installations. Offer donors a reward for their coin donations in the form of a light show. -
Page 47: Aurora Pro (Aur-R2-P8D-00-Us/Aur-R2-P8D-00-Eu) Specifications
AURORA PRO SPECIFICATIONS (AUR-R2-P8D-00-US/AUR-R2-P8D-00-EU) Control Input DMX IN, 1⁄8” stereo auxiliary input, XLR / 1⁄4” combo, USB audio interface + Mic, USB 2.0 connector x 2, micro USB, panel mount buttons x 2, recessed button Output USB 2.0 connector x 2 (USB-to-Ethernet adapter available), 1⁄8”... - Page 48 Lighting Other light fixtures are compatible using modified versions of the Aurora Pro built- in RGB connectors. These reflect general specifications. Power 12 V @ 35 mA - 250 mA (depending on fixture) Lighting/Native Protocol 5 V UCS8903 (16 bits per channel addressing), 5 V...
-
Page 49: Aurora Pro Power Best Practices
Fig. 39: Aurora Pro housing dimensions AURORA PRO POWER BEST PRACTICES Power Requirements Aurora Pro requires a maximum current of 6.8 A at 120 VAC and 3.4 A at 240 VAC. Power and Data considerations for installations • Each Port on Aurora Pro supplies 2.5 A at 12 V. - Page 50 Lamp type: LED 5050 • Lamp wattage: 1 W • All RGB LED fixtures use LED 5050 as the lamp type. Warning: Please contact Limbic Media to use Aurora Pro with fixtures other than those listed in the following table.
- Page 51 Aurora Pro Power Fixture Limits Per Port LEDs IP Rating Current (A) Max Lights/Port* Fixture Type Node Fixture 23 °C (73 °F) Mini Triklits 0.03 Triklit 100s 0.112 360° Triklits 0.03 Bistros and Light Strings 0.03 Flexible Strip 28/m 0.03...
-
Page 52: Electrical Safety
A potentially hazardous situation which could result in minor or moderate injury or property damage if not avoided. Also alerts against unsafe practices. Ignoring a hazard voids any warranty. Aurora Pro Safety Hazards WARNING Power must be disconnected before installing Aurora AUR-R2-P8D-00-US/AUR-R2- P8D-00-EU or connecting light strands. - Page 53 NOTE The instructions and precautions set forth in this user manual are not fully-inclusive, or pertinent to all installations as Limbic Media cannot anticipate all possible situations. Owner/User Responsibilities It is the responsibility of the contractor, installer, purchaser, owner, and user to install, maintain, and operate Aurora AUR-R2-P8D-00-US/AUR-R2-P8D-00-EU in compliance with all state and local laws, ordinances, and regulations.
- Page 56 limbicmedia.ca 2-740 Discovery Street Victoria, BC V8T 1H2 778.430.5123 info@limbicmedia.ca...
Need help?
Do you have a question about the Aurora Pro and is the answer not in the manual?
Questions and answers