Table of Contents
Advertisement
Advertisement
Table of Contents

Related Manuals for Silca DUO POWER

Summary of Contents for Silca DUO POWER
- Page 1 Operating manual D434685XA vers. ®...
- Page 2 This manual has been drawn up by SILCA S.p.A. All rights reserved. No part of this publication may be reproduced or used in any form or by any means (photocopying, microfilm or other) without the written permission of SILCA S.p.A. Edition : october 2010 Printed in India by MINDA SILCA Engineering Ltd.
-
Page 3: Table Of Contents
TRANSPORT ....................5 Packing ....................5 Transport ....................5 Unpacking .....................5 Handling the machine ................5 DUO / DUO POWER machines WORKING PARTS ........6 DUO BRAZIL machine WORKING PARTS ...........7 MACHINE DESCRIPTION ................8 Technical Data ..................9 Graphics ....................9 Electric circuit ..................10 ACCESSORIES PROVIDED .................11... - Page 5 : WITH LEFT-HAND CARRIAGE Fig. 1 PUMP KEYS ATTENTION: see chap. 8.3.4. WITH RIGHT-HAND CARRIAGE Fig. 2 1) Head 2) Rim 3) Stop 4) Blade 5) Tip 6) Back 7) Cuts 8) Stem 9) Bit Copyright Silca 2 010...
- Page 6 If th e key-cuttin g ma chine is used differently or for purposes differ ent from those describe d in this manual, the customer will forego any rights he may have over SILCA S.p.A. Furthermore, unforeseen danger to the operator or any third parties may arise from incorrect use of the machine.
-
Page 7: Transport
Handling the machine When the DUO has been unpacked, place it directly on its workbench. This operation can be carried out by one person, firmly holding the base, and no other part, to lift and carry the machine. Copyright Silca 2 010... -
Page 8: Duo / Duo Power Machines Working Parts
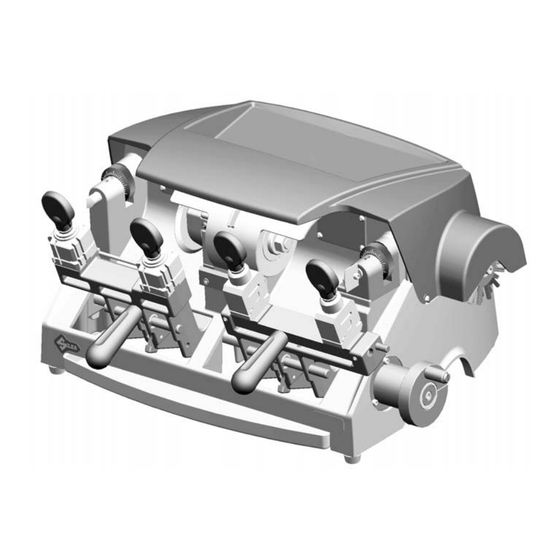
Operating manual - English DUO / DUO POWER machines WORKING PARTS DUO / DUO POWER Fig. 5 A - left-hand carriage A1 - carriage lock/release pin - left-hand side B - right-hand carriage B1 - carriage lock/release pin - right-hand side... -
Page 9: Duo Brazil Machine Working Parts
N1 - centesimal ring - right tracer point P - brush Q - top cover R - lamps S - chippings tray T - main switch U - motor on switch V - supply socket V1 - fuses W - cutters protective shield Copyright Silca 2 010... -
Page 10: Machine Description
• bit, double bit, pump and mail box keys*: with right-hand carriage. DUO / DUO POWER DUO BRAZIL Fig. 7 The main parts of the machine are described below: Main switch The ke y-cutting machine is co nnected to a pow er supply so cket provided wit h a differentia l switch. -
Page 11: Technical Data
DIMENSIONS: width: 510 mm - depth: 450 mm - height: 280 mm SONOROUS PRESSURE: Leq. = less than 70 dbA WEIGHT: Kg.23 Graphics THE USE OF PROTECTIVE GOGGLES IS COMPULSORY * Mail box keys only on DUO and DUO BRAZIL versions Copyright Silca 2 010... -
Page 12: Electric Circuit
The main parts of the electric circuit on the DUO are listed below: 1) Main socket with fuses 2) Safety main switch 3) Illuminated switch 4) Motor: 230V- 50Hz (120V-60Hz) 5) Condenser 6) Lamps blue blue brown brown yellow/green Copyright Silca 2 010... -
Page 13: Accessories Provided
DUO is supplied with a full range of accessories. The accessories provided by Silca are all that is nec- essary to carry out the operations for which the machine is designed. -
Page 14: Machine Installation And Preparation
. ATTENTION: ensure that the machine voltage is the same as that of the mains, which must be properly earthed and provided with a differential switch . 200 mm 200 mm 200 mm Fig. 8 Copyright Silca 2 010... -
Page 15: Description Of Work Station
Connection to the mains For the safety of the operator and the machine it is important to ensure that the machine is connected to the proper mains voltage by means of an earthed differential switch. Copyright Silca 2 010... -
Page 16: Cutter Shield
The shield (W) is mobile and can be placed over the cutter when not in use: to operate the left-hand carriage, take shield (W) to the right (fig. 11) to operate the right-hand carriage, take shield (W) to the left (fig. 12) Fig. 11 Fig. 12 Copyright Silca 2 010... -
Page 17: Machine Regulation And Utilization
(G2) holding the tracer point. b) turn the ring nut (G1) clockwise to advance the tracer point (fig. 15 and fig. 16). c) turn the ring nut (G1) anticlockwise to return (fig. 17). Copyright Silca 2 010... - Page 18 Turn the nut to the RIGHT (clockwise) to take the tracer point down. Result: LESS DEEP CUTS cutting tool Fig. 17 Turn the nut to the LEFT (anticlockwise) to take the tracer point up. Result: DEEPER CUTS Copyright Silca 2 010...
-
Page 19: Calibration - Right-Hand Carriage
If this is not so, loosen the 2 tracer point holder screws (N2) (fig. 19) and move the tracer point holder manually (right or left) until the ideal condition is found. 8) Tighten the 2 screws (N2). Fig. 19 Copyright Silca 2 010... - Page 20 2a) DUO and DUO BRAZIL: place the adjusting keys on the clamps (fig. 20-a) on the 2nd side for mail box keys - fig. 38); 2b) DUO POWER: place the adjusting pins on the clamps (fig. 20-b) on the 1st side for bit/double bit keys - fig. 39).
- Page 21 Turn the nut to the RIGHT (clockwise) to take the tracer point down. Result: LESS DEEP CUTS. cutting tool Fig. 22 Turn the nut to the LEFT (anticlockwise) to take the tracer point up. Result: DEEPER CUTS. Copyright Silca 2 010...
-
Page 22: Cutting Operations
1) Loosen the clamp closing knob by a few turns. 2) Raise the clamp (both jaws) and turn so that the re- quired side is facing the tracer point and cutter. Note: carry out the operation on both clamps. Fig. 24 Copyright Silca 2 010... -
Page 23: Carriage Translation On Duo Key-Cutting Machine
• If the carriage to be used for cutting is in a mobile/free position (carriage released), to move it: - use the handle (C) or (H) to both raise and move the carriage. DUO / DUO POWER Fig. 25 8.1.4 Carriage translation on DUO BRAZIL key-cutting machine - use the handle (C) or (H) to both raise and move the carriage. -
Page 24: Flared Cuts Cutting Bit Keys (Right-Hand Carriage)
• To activate tilting: pull out the pin (L). • To deactivate tilting: inser t the pin (L) to lock the clamps in the fixed horizontal position. Fig. 27 Fig. 28 Fig. 29 Copyright Silca 2 010... -
Page 25: Cutting Flat Cylinder And Vehicle Keys - Left-Hand Carriage
Cutting flat cylinder and vehicle keys - LEFT-HAND carriage only with DUO BRAZIL DUO / DUO POWER key-cutting machine DUO BRAZIL key-cutting machine Fig. 30 1) Turn the clamps to find the appropriate side for securing the key (fig. 30). - Page 26 5) Turn off the machine with witch (U) before removing the duplicated key. 6) Remove the keys from the clamps. 7) Turn on the machine with switch (U) and smooth off the key edges by means of the brush (P). Fig. 32 Copyright Silca 2 010...
-
Page 27: Using The Accessories
ATTENTION: the pins provided have two different diameters : 1,20 mm and 1,70 mm; It is essential to use pins with the same diameters for locking both the original and the key blank . Fig. 33 Copyright Silca 2 010... - Page 28 1) Leave the gauges in the idle position; 2) Insert the bars into the slot in the clamps; 3) Rest the tip of the key against the bar; 4) Secure the key and remove the bar. Fig. 35 Copyright Silca 2 010...
-
Page 29: Cutting Double Bit, Pump And Mail Box Keys - Right-H. Carriage
The duplication is possible for keys with these The duplication is possible for keys with these characteristics. characteristics. DUO and DUO BRAZIL DUO POWER Fig. 37 * Mail box keys only on DUO and DUO BRAZIL versions Copyright Silca 2 010... - Page 30 90° pump keys Fig. 39 DUO POWER Clamp side for bit, double bit keys and bit keys with central stop (position 1) Clamp side for pump keys (position 2 turned 90°) Copyright Silca 2 010...
-
Page 31: Cutting Bit And Double Bit Keys
8) Take the carriage back with the handle (H), go on to the next cutting position and continue from point 9) When cutting is finished, turn off the switch (U) and remove the keys. Fig. 40 Fig. 41 Copyright Silca 2 010... -
Page 32: Cutting Keys With Central Stop
7) Take the carriage back with the handle (H), go on to the next cutting position and continue from point 8) When cutting is finished, turn off the switch (U) and remove the keys. Fig. 43 Copyright Silca 2 010... -
Page 33: Cutting Pump Keys
8) When cutting is finished, turn off the switch (U) and remove the keys. DUO and DUO BRAZIL 90° Ø min.3,5 max.7 mm min. 26 mm max. 15 mm ATTENTION: some models only. The duplication is possible for keys with these characteristics. Fig. 44 Copyright Silca 2 010... - Page 34 The duplication is possible for keys with the following characteristics. Ø min.3,5 max.7 mm max.7 mm 14 mm max. 15 mm max.20 mm 90° pump keys pump keys ROUND stem FLAT stem (Mottura type) Fig. 45 Copyright Silca 2 010...
-
Page 35: Maintenance
5) Carefully clean the new cutting tool and its seat 6) Install the new cutting tool and tighten the nut. ATTENTION: the direction of cutter rotation is: clockwise for prismatic cutters, anticlockwise for saw cutters. 7) Remove the locking pin . locking rod Fig. 46 Copyright Silca 2 010... -
Page 36: Access To The Lower Part
4) Turn the machine onto its back firmly holding it on handles (C and H) (fig. 47). Fig. 47 Copyright Silca 2 010... -
Page 37: Replacing The Brush
2) Access the bottom part (chap.9.2, page 34) and loosen the 4 nuts (S1) of the plate motor (fig. 50). 3) Push the motor back until the belt is properly tightened. 4) Tighten the four nuts (S1). 5) Place the machine in position on the work bench. Fig. 49 Copyright Silca 2 010... -
Page 38: Replacing The Tracer Point
5) Fit the new tracer point and screw down to the end of run. 6) Tighten the grub screw (G3). 7) Tighten the screw (G4). 8) Re-set the machine as described in chap. 7.2, page 15. Fig. 52 Copyright Silca 2 010... -
Page 39: Regulating Left Carriage Depth
4) Close the fuses box and connect the power cable ATTENTION: fuses must always be replaced with others of the same type (rapid) and with the same Amps (4 Amp for 230V - 8 Amp for 120V). fuses box Fig. 55 Copyright Silca 2 010... -
Page 40: Replacing Main Switch
3) Remove the switch making pressure on the tabs with a screwdriver. 4) Fit the new main switch. 5) Reconnect the 4 connectors (V2). 6) Replace the top cover and secure with the 4 screws (Q1). Fig. 56 Fig. 57 Copyright Silca 2 010... -
Page 41: Replacing Motor On Switch
4) Fit the new switch in its seat and r econnect the 4 connectors (S2) p aying special attention to their position. 5) Replace the top cover and secure with the 4 screws (Q1). Fig. 58 Copyright Silca 2 010... -
Page 42: Replacing Motor/Condenser
(S5) (fig. 59). 11) Replace the condenser wires. 12) Place the machine in position on the work bench. 13) Replace the top cover and secure with the 4 screws (Q1). Fig. 59 Fig. 60 Copyright Silca 2 010... -
Page 43: Replacing Lamp
2) Loosen the light bulb (this may be facilitated by removing the shield (R1) or (R2). 3) Screw the new light bulb into the lamp. 4) Replace the top cover and secure with the 4 screws (Q1). Fig. 61 Copyright Silca 2 010... -
Page 44: Disposal
The sanctions currently provided for by law shall apply to users who dispose of products in unauthorised ways. Copyright Silca 2010... -
Page 45: Assistance
How to request service The guarantee attached to DUO key-cutting machines ensures free repairs or replacements of faulty parts within 24 months of purchase. All other service calls must be arranged by the customer with Silca or with a Silca service centre. - Page 46 Standards | 09 | European Union DIRECTIVE 2006/95/CE (Low Voltage) and with the EN 60204-1 : 2006 Standards Claudio Tomasella of the Silca S.p.A. Research & Development Division is authorized to create a Technical File. General Manager Basic Production Center...
- Page 47 SILCA S.p.A. Via Podgora, 20 (Z.I.) 31029 VITTORIO VENETO (TV) Tel. 0438 9136 Fax 0438 913800 E-mail: silca@silca.it www.silca.biz Members of the Kaba Group...
Need help?
Do you have a question about the DUO POWER and is the answer not in the manual?
Questions and answers