Advertisement
Table of Contents
- 1 Table of Contents
- 2 Technical Data
- 3 General Safety Rules
- 4 Specific Safety Rules for the Mini Wood Lathe
- 5 Electrical Information
- 6 Diagram and Location of Parts
- 7 Assembly and Adjustment Instructions
- 8 Operating Instructions
- 9 Maintenance
- 10 Parts List
- 11 Exploded View
- 12 Warranty
- Download this manual
Advertisement
Table of Contents

Related Manuals for MasterCraft 55-4504-8


Summary of Contents for MasterCraft 55-4504-8
- Page 1 12" Mini Wood Lathe 55-4504-8 Owner's Manual Toll-Free Helpline: 1-800-689-9928 01/07...
-
Page 2: Table Of Contents
Warranty ............18 I. Technical Data MINI WOOD LATHE MODEL NUMBER: 55-4504-8 MOTOR: 120 V AC, 60 Hz, 3 A SPEEDS: 500–3500 RPM... -
Page 3: General Safety Rules
II. General Safety Rules Safety is a combination of common sense, staying alert, and knowing how the mini wood lathe works. WARNING: IN ORDER TO AVOID MISTAKES THAT COULD CAUSE SERIOUS INJURY, READ THE FOLLOWING STEPS CAREFULLY AND UNDERSTAND THEM THOROUGHLY BEFORE PLUGGING IN THE LATHE. - Page 4 II. General Safety Rules (continued) 14. DO NOT STAND ON THE TOOL. Serious injury could result if the tool tips or is accidentally jarred. Do not store anything above or near the tool. 15. DO NOT OVERREACH. Keep proper footing and balance at all times. Wear oil-resistant rubber-soled footwear.
-
Page 5: Specific Safety Rules For The Mini Wood Lathe
III. Specific Safety Rules for the Mini Wood Lathe WARNING: DO NOT OPERATE THE LATHE UNTIL IT IS COMPLETELY ASSEMBLED AND INSTALLED ACCORDING TO THE INSTRUCTIONS. 1. FOR SAFETY REASONS, read the entire instruction manual carefully before operating the lathe. 2. -
Page 6: Electrical Information
III. Specific Safety Rules for the Mini Wood Lathe (continued) 16. DO NOT LEAVE THE LATHE UNATTENDED WHEN IT IS RUNNING. Do not leave the work area until the motor has come to a complete stop. 17. HANG turning tools on the wall beyond the tailstock end of the lathe. Do not lay them on the bench so that the operator must reach over the revolving workpiece to select them. - Page 7 IV. Electrical Information (continued) WARNING: THIS LATHE IS INTENDED FOR INDOOR USE ONLY. DO NOT EXPOSE IT TO RAIN OR USE IT IN A DAMP LOCATION. GUIDELINES FOR USING EXTENSION CORDS Verify that the extension cord is in good condition. When using an extension cord, be sure to use one that is heavy enough to carry the current that the tool will draw.
-
Page 8: Diagram And Location Of Parts
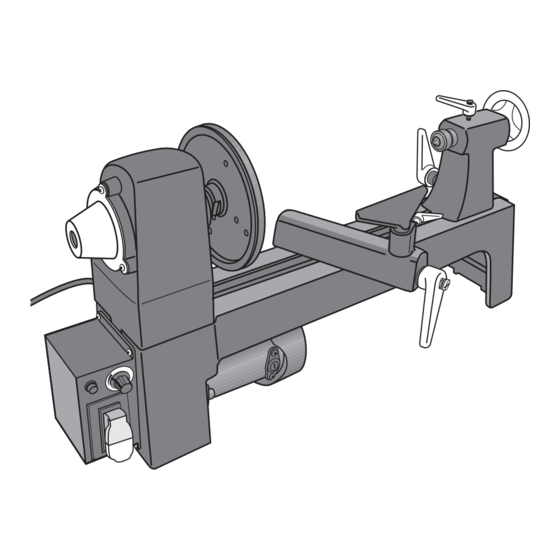
V. Diagram and Location of Parts Headstock Tool rest lock lever Faceplate Base lock lever Tool rest Tool rest base Tailstock lock lever Motor Tailstock cup centre Speed control knob Spindle lock lever ON/OFF switch Hand wheel Reset button Tailstock... -
Page 9: Assembly And Adjustment Instructions
VI. Assembly and Adjustment Instructions Unpacking (Fig. 1) CAUTION: THE MINI LATHE IS HEAVY, AND MUST BE LIFTED WITH THE HELP OF ANOTHER PERSON. 1. Carefully remove the mini lathe and all loose parts from the box. 2. Lay out all of the parts and check them against the parts listed below. Examine all parts carefully. - Page 10 VI. Assembly and Adjustment Instructions (continued) Mounting the lathe on a workbench (Fig. 2) WARNING: THE LATHE MUST BE BOLTED TO A WORKBENCH. OPERATING A LATHE THAT IS NOT BOLTED DOWN MAY RESULT IN SERIOUS INJURY. 1. Measure and mark three hole centres in a clear space on the workbench, as shown in Fig.
- Page 11 VI. Assembly and Adjustment Instructions (continued) Using a faceplate Fig. 4 Mount the workpiece onto the faceplate using brass wood screws. Do not use screws that are long enough to enter the area of the workpiece where material is to be removed. Note: The faceplate has an open centre, so that the drill bit can go completely through the workpiece when drilling through a workpiece from...
-
Page 12: Operating Instructions
VII. Assembly and Adjustment Instructions (continued) Removing the spur or the centre (Fig. 7) Fig. 7 1. Insert the push-out rod (1) into the far end of the headstock spindle or the tailstock spindle until it comes into contact with the shaft of the spur or centre. - Page 13 VII. Operating Instructions (continued) ON/OFF Switch (Fig. 8) The ON/OFF switch (2) controls the supply of electrical power to the lathe’s motor. The safety key (3) must be placed in the switch before the switch will operate. 1. Move the switch to the ON position to start the motor. The electric current is applied to the motor immediately.
- Page 14 VII. Operating Instructions (continued) Tailstock (Fig. 9) Fig. 9 1. Move the tailstock (5) by loosening the lock lever (1) and pushing the tailstock to the desired position on the bed. Lock it in place by tightening the lock lever (1). 2.
-
Page 15: Maintenance
VIII. Maintenance WARNING: FOR SAFETY REASONS, TURN THE SWITCH TO THE OFF POSITION AND REMOVE THE PLUG FROM THE POWER SOURCE BEFORE PERFORMING ANY MAINTENANCE WORK OR LUBRICATING THE LATHE. 1. Blow out any dust that accumulates inside the motor, the housing, and the bed assembly on a regular basis. -
Page 16: Parts List
IX. Parts List MASTERCRAFT ® 12" Mini Wood Lathe 55-4504-8 Description Description Screw M4 x 8 Wheel Flat washer 4 Handle Cover Screw Handle cap Pulley Eccentricity shaft (B) Screw M5 x 10 Threaded sleeve Bearing 6004-2Z Threaded rod B... -
Page 17: Exploded View
55-4504-8 ® ® When servicing the Mastercraft Mini Wood Lathe, use only Mastercraft replacement parts. Use of any other parts may cause damage to the product. Servicing of the wood lathe should be performed by a qualified service technician. WARNING: ANY ATTEMPT TO REPAIR OR REPLACE ELECTRICAL PARTS ON THIS TOOL MAY BE HAZARDOUS. -
Page 18: Warranty
XI. Warranty This Mastercraft product carries a three (3) year repair warranty against defects in workmanship and materials. At its discretion, Mastercraft Canada agrees to have any defective part(s) repaired or replaced free of charge, within the stated warranty period, when returned by the original purchaser with proof of purchase.
Need help?
Do you have a question about the 55-4504-8 and is the answer not in the manual?
Questions and answers