Table of Contents
Advertisement
Quick Links
Installation, Operation & Maintenance
Instructions
Please leave this instruction booklet with the home owner as it contains
important guarantee, maintenance and safety information
Read this manual carefully before commencing installation.
This manual covers the following products:
iBoost +200
Pt. No. 46712
Please note images are representative only and
may not portray your model
iBoost +200 CAT 5
Pt. No. 46714
CE compliant product
Advertisement
Table of Contents

Related Manuals for Stuart Turner Aquaboost iBoost +200 CAT 5

Summary of Contents for Stuart Turner Aquaboost iBoost +200 CAT 5
- Page 1 Installation, Operation & Maintenance Instructions Please leave this instruction booklet with the home owner as it contains important guarantee, maintenance and safety information Read this manual carefully before commencing installation. This manual covers the following products: iBoost +200 iBoost +200 CAT 5 Pt.
- Page 2 PRODUCT DESCRIPTION iBoost +200 Additional water storage tank consisting of fill valve, 200 litre water storage and coupling for system integration to an iBoost 200. The design of the tank incorporates an AF air gap for fluid isolation (BS EN 1717). iBoost +200 CAT 5 Additional water storage tank consisting of fill valve, 200 litre water storage and coupling for system integration to an iBoost 200 CAT 5.
-
Page 3: Table Of Contents
CONTENTS Page Checklist ............4 Important Facts - read before commencing installation . -
Page 4: Checklist
CHECKLIST IMPORTANT: With the appliance removed from its packaging check for any damage prior to installation. If any damage is found contact Stuart Turner Ltd within 24 hours of receipt. Fig. 1 Item Description Qty Item Description iBoost +200 Jubilee clip... -
Page 5: Important Facts: Read Before Commencing Installation
1 IMPORTANT FACTS: READ BEFORE COMMENCING INSTALLATION A. Water storage capacity. 1.11 The iBoost +200 has a usable water volume of approximately 200 litres; the length of time the iBoost delivers water will be dependent on the usage and refill rates. -
Page 6: Location
2 LOCATION - GENERAL 2.11 Access: The iBoost +200 must be easily accessible. 2.12 Protection: The iBoost must be located in a dry, frost free area. The iBoost must not be installed in a loft space. 2.13 Water retention: Site the iBoost in a location where in the unlikely event of a water leak, any spillage is contained or routed to avoid electrics or areas sensitive to water damage. -
Page 7: Key Features
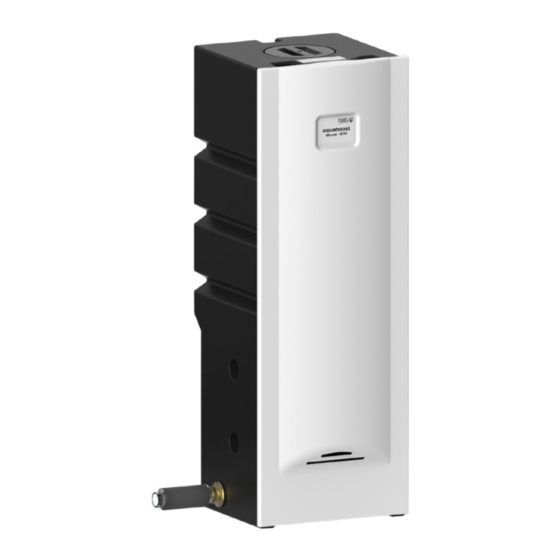
3 KEY FEATURES Retaining strap iBoost +200 Tank Label Part No & Serial No Cover retaining screw Tank access cover location Mains water connection Overflow Drain valve Fig. 2 iBoost +200 CAT 5 Fig. 3 Weir aperture - 7 -... -
Page 8: Installation
4 INSTALLATION 4.11 Mains water connection to iBoost: The iBoost +200 is to be permanently connected to the mains water supply using rigid pipe or suitably sized and rated flexible hose to comply with current building and plumbing regulations. The water tank fill valve has a G ½ male threaded fitting; a suitable 90 elbow type fitting must be used. - Page 9 c) First step is to decide where your preferred connection should be, either the side or the rear of the tanks then mark the centre point location on both units (iBoost +200 and iBoost 200). Note: Later models will have pre-marked centres on the tank. BACK FRONT BACK...
- Page 10 d) Whilst taking care not to drop/lose the wire holder inside the tank, thread the split washer onto the wire holder and then with the aid of the split, insert the washer into the hole in a spiral manner. Place washer into the body and against the flange.
- Page 11 h) Remove the wire holder from the tank by pulling it through. DO NOT allow for it to fall inside. Repeat steps C - H to fit the second flange in the other tank. Assembled connector Wire holder Fig. 11 Step 3 Connecting the tanks: a) Apply appropriate sealer such as threadlock or PTFE tape to each hose connector and screw one into each tank connector.
- Page 12 c) Run the mains water and overflow to the template positions and make the pipe length as detailed in Fig. 14). Non-pumped water supply Overflow Mains water supply Isolating valve Pumped water supply (connection only for iBoost 200) Length of pipework from wall* Fig.
- Page 13 e) Fix the retaining strap to Secure to wall using the top of the iBoost +200 M6 screw suitable fastener (not using the M6 screw supplied) provided.The free end of Retaining strap the strap must be secured to suitable wall using suitable fastening system.
-
Page 14: Commissioning
6.12 Water Supply: Always ensure that water supply is adequate to meet the demand. 6.13 For Further Technical Support: Phone the Stuart Turner PumpAssist team on +44 (0) 800 31 969 80. Our staff are trained to help and advise you over the phone. -
Page 15: Maintenance
6 MAINTENANCE 6.11 Water quality: The iBoost has been manufactured to the highest standard from WRAS approved materials. As with any stored volume of water; in order to ensure that the water remains fit for use the water temperature needs to remain below 20 C. - Page 16 6.14 Float fill valve: The float level is factory set but if in time the water level in the tank is found to be too high, the level can be adjusted by moving the float assembly on the arm of the fill valve down (see Fig. 21). Access the float fill valve by removing the lid of the tank (see Section 3 - Key Features).
-
Page 17: Technical Specification
Break tank Polyethylene Front panel Acrylic capped ABS Depth 529 mm Physical Width 536 mm Height 1504 mm Empty weight 35 Kg Filled weight 235 Kg Stuart Turner reserve the right to amend the specification without notice. - 17 -... -
Page 18: Trouble Shooting
8 TROUBLE SHOOTING GUIDE 8.11 Environment Protection: Your appliance contains valuable materials which can be recovered or recycled. At the end of the products’ useful life, please leave it at an appropriate local civic waste collection point. Cont ... - 18 -... -
Page 19: Guarantee
+44 (0) 800 31 969 80 You should obtain appropriate insurance cover for any loss or damage which is not covered by Stuart Turner Ltd in this provision. Please record here for your records. TYPE NO. SERIAL NO. - Page 20 Installers – Register with Stuart Turner and move up to Approved Installer status We receive thousands of enquiries every month from people seeking a Stuart Turner installer and by registering your details with us, we can offer consumers the opportunity to quickly locate an installer in their area.
Need help?
Do you have a question about the Aquaboost iBoost +200 CAT 5 and is the answer not in the manual?
Questions and answers