
Summary of Contents for Aeware in.xm
- Page 1 ™ Mid-range spa pack platform TechBook Featuring in.therm remote heater ™ So advanced! It's like walking on water!
-
Page 2: Table Of Contents
- SP error codes .............. 20 features ................... 5 - SP corrective actions ............22 overview heater error codes - in.xm™ overview ............. 7 - RH error codes ..............26 - in.xm™ dimensions ............8 - RH corrective actions ...........28 installation accessories error codes - floor installation ...............9... - Page 3 in.xm...
-
Page 4: Introduction
With its waterproof enclosure & breakthrough connectors, in.xm™ boasts the highest water resistance ever designed in a pack, just one of a long list of innovative features that make in.xm™ the safest and most reliable spa pack platform ever offered to the industry. -
Page 5: Warnings
WARNINGS: Before installing or connecting the unit, please read the following. * FOR UNITS FOR USE IN OTHER THAN SINGLE-FAMILY DWELLINGS, A CLEARLY LABELED EMERGENCY SWITCH SHALL BE PROVIDED AS PART OF THE INSTALLATION. THE SWITCH SHALL BE READILY ACCESSIBLE TO THE OCCUPANTS AND SHALL BE INSTALLED AT LEAST 5 FEET (1.52 M) AWAY, ADJACENT... -
Page 6: Features
In.xm™ boast a long list of technical features. Each of them stands on its own merits and contributes to bring to spa and hot tub manufacturers the most advanced solutions available to them: In.kin™ In.put™ kinetic heat monitoring... - Page 7 In.scan™ In.link™ ingenious plugs and connectors system auto-diagnostic In.link™ cables are very cool output and input plugs and Auto-diagnostic module with multiple detection levels, connectors that come with colored and tagged polarizers. in.scan™ continuously reads current at in.put™ to monitor Totally waterproof, they are designed to be easily breaker status.
-
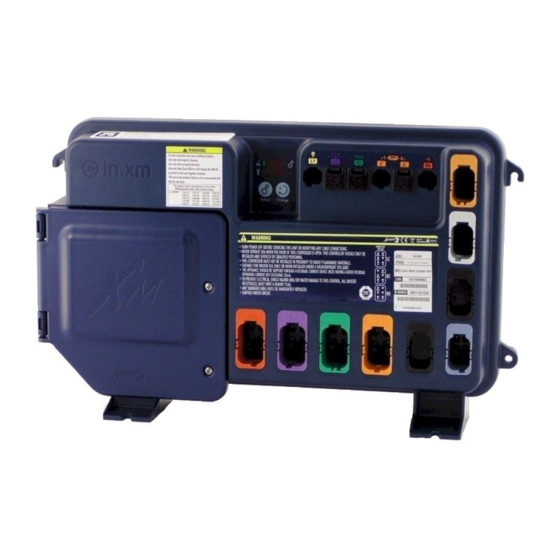
Page 8: In.xm™ Overview
In.xm™ overview Accessory connector (in.pocket™, in.terface™, Light or CoolRays connector General I/O connector SpaWatch™, etc.) (EXM-5™ or IR receiver*) Power box display and buttons Fuses in.keys™ main and Installation brackets aux. keypad connectors Main power entry connection Connector for direct... -
Page 9: In.xm™ Dimensions
In.xm™ dimensions: Front View Side View 16.6" (422 mm) 6.0" 9.9" (159 mm) (253 mm) 2.1" (54 mm) .79" (21 mm) 17 .8" 3,9" (451 mm) (101 mm) Ø.25" (6 mm) 4.110" 11" (104 mm) (279 mm) 2.948"... -
Page 10: Installation - Floor Installation
Floor installation procedure 4" The following material is Slide back side of the unit's foot Now fi rmly attach unit to Note: The spa pack must be recommended: into the guide plate. It should wooden base by using the installed at least 4 inches above easily slide into place. -
Page 11: Wall Installation
Wall installation procedure The following material is recommended: Firmly attach lower mounting holes on each side of the pack with the (2) remaining screws 4- # 10 screws of appropriate length with round, truss or pan head. 4- washers 1/2 OD x 1/16" thickness. -
Page 12: Electrical Wiring
Electrical wiring Main electrical box GFCI panel Warning! For 240 VAC (4 wires) For 240 VAC (*3 wires) "For units for use in other than single-family dwellings, a clearly Correct wiring of the electrical *If connected to a 3 wire system... - Page 13 Phillips screwdriver, a " use the " wrench or fl at left side of the in.xm™ spa pack This product must always 9/16 9/16 nut driver or a fl at screwdriver. screwdriver to tighten the bolts...
-
Page 14: In.link™ Connectors
Heater power cable in.link™ connectors In.xm™ features in.link™ connectors with colored and tagged They all include an integrated polarizers. This new plug and connector technology has been latch that keeps them safely in specifi cally designed for easy and safe assembly. The tags are place and provides audible and interchangeable depending on the output;... -
Page 15: Powering Up The Unit
Bonding lug Make sure all accessories Press Select button to change Br values displayed by the Use Change button to set the are linked to the bonding breaker setting. system correspond to 0.8 of current breaker rating then... -
Page 16: Setting The Learning Mode
Description Select button is used to access the breaker setting The in.xm™ pack has the ability to verify and "learn" the current consumption of every output connected to it. If an output is menu (short press) as well as the low level pro- replaced, a new learning must be done. -
Page 18: Troubleshooting Section
Mid-range spa pack platform Troubleshooting section So advanced! It's like walking on water! -
Page 19: Interface
In.xm™ troubleshooting advantage In.xm™ unique troubleshooting features are called in.scan™ because in.xm™ has the capacity to scan itself and read the status of all exterior connected devices. All errors codes will be displayed on the keypad and on the in.xm™... - Page 20 On: Something's wrong! If problems are found on System should be checked several devices, the priorities are as follows: • in.xm™ (error “SP” for spa pack) • in.therm™ (error “RH” for remote heater) • high voltage devices Select key. Pressing this key Change button.
-
Page 21: Spa Pack Error Codes
SP error codes SP - HR An internal hardware error has been detected in in.xm™. SP - BR The chosen input current rating is lower than the sum of current for all pumps. SP - IN The input voltage is too low. - Page 22 Pump 1 SP - OT Temperature inside the spa skirt is too high, causing the internal temperature in the in.xm™ to increase above normal limits (overheat condition). SP - OH & blinking temperature higher than 112°F on the keypad display The system detects spa water temperature exceeding 112°F...
-
Page 23: Sp Corrective Actions
Incorrect input current confi guration setting • Restart the spa pack and start & stop all pumps and blower. • Increase in.xm™ current rating and breaker setting. • If error reappears, replace in.xm™ spa pack. • Increase breaker size and manufacturer's cable gauge or reduce pump size. - Page 24 SP - IN SP - F1 Input voltage issue In.xm™ Fuse F1 is blown • Check input terminal connections to make sure they are • Replace the blown fuse F1 with an identically rated replacement correctly wired & tighten (see connection section) (SC-20, SC-25, etc.)
- Page 25 SP corrective actions in.xm SP - F2 SP - F3 In.xm™ Fuse F2 is blown In.xm™ fuse F3 is blown • Replace the blown fuse F2 with an identically rated replacement • Replace the blown fuse F3 with an identically rated replacement (SC-20, SC-25, etc.)
- Page 26 SP corrective actions SP - OT SP - OH & blinking water temp. on the keypad display Internal hardware temp. is too high water temperature exceeding 112°F is detected • Remove spa skirt and let system cool down. • Remove spa cover and let spa cool down.
-
Page 27: Heater Error Codes
RH - NF This code is displayed when a “no fl ow” condition is detected by in.therm™. RH - NC Communication problem exists between in.xm™ and in.therm™. RH - HL High Limit hardware circuit tripped. - Page 28 RH - PR The system detects a problem with the regulation probe. The system is constantly verifying if temperature probe readings are within normal limits. RH - ID The system detects a no match between the in.xm™ model and the in.therm™ model.
-
Page 29: Rh Corrective Actions
RH corrective actions in.xm RH - HR RH - NH A "no heat" issue is detected Internal hardware error detected in in.therm™ • Verify if in.therm™ is properly connected. (You should hear a click!) • Reset main breaker; make sure the heater restarts by changing set •... - Page 30 RH corrective actions RH - NF RH - HL “No fl ow” condition detected High limit hardware circuit tripped. • Make sure water valves are open and that water level is high There are 2 possible causes: enough. • The heater was previously stored in a very hot location prior to •...
- Page 31 If problem persists, either the in.xm™ or the in.therm™ may need - Reset the breaker. to be replaced (both parts must be returned since either part •...
- Page 32 RH - ID Incompatibility between the in.xm™ and in.therm™ models The North American version of the in.xm™ pack can only be connected with the North American version of the in.therm™ heater. The same applies to the European version of both devices.
-
Page 33: Accessories Error Codes
High voltage devices/accessories (P1, P2, P3..) P1 - ER System hasn’t detected any current change when turning Pump 1 on or off P2 - ER System hasn’t detected any current change when turning Pump 2 on or off P3 - ER / P4 - ER / P5 - ER System hasn’t detected any current change when turning... - Page 34 BL - ER System hasn’t detected any current change when turning blower on or off FN - ER System hasn’t detected any current change when turning fan on or off SC - ER System learning error...
-
Page 35: Accessories Corrective Actions
• If the spa is equipped with an in.k600™ menu driven, the learned current value can be verifi ed (see viewing current management data section for more details). Furthermore, if the current value learned by the in.xm™ spa control is not appropriate, it can trigger false... - Page 36 Note: If the spa is equipped with an in.k600™ menu driven, the learned current value can be verifi ed (see "viewing current management data" section for more details). Furthermore, if the current value learned by the in.xm™ spa control is not appropriate, it can trigger false...
- Page 37 BL - ER FN - ER Blower not responding Fan not responding • Make sure blower is connected properly. • Make sure fan is properly connected. • Manually change the output status (on/off) of blower. • Manually change the output status (on/off) of fan.
- Page 38 SC - ER System learning error Keypad doesn’t seem to work! Note: Keypad connected to in.xm™ is only detected when main Every time a low-level option is changed, system must “learn” breaker is reset. Don’t forget to reset breaker if you’re changing currents associated to each output/load.
-
Page 39: Testing The Ozonator
Testing the ozonator Smart Winter Mode not a bug but a feature! • Make sure ozonator is connected properly. Our Smart Winter Mode protects your spa from water cold enough to freeze the pipes by automatically turning pumps on for one •... -
Page 40: Gfci Trips
Verify if GFCI is properly connected. Note: If the neutral of the GFCI is hooked up to the neutral bar, the in.xm™ spa control will only trip when the 120v outputs are fired If it's not, verify GFCI diagram and reconnect it. -
Page 41: In.k600™ Keypad Function Description
In.k600™ keypad menu driven interface Multifunction Keys "Mode" Key "Plus" Key increases 1, 2, 3, 4 selects mode of "Ok" Key parameter setting operation: Spa, Audio, Each of these four and Options. Also, it keys helps you... -
Page 42: Viewing Current Management Data
*viewing current management data Multifunction key 2 Tech menu • Select Options menu • Select Info sub-menu • Press and hold Multifunction • Press Mode key to display the mode selection window. Key 2 for 5 seconds to access Tech menu (see next page) * Option available with in.k600™... - Page 43 Tech menu Here Pump 1 low speed current This menu allows you to view Here Pump 1 high speed current Here Pump 2 high speed current and phase angle are displayed the speed (low or high in the...
- Page 44 Tech menu Here Pump 2 low speed current Here Fan current and phase Here Ozonator current and Here Heater current and phase and phase angle are displayed angle are displayed phase angle are displayed angle (0°) are displayed •...
-
Page 46: In.therm
in.therm intelligent remote water heating systems Designed to be totally maintenance free! - Page 47 in.therm...
-
Page 48: Overview
in.therm overview in.therm ™ Intelligent remote water heating system designed to be totally maintenance free. Separated from pack, in.therm™ is an intelligent 4kw remote heater that integrates electronics in its power box. It includes a built-in temperature probe and a new water fl ow detection feature that eliminates the need of a pressure switch. -
Page 49: Installation
installation in.therm Heater installation For an optimal connection to spa plumbing, please note that we Grounding lug recommend the following 2” compression fi ttings & nuts. 368 mm Waterway Aquatemp Aqua-Flo Magic Plastics (14.5") #400-5570 # 86-02335 # 52202000 #0602-20 Plastic union nut Plastic union nut www.waterwayplastics.com... -
Page 50: Connecting In.therm™ To In.xm
Connecting in.therm™ to in.xm™ Heater communication cable Bonding lug Heater power cable Connect the heater power cable to the in.link™ output connector indicated Rh on the spa pack. Connect the heater communication cable to the low voltage connector indicated Rh on the spa pack. -
Page 51: Specifications
In.xm™ electrical specifications: Light, 1 A / 10 VAC (-5%/+10%) @ 240 VAC / 60Hz Input rating : 120/240 VAC (2-phase required, with or Communications port * without neutral) 48 A maximum, 60Hz. Top side controller * Input operation specification:... - Page 52 General specifications: Environmental: In.therm™ supply ratings: Operating temperature: 0°C (-32°F) to 50°C (122°F) Voltage: 2-phase, 240VAC Storage temperature: -25°C (-13°F) to 85°C (185°F) Current: 17 A maximum (4 kW heater) Humidity: up to 80% RH, non condensing Frequency:...
- Page 53 Advanced electronics! Water resistance! Gecko Alliance 450 des Canetons, Quebec City (QC) G2E 5W6 Canada, 1.800.78.GECKO 9225 Stellar Court, Corona, CA 92883 USA , 951.667 .2000 9919-100606 www.geckoalliance.com Rev. 05/10...
Need help?
Do you have a question about the in.xm and is the answer not in the manual?
Questions and answers