Table of Contents
Advertisement
Quick Links
Flash
™
Rough Valve Kit
Thank you for selecting American-Standard...
the benchmark of fine quality for over 140 years.
To ensure that your installation proceeds smoothly-please read
these instructions carefully before you begin.
RECOMMENDED TOOLS
Phillips Screwdriver
Flat Blade Screwdriver
ROUGHING-IN DIMENSIONS
n
To assure proper positioning in relation to wall,
note roughing-in dimensions.
104 mm
(4-1/16")
143 mm
(5-5/8")
144 mm
(5-11/16")
95 mm
(3-3/4")
116 mm
(4-9/16")
116 mm
(4-9/16")
Product names listed herein are trademarks of AS America, Inc.
© AS America, Inc. 2018
INSTALLATION
INSTRUCTIONS
R950, R950SS
Tubing Cutter
Adjustable Wrench
R950
95 mm
(3-3/4")
116 mm
(4-9/16")
1/2 - 14 NPT
143 mm
(5-5/8")
- 1 -
Certified to comply with ASME A112.18.1/CSA B125.1
Channel Locks
116 mm
(4-9/16")
R950SS
104 mm
(4-1/16")
1/2 - 14 NPT
144 mm
(5-11/16")
R950SS
R950
Plumbers' Putty or Caulking
104 mm
(4-1/16")
143 mm
(5-5/8")
144 mm
(5-11/16")
95 mm
(3-3/4")
116 mm
(4-9/16")
116 mm
(4-9/16")
M965925 (5/18)
1/
Advertisement
Table of Contents

Summary of Contents for American Standart Flash R950
- Page 1 INSTALLATION INSTRUCTIONS R950, R950SS Flash ™ Rough Valve Kit R950SS Thank you for selecting American-Standard... the benchmark of fine quality for over 140 years. To ensure that your installation proceeds smoothly-please read R950 these instructions carefully before you begin. Certified to comply with ASME A112.18.1/CSA B125.1 RECOMMENDED TOOLS Phillips Screwdriver Tubing Cutter...
- Page 2 Turn off hot and cold water INSTALL TUB FILLER FLOOR SUPPORT CAUTION supplies before beginning. • Note: Refer to Roughing-in Dimensions on page 1 for additional information. • Adequate floor support is required. The WOOD SUPPORT (1) must be a minimum of 2" (51 mm) thick by 10" (254 mm) wide. 2x6 lumber is NOT adequate for this application.
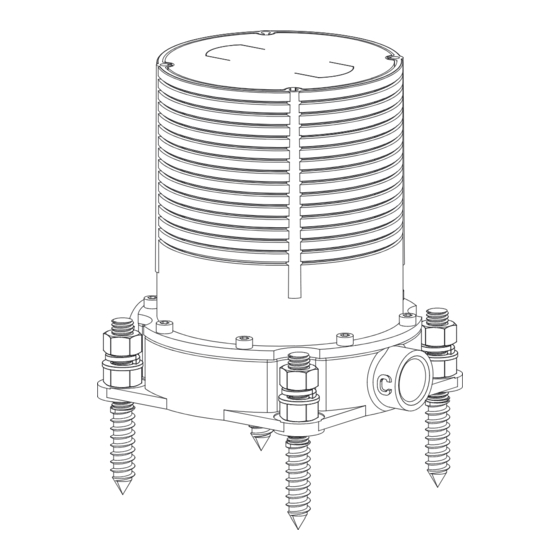
- Page 3 INSTALL ROUGH-IN VALVE • Locate the position on the wood support where the ROUGH-IN VALVE (1) will be installed. Use the ROUGH-IN VALVE (1) as a guide to mark the four mounting hole locations. Fig. 1. • Remove ROUGH-IN VALVE (1) and drill four pilot holes of 3/8" (9 mm) in diameter. Fig 2. •...
- Page 4 FINISH FLOOR INSTALLATION • Complete the installation of the Finished Floor. Tile as close to the PLASTER GUARD (3) as you can. • Caulk between Finished Floor and PLASTER GUARD (3). FINISHED FLOOR ROUGH FLOOR F R O N COLD M965925 (5/18) - 4 -...
- Page 5 Flash ™ Rough Valve Kit MODEL NUMBERS R950 R950SS R950 R950SS M970513-0070A MOUNTING SCREW KIT M970513-0070A MOUNTING SCREW KIT HOT LINE FOR HELP For toll-free information and answers to your questions, call: 1 (800) 442-1902 Mon. - Fri. 8:00 a.m. to 8:00 p.m. EST Saturday 10:00 a.m.
Need help?
Do you have a question about the Flash R950 and is the answer not in the manual?
Questions and answers