
Summary of Contents for Aerpro APHUB X4
- Page 1 APHUB REAL TIME FPV 《 User Manual Version 1.0》 Read the User Manual and its instructions carefully before use! Users may download the User Manual from the official AERPRO website. WWW.AERPRODRONE.COM...
-
Page 2: Important Safety Information
To avoid any injuries, do not use the quad with broken or damaged components. Maintenance: Do not try to open or repair the units by yourself. Please contact AERPRO technical support for service. For more information, please visit the official website at www.aerpro-drones.com. -
Page 3: Table Of Contents
Table of Contents Important safety information 5.4 Battery installation Reading Tips 5.5 Transmitter stick calibration Symbol Explanation 5.6 Antennas Usage Advice 5.7 How to set or change the 5.8GHz video frequency Table of Contents The APHUDX4 (H109S Standard) Profile 5.8 Binding the transmitter 1 What’s Included and aircraft 2 Aircraft Overview... -
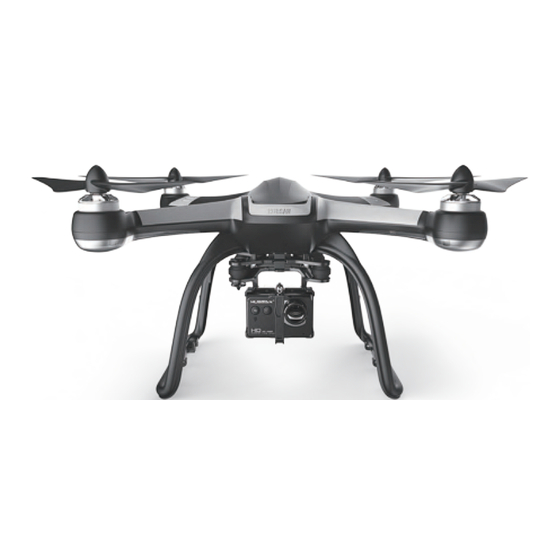
Page 4: The Aphudx4 (H109S Standard) Profile
The APHUDX4 (H109S Standard) Profile The APHUDX4 is a four-rotor quadcopter made for aerial photography and filmography. It comes equipped with a high-precision single-axis gimbal, 1080P HD camera and an advanced flight control system. The FPV remote control is capable of long-range flight while supplying real-time video transmission FPV. The APHUDX4 can also record video footage and take quality photos during flight. -
Page 5: Aircraft Overview
10 Balance Charger Used to charge the aircraft battery Used to read camera data; also 11 Micro-USB camera cable used to charge the camera battery User Manual The Hubsan X4 PRO User Manual 13 1080P Camera An HD camera The transmitter’s 2.4GHz 14 2.4GHz transmission antenna transmission antenna The aircraft’s 5.8GHz... -
Page 6: Pre-Flight Checklist
The transmitter (uses 8 AA batteries or a LiPo battery- not included) Pre-Flight Checklist Please refer to the following installation and preparation steps before using the aircraft. Before flight, check that the remote control and aircraft have sufficient power to fly. Check the drone fuselage and propellers carefully. -
Page 7: Battery Installation
1.2 Battery installation and use Power on/power off Power on: Push the battery into its compartment and connect the bullet adapters as shown in the below figure. Note the positive and negative polarities. The aircraft ’s LEDs should light up. Power off: Disconnect the battery adapters to power off the aircraft. - Page 8 (1) Overcharge protection : When the battery voltage level reaches 12.8V, the battery will stop charging. Excessive charging will seriously damage the battery. (2) Over-discharge protection : When the battery voltage level reaches 8.4V, the battery will stop outputting power. Excessive discharging will seriously damage the battery. (3) Short-circuit protection : When the battery detects a short-circuit, it will stop outputting power to protect itself.
-
Page 9: Preparing The Aircraft
2 Preparing the Aircraft The APHUDX4 comprises four motors, a single-axis gimbal, 1080P HD camera and an advanced flight control system. The aircraft is equipped with data and video transmission capabilities for user-friendly flight. 2.1 Introduction [1] Propeller [2] Motor [3] LED [4] Gimbal shock absorbers... - Page 10 Camera specifications Video resolution 1920*1080 HD Battery 3.7V 650mAh Recording frame rate 30FPS Ambient operational temperature 10∼+70 degrees Celsius Video format Ambient operational humidity 30%∼80% Video format 3 million pixels MJPG Power consumption (operational) 1.9W Resolution 2048 * 1536 pixels Power consumption (standby) 1.33W Lens specifications 1/3”...
- Page 11 If the camera is connected to a computer via the Micro-USB, the former must be powered on to copy videos and pictures to the PC. If the camera is powered off, media cannot be transferred (only the battery will charge). If the camera’s USB connection to the aircraft is disconnected, any video recordings will be terminated.
-
Page 12: The 1-Axis Gimbal
2.3 The 1-axis gimbal After the gimbal and camera are installed and the aircraft powered on, the gimbal will also power on and test itself for issues. The gimbal’s movement (pitch) may be controlled by the H906A transmitter/remote control. Gimbal features Precision of control ±0.03 °... -
Page 13: The Propellers
3 The Prope llers The APHUDX4 uses 9-inch propellers. Each is marked with either an A or a B. Please replace damaged propellers. Before installing the propellers for the first time, please check whether the propeller and motor arm read "A" or "B”. The two letters should match. 3.1 Intr oducti on Propeller Propeller A... -
Page 14: Removal
3.3 Removal When the blade is damaged or needs to be replaced, hold the propeller with a hand or the provided auxiliary wrench, and remove by turning it in the indicated “unlock” direction. before each flight. Before each flight, be sure to check that all propellers are free of deformations and undamaged. If any propeller is damaged, please replace before flying. -
Page 15: Installing The Aircraft's 5.8Ghz
4 Installing the Aircraft’s 5.8GHz transmission antenna Remove the antenna from its wrappings and locate the gold SMA connector at the side of the unit. Attach the antenna to the connector by screwing it on clockwise. After securely tightening the antenna, bend it at the joint to point it downwards. -
Page 16: Getting To Know The Transmitter
5.2 GETTING TO KNOW THE TRANSMITTER 5.8GHz Antenna 9 Antenna Home 8 Neck Strap Eyelet (2) Elevator/Rudder Stick (1) Throttle /Aileron stick EXT Function Key ENT Function Key 5 Rudder Trim 3 Aileron Trim 6 Throttle Trim 4 Elevator Trim Down Function UP Function 7 Power SW... -
Page 17: Key Functions
5.3 KEY FUNCTIONS IDENTIFICATION FUNCTION Forward and backward movement of the stick will make the X4 Pro Throttle/Rudder Stick increase or decrease speed respectively.Left and right movement of the stick makes the X4 Pro yaw left/right respectively. Forward and backward movement of the stick makes the X4 Pro nose Elevator/Aileron Stick point up/down respectively. -
Page 18: Battery Installation
5.4 Battery installation Insert 8 AA batteries into the Plug the battery pack back into slots of the battery pack. Take the compartment. Close the Open the compartment hatch note to make sure the polarities compartment hatch and screw and remove the battery pack. are correctly matched. -
Page 19: Antennas
5.6 Antennas To keep video transmission clear and avoid interference, make sure the H906A’s 5.8Ghz antenna logo faces the aircraft. During flight, the antenna and its signal path must be unobstructed to maximize the video and control range. Bend the antenna so that its logo is as directly pointed towards the aircraft as possible. -
Page 20: Binding The Transmitter
Getting ready to fly It is recommended that users implement some kind of flight training (i.e using a simulator for flight practice, seeking professional guidance, etc.) before flying the H109S. Please select an appropriate flight environment for flight. Flight environment requirements (1) Select an open environment devoid of high rise buildings and tall obstructions (such as trees and poles). -
Page 21: Compass Calibration
6 Compass Calibration Every time the aircraft is powered on, its compass will automatically test for deviations in the local magnetic field. If deviations are detected, the aircraft will automatically enter compass calibration mode. The remote control screen will first read "Calib compass 1" and the LEDs should be red, flashing clockwise. Slowly rotate the aircraft on the horizontal plane until the aircraft LEDs change color. -
Page 22: Horizontal Calibration
Horizontal calibration is required when the quadcopter drifts on the horizontal plane during flight. When this happens, land the aircraft and disarm its motors. Place the aircraft on a completely flat surface and then follow the below calibration procedure. Hold the left stick to the right side of its socket. Rapidly wiggle the right stick left and right continuously until all 4 LEDs slowly flash yellow. -
Page 23: Arming/Disarming The Motors
7 Arming/Disarming the Motors Arming/starting motors ①Simultaneously pull the transmitter joysticks diagonally down-out to arm the motors (as shown in the side figure). Disarming/stopping motors ①Pull the throttle joystick all the way down until the copter has completed its descent to the ground. Simultaneously pull the transmitter joysticks diagonally down-out to disarm the motors (as shown in the side figure). - Page 24 The elevator controls the aircraft’s forward and backward movement. Push the joystick forward and the aircraft will tilt and fly forward. Pull the joystick back and the aircraft will tilt and f ly ba ck war d s . When t he joys t ic k is centered (unmoving), the aircraft will hold its altitude in the air.
-
Page 25: Advanced Performance Set Up
9 Advanced performance set up 1) Reverse channel setup If you would like to reverse any of the stick functions, please follow the instructions below. Be aware that this will reverse the control commands. Pull the throttle stick down to the lowest position and long press the ‘Enter’ key to open the ‘Main Menu’ interface. - Page 26 g Re e RT s ex Re...
-
Page 27: The Fail Safes
10 The Fail Safes 10.1 Low power failsafe When the aircraft battery is low, there is likely insufficient power to support the return of the aircraft. Please land the aircraft immediately, otherwise the aircraft will fall and cause damage to the aircraft and surrounding objects. -
Page 28: Frequently Asked Questions
Frequently Asked Questions (FAQ) 1) Cannot arm motors Try calibrating the transmitter sticks as shown below. Afterwards, check that all channels are properly moving and centered. Mode 1: Push the left stick to the upper left corner and the right stick to the upper right corner. Power the transmitter on while holding both sticks in their respective positions;... -
Page 29: Technical Assistance
Technical assistance If you need assistance setting up or using your Aerpro product now or in the future, call or email Aerpro Support (Australia and International inquires). -
Page 30: Features & Specifications
Features & Specifications 2.4GHz RC series 5.8Ghz FPV system GPS Positioning GPS-RTH Auto-pilot function GPS and altitude modes provide stability Automatic return switch Failsafe to return home & landing Compass sensor Flight time around 20-25 minutes 11.1V 7000mAH Li-Po battery Low voltage battery protection 1080P High Definition camera 1080P... -
Page 31: Laws For Drone Flight (Aus)
You need to be able to see the aircraft, with your own eyes (eg, without binoculars) at all times. Don’t let it get too far away from you! You need to fly the aircraft so it isn’ t a hazard to other aircraft, propert y, and people. -
Page 32: Laws For Drone Flight (Nz)
You need to be able to see the aircraft, with your own eyes (eg, without binoculars) at all times. Don’t let it get too far away from you! You need to fly the aircraft so it isn’t a hazard to other aircraft, propert y, and people.
Need help?
Do you have a question about the APHUB X4 and is the answer not in the manual?
Questions and answers