Table of Contents
Advertisement
Quick Links
Advertisement
Table of Contents

Summary of Contents for SDG S007
- Page 1 Smart Wifi Robotic cleaner with HD camera User Manual S007...
-
Page 2: Table Of Contents
Table of contents: 1.Safety instruction 1.1 About the instruction manual 1.2 About power supply 1.3 Suitable usage 1.4 Attention before use 1.5 Attention for children 1.6 About rechargeable battery and disposal 1.7 About package 1.8 Technical support 2.Components of cleaner 2.1 Parts name 2.2 Power rated 3.Charging base... -
Page 3: Safety Instruction
1.Safety instruction Do not use the cleaner on small table and chair CAUTiON or other small space without protection railings, or use it hung in the air, the unit may damage. 1.1 About the instruction manual Read the instruction carefully before use: Read the instruction carefully, and following the step to operate the unit. -
Page 4: Suitable Usage
1.3 Suitable usage Suitable use area The unit just suitable to use indoor. And it can cleaning the wooden floor, compound floor, plastic floor, ceramic floor, marble floor, carpet (within 15mm), etc.. Wooden Carpet (within 15mm) Ceramic Marble Not suitable area Do not use in outdoor, commercial and industrial area. -
Page 5: Attention Before Use
1.4 Attention before use Remove all easy damaged objects (including luminous objects, fabrics, glass bottles, etc.) before using, it may cause damage to these objects or affecting the using of cleaner. To ensure the cleaner operating smoothly, please follow: --- Remove the easy damage objects to a safety area. --- Beware of the tablecloth and window curtains, make sure it above the floor. -
Page 6: About Rechargeable Battery And Disposal
1.6 About rechargeable battery and disposal Use the original battery only, wrong use of other battery will cause explosion, if you need to replace the battery please contact your local dealer. It is dangerous to use the imitative battery or accessories, and the warranty will void if you do so. -
Page 7: Components Of Cleaner
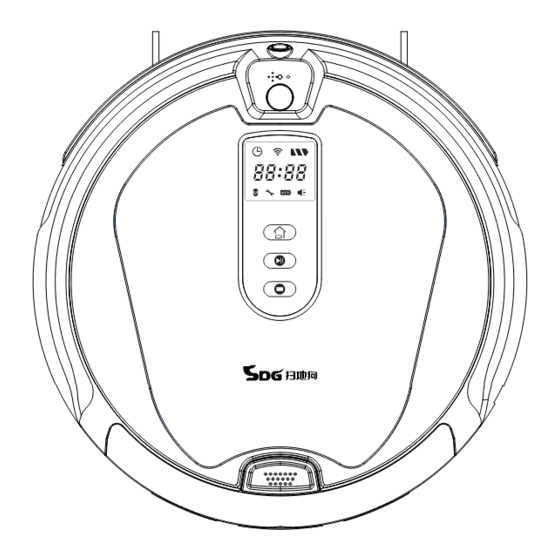
2.Components of cleaner 2.1 Parts name 1 Million pixels camera Ground detection sensor Front wheel Reset button Charging electrode Right side Infrared signal LED display receiver cleaning brush Left side cleaning brush MIC Input Battery cover Sensor window Right wheel LED display Left wheel Fabric brush... -
Page 8: Power Rated
2.2 Power rated Specification Rating Voltage of the unit (V) DC 14.8V Power rated of the unit (W) Adaptor output (V) DC 19V Adaptor output (mA) 1000mA Note: Suitable storage temperature from -20 to 50 * We reserve the right to change the product specification without notice. 3. -
Page 9: Operation Instruction
3.4 Auto recharge Connected the charging station, the cleaner will auto return to charging station when power low. Pls be noted the signal range of the charging station is 7M, at an angle of about 35 degrees. If beyond the range, robot will go to search the signal along the wall till power off. -
Page 10: Switch On The Unit
Control panel Auto recharge Auto cleaning Mopping 1. Press auto recharge the unit will auto return to the connected charging base. 2. Press auto cleaning the unit will perform auto cleaning until power low. 3. Press mopping and use with trailing bap and mop pad, the unit will perform mopping. Note: under auto recharge, auto cleaning, mopping operating mode, press any key to stop working. -
Page 11: Full-Go
4.5 Timer function Set the timer under stand-by mode (stop any mode working), and set the current time (clock) before using the timer function. Set the current time (Clock) 1.Press the “ ” button on remote control, the clock symbol display on screen. 2.Press“... -
Page 12: Auto Mode
5.Cleaning model selection Attention: Please make sure the dust box well assembly in the cleaner before use. 5.1 Auto mode Clear up the gadgets or obstacles in the cleaning area before cleaning. 5.2 Spot mode Press the Spot cleaning key, it will clean the area within 1m and clean by spiral mode. It will automatic operate in around 2-3 minutes. -
Page 13: Maintenance
6.Maintenance 6.1 Cleaning the dust box and filter Dust box button 1. Press the dust box button, and pull the dust box out from the unit. Attention: Do not take the cleaner up by holding the dust box position, to avoid the dust box loosen and drop the unit. 2. -
Page 14: Cleaning The Infrared Receiver And Charging Connector
6.2 Cleaning the infrared receiver and charging connector Use the dry soft cloth to clean the sensor in front of the unit. Use the dry soft cloth to clean the charging connector and the sensor in bottom. lean the charging connector and the s Attention: Please also clean the dust on charging base, to ensure it well contact with the unit. -
Page 15: Cleaning The Fabric Brush
6.4 Cleaning the fabric brush Attention: Take out the dust box before take out the fabric bust. 1. Open the fabric brush buckle on the left side. Attention: Remount the brush to the unit, assembly 2. Pull out the brush holder to right side. the left side first. -
Page 16: Assembly The Trailing Bar And Mop Pad
6.5 Assembly the trailing bar and mop pad 1. Mount the mop pad to the trailing bar. 2. Reverse the cleaner, assembly the trailing bar to the unit, beware of the direct is correct. Attention: Take out the mop pad before switch to other cleaning modes. -
Page 17: Failure Checking
7.Failure checking Failure Code Failure Cause How to solve Edge detection sensors Clean the sensors on the bottom of the robot. Collision detection sensors Clean the sensors on the front of the robot. Hardware malfunction Please send to maintenance station. Clean the rubbish such as hair ,thread wrapped on Middle brush the brush. -
Page 18: Trouble Shooting
8.Trouble shooting The Cleaner doesn’t work or clean poorly 1. Check whether is on the switch. 2. Check whether the dust box, filter and intake are clean, and whether the side brush works. 3. Check whether the battery voltage declines greatly. The remote control doesn’t work 1. - Page 19 FCC STATEMENT 1. This device complies with Part 15 of the FCC Rules. Operation is subject to the following two conditions: (1) This device may not cause harmful interference, and (2) This device must accept any interference received, including interference that may cause undesired operation.
Need help?
Do you have a question about the S007 and is the answer not in the manual?
Questions and answers