Table of Contents
Advertisement
®
& User's Manual
Jet Burner
FSOGBG4203
Please keep this instruction manual for future reference
Warning:
READ INSTRUCTION MANUAL BEFORE ATTEMPTING TO ASSEMBLE OR
OPERATE THIS PRODUCT.
Adult assembly required.
Keep screws and parts out of reach of children.
Customer Service: (866) 814-0585, 8:00am to 8:00pm,
Monday thru Friday Eastern Standard Time
--------------------------------------OR-------------------------------------
Customer Service: (888) 922-2336 7:00 am to 12:00 am CST (daily)
Live Chat at: www.academy.com
Email: customerservice@academy.com
(Made in China)
Advertisement
Table of Contents

Related Manuals for Outdoor Gourmet Crawfish Keg

Summary of Contents for Outdoor Gourmet Crawfish Keg
- Page 1 ® Assembly Instructions & User’s Manual Jet Burner FSOGBG4203 Please keep this instruction manual for future reference Warning: READ INSTRUCTION MANUAL BEFORE ATTEMPTING TO ASSEMBLE OR OPERATE THIS PRODUCT. Adult assembly required. Keep screws and parts out of reach of children. Customer Service: (866) 814-0585, 8:00am to 8:00pm, Monday thru Friday Eastern Standard Time --------------------------------------OR-------------------------------------...
- Page 2 WARNINGS TABLE OF CONTENTS THIS APPLIANCE IS NOT FOR FRYING TURKEYS. Warnings....................1, 3-8 DO NOT USE WITH OIL. Parts List....................9-10 SAFETY SYMBOLS: When using this appliance, basic safety precautions should always be observed. Read and understand the meaning of these symbols before assembling and using this appliance. Assembly Instructions.................11 DANGER Operating/Cooking Instructions.............12-13...
- Page 3 WARNINGS WARNINGS appliance until the cooking liquid has cooled to less than 1 SAVE THESE INSTRUCTIONS DO NOT move the appliance when in use. Allow the cooking vessel to cool to 1 Read and understand all instructions before assembling and using this appliance. moving or storing.
- Page 4 WARNINGS WARNINGS: LP TANK ONE USED. Replacement pressure regulator and hose assemblies must be those supplied by the DANGER manufacturer. Indicates a hazardous situation, which if not avoided, will result in death or serious injury. NEVER use a cooking vessel larger than the capacity and diameter recommended by the manufacturer.
- Page 5 WARNINGS: LP TANK WARNINGS: LP TANK CONNECTING REGULATOR TO LP TANK: REGULATOR HOSE ASSEMBLY CHECK: 1. Place LP tank on a secure, level and stable surface. WARNING 2. Turn control knob to the “OFF” position. Before each use, check to see if there is evidence of abrasion, wear, cuts or leaks on the hose. If 3.
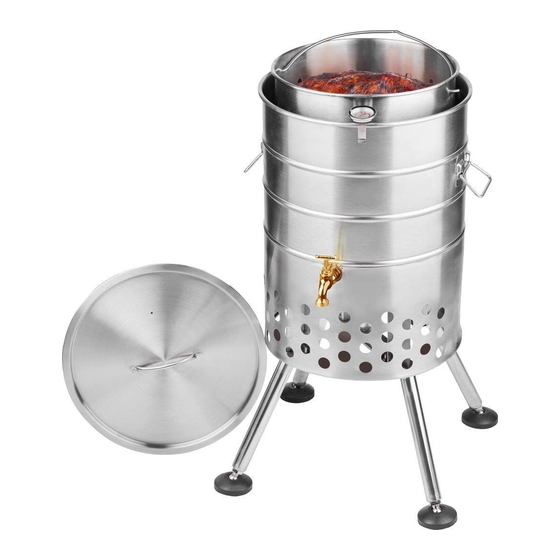
- Page 6 PARTS LIST PARTS LIST Part # Description Image NOTE: Wash all parts that will come in contact with food or water with warm soapy water, rinse and towel dry. LEGS WITH ADJUSTABLE FEET (* For Jet Burner) Part # Description Image M6*15 SOCKET SCREW MAIN BODY WITH SPIGOT...
- Page 7 ASSEMBLY INSTRUCTIONS OPERATING/COOKING INSTRUCTIONS WARNING STEP 1 Turn the MAIN BODY WITH SPIGOT upside down. “Max Fill” line. Doing so could result in the unit becoming top heavy and creating an unsafe condition. ADDING THE RIGHT AMOUNT OF WATER: STEP 2 to cook.
- Page 8 OPERATING/COOKING INSTRUCTIONS CARE AND MAINTENANCE SUGGESTED CLEANING MATERIALS: STEAMED CLAMS Hot water Mild dishwashing liquid detergent Add enough water to bring water level up to the bottom of the steamer pot in the keg and Soft, nylon cleaning pad turn on heat to high. When water boils, place clams on a steamer plate (not included) in basket.
- Page 9 WARRANTY INFORMATION The appliance has been manufactured under the highest standards of quality and workmanship. We warrant to the original consumer/purchaser that all aspects of this product will be free of defects in material and workmanship for one (1) year from the date of purchase. A replacement for any defective part will be supplied free of charge for installation by the consumer.
Need help?
Do you have a question about the Crawfish Keg and is the answer not in the manual?
Questions and answers
How can I get a new burner the pipe that hooked to regulator hose has rusted and burnt through always covered when not in use
To replace the burner for the Outdoor Gourmet Crawfish Keg:
1. Make sure the LP tank valve is turned off.
2. Disconnect the regulator by turning the coupling nut counterclockwise by hand.
3. Remove the existing jet burner from the appliance.
4. Install the new jet burner (Part #7 in the parts list).
5. Reconnect the regulator by aligning it straight with the LP tank valve and turning the coupling nut clockwise to a full solid stop.
6. Ensure all connections are tight and check for leaks with a soapy water solution before use.
Only use the specified CSA-approved burner and regulator models.
This answer is automatically generated
I need jet burner assembly mine has a hole in it. How do I get a new one and how much
Can I buy the jet burner? Mine has a hole in it blowing out fire