Table of Contents
Advertisement
Quick Links
DIGITAL THREAD TENSION SENSOR
INCLUDED IN PACKAGE
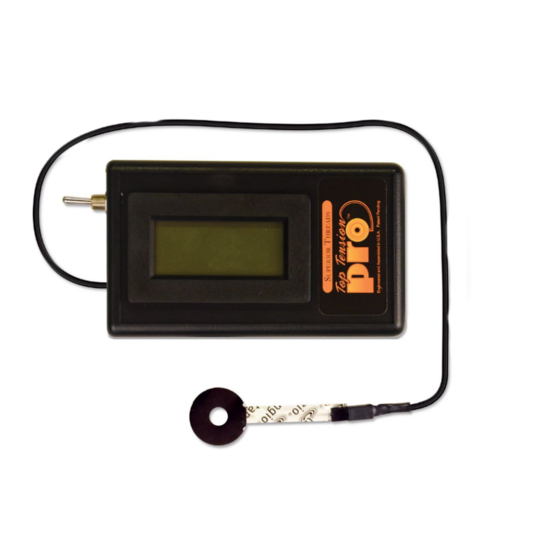
1. Digital readout meter with
attached cable and
sensor disc
2. One 9-volt battery
3. Two stick-on cable
support hooks
4. Self-sticking Velcro
®
fasteners
5. Instruction sheet and
reference guide
INSTALLATION INSTRUCTIONS
STEP 1: Remove the battery compartment door on
the back of the Top Tension Pro and connect the
9-volt battery (provided). Flip the on/off switch to
the on position and 3 numbers will appear. With
no pressure on the sensor disc, the display should
show a reading of 000, or - 000. Place the sensor
disc between your thumb and forefinger and press
gently. The numbers displayed should increase
with applied pressure, which indicates an operating
sensor. Turn the meter off and proceed with the
installation.
for Handi Quilter Longarm and other machines
For video demonstration go to www.superiorthreads.com/top-tension-pro
Save these instructions.
3
Cable Support Hooks
www.superiorthreads.com
1
Digital Readout Meter and Sensor
(Top Tension Pro)
STEP 2: Using the Velcro
mount the Top Tension Pro onto your machine.
Please be sure to place the Top Tension Pro close
enough to the tension guide, so the sensor disc
can easily reach the tension guide. (We recommend
placing the Top Tension Pro on top of the left front
handlebar. See photo on reverse.)
STEP 3: Add a cable support hook to the body of
your longarm machine, close to the head. This will
keep the sensor cable from moving around.
5/14
2
9v Battery
4
Velcro® Fasteners
fasteners provided,
®
Advertisement
Table of Contents

Summary of Contents for Superior Threads Top Tension Pro
-
Page 1: Installation Instructions
(We recommend show a reading of 000, or - 000. Place the sensor placing the Top Tension Pro on top of the left front disc between your thumb and forefinger and press handlebar. See photo on reverse.) gently. - Page 2 STEP 8: Once you have achieved proper stitch balance, record any change in number on the Tension Guide (if applicable), then turn off the Top Tension Pro and enjoy quilting! NOTES & TIPS Please note that typically we only thread the top thread through two of the pre-tension holes (instead of all 3).
Need help?
Do you have a question about the Top Tension Pro and is the answer not in the manual?
Questions and answers