
Related Manuals for Dorel Living BELMONT DA1026P-18


Summary of Contents for Dorel Living BELMONT DA1026P-18
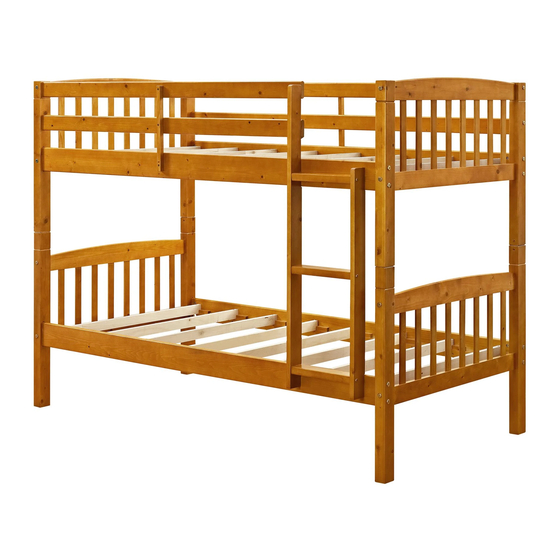
- Page 1 BELMONT BUNK BED PINE DA1026P-18 0-72000-96502-3 WHITE DA1026W-18 0-72000-96501-6 0-65857-14462-8 WALNUT DA1026WN-18 0-65857-15766-6 DA1026B-18 BLACK...
- Page 3 BELMONT BUNK BED DA1026P-18 PINE / DA1026W-18 WHITE / DA1026WN-18 WALNUT / DA1026B-18 BLACK HARDWARE LIST 1/4" x 85mm 6.5mm x 48mm JOINT CONNECTOR (4mm HEX HEAD) WOOD JOINT CONNECTOR (4mm HEX HEAD) 16 PCS 12 PCS 6.5mm x 100mm 4mm x 35mm WOOD JOINT CONNECTOR (4mm HEX HEAD) FLAT HEAD SCREW...
-
Page 4: Parts List
BELMONT BUNK BED DA1026P-18 PINE / DA1026W-18 WHITE / DA1026WN-18 WALNUT / DA1026B-18 BLACK PARTS LIST TOP POST TOP POST TOP POST 2 PCS 1 PC 1 PC HEADBOARD TOP CROSS BOTTOM POST BOTTOM POST 2 PCS 2 PCS 4 PCS... - Page 5 BELMONT BUNK BED DA1026P-18 PINE / DA1026W-18 WHITE / DA1026WN-18 WALNUT / DA1026B-18 BLACK...
- Page 6 BELMONT BUNK BED DA1026P-18 PINE / DA1026W-18 WHITE / DA1026WN-18 WALNUT / DA1026B-18 BLACK without label 8 PCS 4 PCS 4 PCS STEP 1 One of the headboard top cross (F) has a label on it, do not use it in this step. push down until firmly in place.
- Page 7 BELMONT BUNK BED DA1026P-18 PINE / DA1026W-18 WHITE / DA1026WN-18 WALNUT / DA1026B-18 BLACK with label 8 PCS 4 PCS 4 PCS STEP 2 Use the headboard top cross with label (F) in this step. Insert stoppers (8) and headboard slats (S) into the holes of the headboard bottom cross (G) and push down until firmly in place.
- Page 8 BELMONT BUNK BED DA1026P-18 PINE / DA1026W-18 WHITE / DA1026WN-18 WALNUT / DA1026B-18 BLACK 16 PCS 8 PCS 8 PCS STEP 3 Insert stoppers (8) and headboard slats (S) into each hole in the headboard bottom cross (G) and push them down until firmly in place.
- Page 9 BELMONT BUNK BED DA1026P-18 PINE / DA1026W-18 WHITE / DA1026WN-18 WALNUT / DA1026B-18 BLACK STEP 4 Attach the two headboards with the bottom posts (D and E) to the bottom side rails (I and K) by the joint connectors (1) and barrel nuts (9) as shown. Use hex key (10) to tighten joint connectors.
- Page 10 BELMONT BUNK BED DA1026P-18 PINE / DA1026W-18 WHITE / DA1026WN-18 WALNUT / DA1026B-18 BLACK STEP 5 Insert a wood dowel (7) into each end of the long guardrails (M). Attach the two long guardrails (M) and the two top side rails (H and J) to the top posts (A and B) and (A and C) as shown. Use the joint connectors (1) with the barrel nuts (9) to fasten the top side rails (H and J) and use the wood joint connectors (11) to fasten the long guardrails (M).
- Page 11 BELMONT BUNK BED DA1026P-18 PINE / DA1026W-18 WHITE / DA1026WN-18 WALNUT / DA1026B-18 BLACK STEP 6 Insert two slats (T) into the center slots of the bottom side rails (I and K) of the bottom bunk as shown. Insert slats (L) into remaining slots of the bottom side rails (I and K) of the bottom bunk. Attach slats (L) onto the bottom side rails (I and K) with flat head screws (4).
- Page 12 BELMONT BUNK BED DA1026P-18 PINE / DA1026W-18 WHITE / DA1026WN-18 WALNUT / DA1026B-18 BLACK PHILLIPS SCREWDRIVER STEP 7 Place four wood dowels (6) into the holes in the bottom posts (D and E). With the help of another person, stack the top bunk onto the bottom bunk. Insert wood dowels (7) into the holes in the ends of short guardrails (N).
- Page 13 BELMONT BUNK BED DA1026P-18 PINE / DA1026W-18 WHITE / DA1026WN-18 WALNUT / DA1026B-18 BLACK STEP 8 Secure the upper bunk to the lower bunk by screwing the screws (4) into the holes in the top and bottom posts (A, B, C, D & E) as shown. Assemble the ladder by inserting wood dowels (7) into the end of the ladder steps (Q) and screwing long ladder end (O) and short ladder end (P) to ladder steps (Q) with wood joint connectors (2) as shown.
- Page 14 BELMONT BUNK BED DA1026P-18 PINE / DA1026W-18 WHITE / DA1026WN-18 WALNUT / DA1026B-18 BLACK Slats are not shown in illustration for clarity STEP 9 Attach the ladder to the short guardrails (N), the top side rail (H) and bottom side rail (I) with the wood joint connectors (2).
- Page 15 BELMONT BUNK BED DA1026P-18 PINE / DA1026W-18 WHITE / DA1026WN-18 WALNUT / DA1026B-18 BLACK Instructions for converting the bunk bed into two single beds The supports slats are removed from illustration for clarity only - they DO NOT need to be removed to convert the bunk bed to single beds.
- Page 16 BELMONT BUNK BED DA1026P-18 PINE / DA1026W-18 WHITE / DA1026WN-18 WALNUT / DA1026B-18 BLACK DO NOT ALLOW HORSEPLAY ON DO NOT ALLOW CHILDREN UNDER 6 YEARS OF AGE OR UNDER THE BED AND TO USE THE UPPER BUNK. PROHIBIT JUMPING ON THE BED. BED IS DESIGNED FOR CHILDREN RANGING FROM 6 YEARS OF AGE TO...
Need help?
Do you have a question about the BELMONT DA1026P-18 and is the answer not in the manual?
Questions and answers