Table of Contents
Advertisement
Quick Links
Whizbang Jr. – Installation Instructions
The Whizbang Junior provides highly accurate current sensing when used with
compatible Midnite Solar products. However, for our customers that already own
similar products, the Whizbang Jr. has been designed for cooperative
attachment. If you already own another battery-monitoring product and wish to
continue using it, skip down to step 1.2.
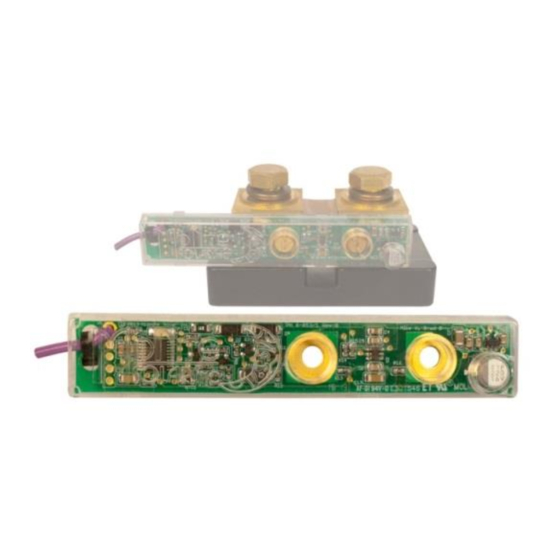
Step 1.1 (Whizbang Jr. only): Attach Whizbang Jr. to 500A/50mV Deltec MKB Shunt
or equivalent (see Figure 1).
WARNING: The Whizbang Jr. is designed for low-side shunt measurement. Make
certain shunt is attached to battery-negative, not battery-positive.
A. Remove sensing screws from shunt, including lock-washer and flat-washer.
Put flat washers to the side, they will not be used.
B. With lock-washers attached, guide both screws through the Whizbang
terminals.
C. Slide on provided 1/8" long spacers over screws on the back-side of the
Whizbang Jr.
D. Carefully guide the Whizbang Jr. to the shunt. The Whizbang Jr.'s purple
wire should be pointing toward the battery cable side of the shunt. Hand-
tighten screws to provide a solid connection. Loosen and retighten screws
to ensure a snug fit. Skip to 2.1.
Step 1.2 (Cooperative): Attach Whizbang Jr. to 500A/50mV Deltec MKB Shunt or
equivalent (see Figure 2).
WARNING: The Whizbang Jr. is designed for low-side shunt measurement. Make
certain shunt is attached to battery-negative, not battery-positive.
A. Remove sensing screws from shunt. Gather their attached lock-washers. The
pre-mounted screws and flat-washers will not be used. Put them to the
side.
B. Place provided 1/4" long spacers into Whizbang terminal recesses.
C. Attach lock-washers to included stainless-steel 3/4" screws, then slide
on #8 ring terminals w/attached 3
D. Guide both screws through the spacers and Whizbang terminals.
E. Slide on provided 1/8" long spacers over screws on the back-side of the
Whizbang Jr.
F. Carefully guide the Whizbang Jr. to the shunt. The Whizbang Jr.'s purple
wire should be pointing toward the battery cable side of the shunt. Hand-
tighten screws to provide a solid connection. Loosen and retighten screws
to ensure a snug fit.
rd
party wiring.
10-264-1 REV-C
1
Advertisement
Table of Contents

Summary of Contents for MidNite Solar Whizbang Jr
- Page 1 If you already own another battery-monitoring product and wish to continue using it, skip down to step 1.2. Step 1.1 (Whizbang Jr. only): Attach Whizbang Jr. to 500A/50mV Deltec MKB Shunt or equivalent (see Figure 1). WARNING: The Whizbang Jr. is designed for low-side shunt measurement. Make certain shunt is attached to battery-negative, not battery-positive.
- Page 2 Step 2.1: Attach Whizbang Jr. to Midnite Classic. A. Strip approximately 3/16” from the end of the 22AWG purple Whizbang Jr. wire. Twist the strands together to reduce fraying. B. Feed wire through preferred conduit opening. C. Secure wire to Classic AUX2+ input, see Fig. 3 below.
- Page 3 The LED on the WB Jr. circuit board will begin flashing approximately every 5 seconds if properly connected to the Classic. STATUS: Pressing the STATUS button three times will bring you to the Whizbang Jr. status screen. There are 4 displayed items here, see Figure 4 below.
- Page 4 Positive Amp Hours Negative Amp Hours Net Amp Hours Figure 5 – Whizbang jr. “More” Screen When the battery is receiving a charge, the accumulated positive Amp-hours figure will increase, as will the total Net figure. When the battery is being discharged, the accumulated negative Amp-hours will increase, and the total (Net) Amp-hours will decrease.
- Page 5 WHIZBANG JR. ASSISTED CHARGING: One feature of the Whizbang Jr. is the ability to end an Absorb charge based on Ending Amps. In this mode, if the battery current falls below a programmable threshold for one minute, the Classic will go to Float, meaning that the batteries have been fully charged.
- Page 6 Note: To manually reset accumulated Whizbang Jr. Amp-hour tallies, go to “LOGS” menu and press Enter. There are three entries related to the Whizbang Jr.: “WB Jr. NET Amp-Hours”, “WB Jr. (+AH)”, and “WB Jr. (-AH)”. To erase, select one and use the soft-left or soft-right keys to confirm “YES”, or “NO”.
Need help?
Do you have a question about the Whizbang Jr and is the answer not in the manual?
Questions and answers