Table of Contents
Advertisement
SP 101 AMPLIFIER
INTRODUCTION
Congratulations on purchasing this Acoustic Solutions' integrated amplifi er.
It has been developed following an extensive research and development
program that has culminated in what we regard as an exceptional mid-range
hi-fi product.
Our aim when designing this product was to produce a visually appealing
unit which would look comparable to higher priced products, and give an
exceptional performance to match.
We trust that this amplifi er will give you hours of listening pleasure, and
provide years of unparalleled performance. As with any new electrical product
please be patient and allow at least 36 hours use before all components
have acclimatised themselves to your surroundings, and found their optimum
working temperature. Please do not operate this product at high volume levels
immediately after switching on.
CONTENTS
1
PAGE No.
1
2
3
4
5
6
7-10
11
12
12
Advertisement
Table of Contents

Related Manuals for ACOUSTIC SOLUTIONS SP 101


Summary of Contents for ACOUSTIC SOLUTIONS SP 101
-
Page 1: Table Of Contents
SP 101 AMPLIFIER INTRODUCTION Congratulations on purchasing this Acoustic Solutions’ integrated amplifi er. It has been developed following an extensive research and development program that has culminated in what we regard as an exceptional mid-range hi-fi product. Our aim when designing this product was to produce a visually appealing unit which would look comparable to higher priced products, and give an exceptional performance to match. -
Page 2: Safety Instructions
• Do not install near any heat source, such as radiators, or other equipment that produces heat. • Protect the mains power cable from being damaged. • The SP 101 system is double insulated and does not require an earth connection in the UK mains plug. CAUTION... -
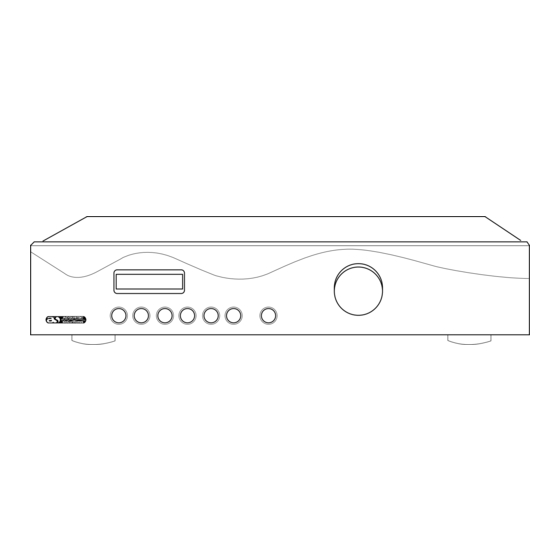
Page 3: Front Panel Controls
FRONT PANEL CONTROLS 1. LCD DISPLAY. Will give an indication of volume position and input source selected. Will also display other menu features as described on pages (7-13). 2. PHONO INPUT SELECTOR SWITCH. 3. TUNER INPUT SELECTOR SWITCH. 4. TAPE/AUX INPUT SELECTOR SWITCH. 5. -
Page 4: Rear Panel Connections
REAR PANEL CONNECTIONS 1. WARNING LABELS. Please be aware that this unit contains high voltages, and should not be opened, please refer to page 2 of this manual. 2. MAINS CABLE INLET POSITION. Please ensure that this cable strain relief bush is intact and has not been damaged. -
Page 5: Installation And Position
INSTALLATION AND POSITION This amplifier should be positioned on a flat stable surface. We would recommend that the position of your hi-fi equipment should be chosen carefully to provide adequate protection for this device, but also provide an attractive showcase for your investment. Hi-fi equipment is not designed to be moved often, therefore it is recommended that a permanent home for your hi-fi be achieved as soon as is possible. -
Page 6: Making The Connections
MAKING THE CONNECTIONS... -
Page 7: Using The Amplifier
USING THE AMPLIFIER When you unpack the amplifi er from the box, all music settings will be at default values. These can be altered according to your listening tastes; these new settings will be retained within the memory of the amplifi er and will remain set even after switchiing off this system. -
Page 8: Bass Control
VOLUME CONTROL DEFAULT SETTING The default setting for the user interface control is the ‘volume’ setting. This will be displayed on line one of the LCD display as a numeric dB value. Note: dB values are a professional indication of the amplitude of an audio signal with full or maximum output achieved normally at 0dB. -
Page 9: Balance Control
TREBLE CONTROL This amplifi er is fi tted with a treble control which offers +/-14dB attenuation around the centre frequency of 10Khz, and 6dB across the frequency range of 2Khz to 20Khz. To alter this treble control press the function button (9) twice to change the LCD display from bass control to treble control. -
Page 10: Loudness Control
LOUDNESS CONTROL This amplifi er is fi tted with a loudness control which provides a boost to lower frequencies at lower listening volumes. This creates the effect of increasing the perceived amount of bass / mid content in the music when playing the amplifi er at a lower level. This control is effective on frequencies between 20Hz and 800Hz and its effect decreases as the amplifi er volume level is increased. -
Page 11: Trouble Shooting
TROUBLE SHOOTING PROBLEM POSSIBLE SOLUTION No power when switched on • Mains socket not switched on, or faulty. • Plug not fully inserted into wall socket • Mains fuse has blown in plug. • Internal mains fuse has blown inside unit, this will need to be replaced by a qualified service technician •... -
Page 12: Specifications
SPECIFICATIONS PHONO INPUT Input impedance 47kΩ Input sensitivity 3.8mV (to suit magnetic cartridges) LINE LEVEL INPUTS Input impedance 47kΩ Input sensitivity 250mV (Tape/AUX, tuner, DAB) 650mV (CD & DVD) LINE LEVEL OUTPUTS Output impedance: Line out 100kΩ Headphones 300Ω Maximum output level - Line out 740mV Headphones...
Need help?
Do you have a question about the SP 101 and is the answer not in the manual?
Questions and answers