Advertisement
Table of Contents
- 1 Table of Contents
- 2 General Information
- 3 Precaution and Contraindication
- 4 Parts and Product Components
- 5 Taking Blood Pressure -AUTO Measurement
- 6 Memory Function
- 7 Operation with Built-In Rechargeable Battery
- 8 Error Displays and Troubleshooting
- 9 Tips on Taking Blood Pressure
- 10 Care and Maintenance
- 11 Technical Description
- 12 Warranty and Service
- Download this manual
Automatic Sphygmomanometer
DM-4000
INSTRUCTIONS
<ENGLISH>
This manual is intended to assist the user for the safe and efficient operation of the Automatic
Sphygmomanometer DM-4000. The product must be used in accordance with the procedures
contained in this manual and must not be used for purposes other than those described herein. It is
essential to read and understand the entire manual before use.
A128851-1_2
Advertisement
Table of Contents

Subscribe to Our Youtube Channel
Summary of Contents for ALP K2 DM-4000
- Page 1 This manual is intended to assist the user for the safe and efficient operation of the Automatic Sphygmomanometer DM-4000. The product must be used in accordance with the procedures contained in this manual and must not be used for purposes other than those described herein. It is essential to read and understand the entire manual before use.
-
Page 2: Table Of Contents
Contents General information ............3 Precaution and contraindication ........6 Parts and product components ........8 Taking blood pressure -AUTO measurement- ..........10 -AUTO3 measurement- ..........13 -MANUAL (auscultation) measurement- ....16 Memory function ............20 Operation with built-in rechargeable battery ...22 Error displays and troubleshooting ......24 Tips on taking blood pressure ........28 Care and maintenance ..........30 Technical description ..........31... -
Page 3: General Information
General information Product Features ◇ AUTO Mode of Measurement Perform automatic measurement (AUTO measurement). ◇ AUTO3 measurement mode Perform AUTO measurement three times in a row, calculate the average of the measurement results, and then display the reliable blood pressure value according to AUTO measurements. ◇... - Page 4 Operation principles This device is equipped with two types of measurement. AUTO measurement measures the systolic blood pressure, diastolic blood pressure, and pulse rate automatically using the oscillometric method. With MANUAL measurement, an operator uses a stethoscope to measure blood pressure using auscultation. If the artery is compressed by the pressure of a tourniquet (cuff), the artery causes a pulsation that matches the pulse, which becomes the pulsation of the internal pressure of the cuff.
- Page 5 General information Product specifications Model : DM-4000 Operating Principle : Oscillometric method (AUTO measurement) / auscultation (MANUAL measurement) Indicator : 12-digit LCD Pressure Indicating Range : 3 to 300 mmHg (cuff pressure) Measuring Range : 50 to 250 mmHg (systolic)
-
Page 6: Precaution And Contraindication
Precaution and contraindication • Please carefully check patient’s conditions in advance to the measurement if he / she is under dialysis therapy or on anticoagulants, antiplatelets or steroids. Use of this instrument under such conditions could cause internal bleeding. • Do not use this product along with implantable and wearable medical electrical equipment such as pacemaker, defibrillator, or electrocardiographic monitor. - Page 7 Precaution and contraindication • The performance of this product may be affected by extremes of temperature, humidity and altitude. • Do not press the display or place the monitor with display face down. • Do not take out batteries or unplug the AC adaptor when the monitor is turned on. Make sure to switch off the monitor before removing batteries or AC adaptor.
-
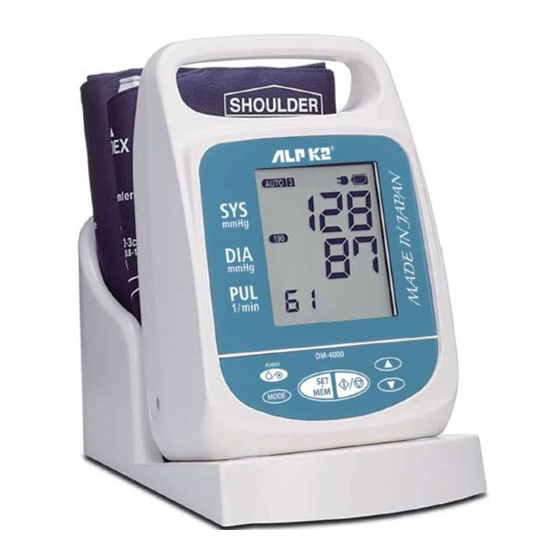
Page 8: Parts And Product Components
Parts and product components MAIN UNIT BATTERY COMPARTMENT COVER DISPLAY UP BUTTON POWER BUTTON MODE BUTTON BATTERY PLUG SET/MEMORY BUTTON START/STOP BUTTON BATTERY CONNECTOR DOWN BUTTON FRONT REAR CUFF HOLDER AC ADAPTOR JACK AIR CONNECTOR CUFF CUFF CUFF HOLDER CUFF HOLDER RIGHT SIDE LEFT SIDE - 8 -... - Page 9 Parts and product components REGULAR SIZE CUFF LARGE SIZE CUFF For arm circumference of 22 to 32 cm For arm circumference of 32 to 42 cm AIR PLUG CONNECTOR CONNECTOR AIR TUBE INSTRUCTION MANUAL INSTRUCTION MANUAL (English) (Spanish) AC ADAPTOR Model: UM312-7516 ADAPTOR PLUG Please check that all of the items above are included.
-
Page 10: Taking Blood Pressure -Auto Measurement
Taking blood pressure -AUTO measurement- To allow the patient to relax, have a five-minute rest before starting measurement. Furthermore, make sure the patient does not talk or move during measurement. Ensure that the cuff is kept at the height of patient’s heart during measurement. To stop measurement, press the START/STOP BUTTON. - Page 11 5. Connect the cuff Measure the patient’s arm circumference, and then use an ARM CIRCUMFERENCE CUFF SIZE appropriate cuff based on the table on the right. 22-32 cm REGULAR 32-42 cm LARGE Securely insert the air plug of the cuff into the air connector on the left side of the main unit.
- Page 12 Taking blood pressure -AUTO measurement- Deflation When a pulse wave is detected, the pulse mark flashes in the rate display. Pulse mark Systolic When measurement ends, air is rapidly exhausted, and then the measurement result is displayed. The measurement result is saved to memory automatically. For information about the memory function, see page Error results are not saved.
-
Page 13: Auto3 Measurement
Taking blood pressure -AUTO3 measurement- This device is equipped with an average mode function. This function performs blood pressure measurement three times in a row, calculates the average of these measurement results, and then displays the reliable blood pressure value according to AUTO measurements. To allow the patient to relax, have a five-minute rest before starting measurement. - Page 14 If the preset pressure value was insufficient for the measurement, inflation is carried out again automatically. For information about re-inflation, see page 3. ARM CIRCUMFERENCE CUFF SIZE 5. Connect the cuff 22-32 cm REGULAR 32-42 cm LARGE Measure the patient’s arm circumference, and then use an appropriate cuff based on the table on the right.
- Page 15 Taking blood pressure -AUTO3 measurement- Automatic inflation of the cuff starts. Inflation mark Pressurization stops when the cuff pressure reaches the preset pressure value, and then the pressure starts to descend. Pulse mark When a pulse wave is detected, the pulse mark flashes in Deflation rate the display.
-
Page 16: Manual (Auscultation) Measurement
Taking blood pressure -MANUAL (auscultation) measurement- In MANUAL measurement mode, this device inflates the cuff automatically, and then blood pressure is measured using auscultation. A stethoscope is not included in the product. Please prepare your own stethoscope. To allow the patient to relax, have a five-minute rest before starting measurement. Furthermore, make sure the patient does not talk or move during measurement. - Page 17 5. Press the SET/MEMORY BUTTON to set the deflation rate The deflation rate displayed in the bottom left of the display area changes each time the SET/MEMORY Deflation rate BUTTON is pressed. Select from one of the following: 2.5, 3.5, 4.5, 5.5, or 6.5 mmHg/s.
- Page 18 8. P r e s s t h e S TA R T / S T O P B U T T O N t o s t a r t measurement Automatic inflation of the cuff starts. Inflation mark Pressurization stops when the cuff pressure reaches the preset pressure value, and then the pressure starts to descend.
- Page 19 Taking blood pressure -MANUAL (auscultation) measurement- 10. Push the POWER BUTTON to turn off the power Even if you forget to switch off the power, the power switches off automatically after about three minutes. - 19 -...
-
Page 20: Memory Function
Memory function Measurement results measured using AUTO measurement and AUTO3 measurement are saved to memory automatically after measurement. Measurement results recorded using MANUAL measurement are not saved. The memory can store up to 30 measurement results. If the number of saved measurement results reaches 30, the oldest measurement result is deleted, and the latest measurement result is saved after the next measurement. - Page 21 Memory function 4. Use the UP or DOWN BUTTON to change the display When the UP BUTTON is pressed, the display changes from the latest measurement result to an old measurement result. When the down button is pressed, the display changes from the oldest measurement result to a new measurement result.
-
Page 22: Operation With Built-In Rechargeable Battery
BATTERY CONNECTOR Operation with built-in rechargeable battery If the built-in rechargeable battery has been charged, this product can be used without the AC adapter. Charge for about four hours before use. BATTERY PLUG Charging the rechargeable battery : Adaptor mark If the AC adaptor is connected correctly, the adaptor mark of :... - Page 23 Operation with built-in rechargeable battery Replacing the rechargeable battery Loosen Tighten 1. Remove the cuff holder Use a Phillips head screwdriver to remove the 4 screws on the bottom surface of the cuff holder. Bottom surface of cuff holder 2. Open the battery compartment cover Use a Phillips head screwdriver to remove the screw of Rear of main unit the battery compartment cover.
-
Page 24: Error Displays And Troubleshooting
Error displays and troubleshooting appears (over-pressurization) Because the patient moved, inflation reached the maximum pressure value, but measurement was not possible. Make sure that the patient stays still during measurement. appears (measurement error) The patient moved or talked during measurement. Make sure the patient does not move or talk during measurement. - Page 25 Flashing Low charge remaining. This indicates the remaining battery charge for a few measurements. The battery mark is displayed when a full LCD display occurs when the power switched on. The display at this time does not indicate that the remaining charge is insufficient. Remaining No charge remaining.
- Page 26 The pulse rate is unusually low (high) The patient moved during measurement. Make sure that the patient stays still during measurement. The patient did not rest sufficiently before measurement. Allow the patient to rest for about five minutes so that they can relax before measurement.
- Page 27 Error displays and troubleshooting Nothing is displayed even when the POWER BUTTON is pushed. The adaptor is not connected correctly. Check the connection of the adaptor. No remaining charge in the rechargeable battery. Either use the adaptor or charge the rechargeable battery. The device was left for one hour or more.
-
Page 28: Tips On Taking Blood Pressure
Tips on taking blood pressure Blood pressure is the force exerted by the heart in pumping the blood through the arteries and the resistance by the veins to this flow. Blood pressure varies all the time, influenced by mental and physical factors and is never constant. - Page 29 Tips on taking blood pressure Blood pressure should be taken after approximately five minutes of rest, under relaxed conditions and in a quiet environment. Exercise, eating, drinking alcohol, smoking and other activities that effect blood pressure should be avoided prior to measurement. Cuff measurement position should be at the height of the heart to obtain correct measurement results.
-
Page 30: Care And Maintenance
Care and maintenance Because the device includes precision parts, care should be taken to avoid extreme temperature variations, humidity, shock, dust, and direct sunlight. Do not drop or strike the device. Make sure not to expose the unit to moisture. This unit is not water resistant. Use only a soft, dry cloth to clean the device. -
Page 31: Technical Description
DM-4000 should not be used adjacent to or stacked with other equipment. Table 1 - Guidance and manufacturer’s declaration - electromagnetic emissions - DM-4000 is intended for use in the electromagnetic environment specified below. The customer or the user of DM-4000 should assure that it is used in such an environment. - Page 32 Technical description Table 4 - Guidance and manufacturer’s declaration - electromagnetic immunity - DM-4000 is intended for use in the electromagnetic environment specified below. The customer or the user of DM-4000 should assure that it is used in such an environment.
- Page 33 - 33 -...
- Page 34 - 34 -...
- Page 35 - 35 -...
-
Page 36: Warranty And Service
Warranty and service ALP K2 warrants the product for two years from the date of purchase for functionality and accuracy without charging cost for inspection, adjustment, repair and labour. Evidence of date of purchase is required for warranty claims. However, this warranty does not cover defects resulting from, •...
Need help?
Do you have a question about the DM-4000 and is the answer not in the manual?
Questions and answers