WABCO ABS Maintenance Manual

WABCO ABS Maintenance Manual

Anti-lock braking system (abs) and electronic stability controls (esc): for e version ecus
Table of Contents

Advertisement

ANTI-LOCK BRAKING SYSTEM
(ABS) AND ELECTRONIC
STABILITY CONTROLS (ESC):
FOR E VERSION ECUs
MAINTENANCE MANUAL

Advertisement

Table of Contents
loading
Need help?

Need help?

Do you have a question about the ABS and is the answer not in the manual?

Questions and answers

Subscribe to Our Youtube Channel

Summary of Contents for WABCO ABS

  • Page 1 ANTI-LOCK BRAKING SYSTEM (ABS) AND ELECTRONIC STABILITY CONTROLS (ESC): FOR E VERSION ECUs MAINTENANCE MANUAL...
  • Page 2 Information contained in this publication was in effect at the time the publication was approved for printing and is subject to change without notice or liability. WABCO reserves the right to revise the information presented or to discontinue the production of parts described at any time.
  • Page 3 Employers and workers employed outside of the United States should consult the regulations that Employers and workers employed outside of the United States should consult the regulations that apply to them for further guidance. apply to them for further guidance. WABCO Maintenance Manual MM-0112 (Revised 07-18)
  • Page 4: Table Of Contents

    Active Braking Valves (ABV) Pressure Modulator Valves ABS Valve Packages Active Braking Valves (ABV) Active Braking Valve on the ABS Valve Package Brake Pressure Sensor (BPS) Electronic Control Unit (ECU) Steering Angle Sensor (SAS) Steering Angle Sensor (SAS) — WABCO Only...
  • Page 5: System Components

    North America Customer Care at 855-228-3203. Electronic Control Unit (ECU) Figure 1.1 The ECU is the control center or “brain” of the ABS, RSC and ESC systems. It receives information from the sensors, processes data and sends signals to modulators and active braking valves to achieve different tasks.
  • Page 6: Pressure Modulator Valves

    Pressure Modulator Valves Figure 1.6 A modulator valve controls air pressure to an affected wheel-end brake during an ABS, RSC or ESC event to reduce speed and Easy Listening Tip! prevent wheel lock up. Modulator valves are also used during ATC events to properly gain traction on the affected wheel end.
  • Page 7: Active Braking Valves (Abv)

    (36.6 Nm) TORQUE 1002006d Figure 1.7 4006870a NOTE: In previous versions of ABS, the valves are cycled Figure 1.9 diagonally. Diagonal cycling does not occur with E version ABS. Steering Angle Sensor (SAS) Active Braking Valves (ABV) The Steering Angle Sensor (SAS) is part of the ESC system. The SAS Active Braking Valves, sometimes referred to as ABVs or 3/2 valve, delivers the driver’s steering input (steering wheel position) to the...
  • Page 8: Electronic Stability Control (Esc) Module

    Trailer Modulator Valve In some stability control applications, an additional modulator valve (the same as what is used for ABS modulation) will be located in the trailer control line downstream of the 3/2 solenoid valve used to control the trailer.
  • Page 9 1 Introduction Figure 1.12 WHEEL SPEED 4S/4M CONFIGURATION — ABS ONLY SENSORS MODULATOR VALVES LAMPS RELAY VALVE MODULATOR WHEEL SPEED VALVE SENSORS QUICK RELEASE VALVE MODULATOR AIR LINES 1002004h VALVE ELECTRICAL LINES Figure 1.12 Figure 1.13 VALVE PACKAGE 4S/4M ABS/ATC...
  • Page 10: Section 2: Stability And Safety Enhancement Systems

    ATC Components 2 Stability and Safety Enhancement Systems ATC uses the base ABS components plus an active braking valve Automatic Traction Control is available as an option on all E version that can be installed with individual modulator valves, or installed as ECUs and is standard on most.
  • Page 11: Roll Stability Control (Rsc)

    RSC uses many of the same components used by ABS/ATC including modulator valves, active braking valves and wheel speed sensors. RSC ECUs are different from ABS ECUs as they contain an internal accelerometer that measures and updates the lateral acceleration of the vehicle and compares it to a critical threshold at which rollover may occur.
  • Page 12 The active braking valve for trailer braking is a stand-alone valve that is not available as part of the ABS/ATC valve package. Depending on the application, a modulator valve may be located downstream of the solenoid valve. Figure 2.7.
  • Page 13: Electronic Stability Control (Esc)

    Electronic Stability Control (ESC) ESC Components ESC is built from the ABS platform and uses many of the same Electronic Stability Control (ESC) combines the rollover prevention of components as ATC and RSC. An active braking valve to control the...
  • Page 14 WABCO Engineering. It is imperative that the correct ECU is installed on your vehicle in service. Contact WABCO or your respective vehicle OEM with any questions regarding ESC ECU. Figure 2.8 and Figure 2.9. Figure 2.8 ±...
  • Page 15: Hill Start Aid (Hsa)

    HSA Components HSA is available on ABS ECUs with E4.4 software revision or higher. Same as ESC, HSA is built from the ABS platform and uses many of the same components as ATC and RSC. HSA uses the front axle active braking valve as well as the rear active braking valve to help maintain the pressure trapped during HSA activation.
  • Page 16: Drag Torque Control

    2 Stability and Safety Enhancement Systems Drag Torque Control The ABS ECU has the ability to send a message to the engine to increase engine RPM to prevent drive axle lock-up, if the vehicle is on a downhill grade and in the incorrect gear.
  • Page 17: Section 3: Diagnostics, Troubleshooting And Testing

    If the vehicle is equipped with ATC, but not RSC/ESC, when the ignition is turned to the ON position, the ABS and ATC lamps will light for approximately three seconds, and then both lamps will turn off simultaneously.
  • Page 18: Diagnostics

    4 mph (6 km/h) — a fault may exist in the ABS system or lamp is permanently shorted. Diagnostics To display E version ABS, RSC, ESC or HSA faults: Connect the computer to the vehicle: NOTE: Blink code diagnostics are not compatible with E8 software versions.
  • Page 19 Check all the powers and grounds coming to the ECU including load testing. 4010612a Check J1587 circuit at the ECU and the data link connector. Figure 3.6 Check J1939 circuit at the ECU and the data link connector. WABCO Maintenance Manual MM-0112 (Revised 07-18)
  • Page 20 3 Diagnostics, Troubleshooting and Testing In the Main Menu, select J1939 Tractor ABS or J1708 Figure 3.9 TOOLBOX™, then Tractor ABS. The ABS Main Screen will appear. Figure 3.7 and Figure 3.8. Figure 3.7 WABCO Toolbox - Pneumatic ABS Diagnostics...
  • Page 21: Blink Code Diagnostics (Abs Only)

    ABS Indicator Lamp: This lamp serves two purposes: it alerts troubleshooting and detailed repair instructions. TOOLBOX™ drivers to an ABS tractor fault and it is used during diagnostics to Software version 11 also provides links to the appropriate display the blink code.
  • Page 22 If the system displays eight quick flashes followed by a system configuration code, the clear was successful. Stored ABS faults have been cleared from memory. If you do not receive eight flashes, there are still active faults that must be repaired before they can be cleared.
  • Page 23 3 Diagnostics, Troubleshooting and Testing Procedure System Response Action Step II. ABS indicator lamp begins flashing two-digit blink Determine if fault is active or stored: code(s). Press and hold Blink Code Active Fault: Lamp will repeatedly display one code. Switch for one second, then Stored Fault: Lamp will display code for each stored release.
  • Page 24 1.5 s Light ON Repeat of Blink Code 1st Digit 2nd Digit ( 3 ) Example: Blink Code 2-3: Fault in ABS modulator valve, right rear drive axle. 1 Second Stored Faults Hold Displays all stored faults once—last fault Pause...
  • Page 25 3 Diagnostics, Troubleshooting and Testing Figure 3.13 Note: After faults are cleared and vehicle is started, ABS lamp will stay on until vehicle is driven over 4 mph (6 km/h). 3 Second Faults Cleared Hold Continues until ignition Pause Pause...
  • Page 26 When using blink code diagnostics, the following conditions could occur: Table B: Blink Code Conditions Condition Reason Action ABS indicator lamp does not Loose or burned-out bulb. Check bulb. come on at ignition. Check connections. Make necessary repairs. Voltage not within acceptable range Check connections.
  • Page 27: Testing

    Figure 3.14 and Figure 3.15. Verify no change in resistance or open circuit between sensor by itself and through harness. Check harness by itself for any shorts to battery and shorts to ground. Measurements should read as follows: WABCO Maintenance Manual MM-0112 (Revised 07-18)
  • Page 28 X3-Green 3 and 4 LR (3rd axle) X3-15 pin 2 and 5 LR (3rd axle) X4-Brown 3 and 4 RR (3rd axle) X3-15 pin 11 and 14 RR (3rd axle) X4-Brown 5 and 6 WABCO Maintenance Manual MM-0112 (Revised 07-18)
  • Page 29: Modulator Valve Testing

    NOTE: If resistance exceeds 9.0 ohm for 12V system (21.0 ohm for 24V system), verify the reading was not taken between the inlet and outlet. If the correct pins were tested, clean the electrical contacts at the modulator and retest. WABCO Maintenance Manual MM-0112 (Revised 07-18)
  • Page 30 LR (3rd Axle) OV X3-15 pin RR (3rd Axle) IV X3-15 pin RR (3rd Axle) OV X3-15 pin Optional with Trailer IV X3-15 pin Stability Control Trailer OV X3-15 pin Trailer Common X3-15 pin WABCO Maintenance Manual MM-0112 (Revised 07-18)
  • Page 31 LR (3rd Axle) X4-Brown Common Common RR (3rd Axle) IV X4-Brown RR (3rd Axle) IV X4-Brown RR (3rd Axle) OV X4-Brown RR (3rd Axle) OV X4-Brown RR (3rd Axle) X4-Brown RR (3rd Axle) X4-Brown Common Common WABCO Maintenance Manual MM-0112 (Revised 07-18)
  • Page 32 X2-Green Modulator Valve Testing Available in WABCO TOOLBOX™ Software (PC Diagnostics) The ABS modulator valves as well as the trailer modulator valve can be cycled using WABCO TOOLBOX™ Software. To cycle the modulator valves, choose the option “Valves” from the “Component Tests”...
  • Page 33: Active Braking Valves (Abv) Testing

    Same as above, no more than 1 connected ohm difference ECU harness by itself for battery No continuity voltage or ground Figure 3.23 CAB MOUNT ECU’S: LOOKING INTO WIRE HARNESS CONNECTOR 4007207a Figure 3.23 WABCO Maintenance Manual MM-0112 (Revised 07-18)
  • Page 34 ABV Testing Available in WABCO TOOLBOX™ Supply Non-ESC Software Drive Axle ABV X3-Green The Active Braking Valves can be cycled using WABCO TOOLBOX™ Common Software. Trailer ABV Supply X2-Black To cycle the ABVs, choose the option “Valves” from the “Component Trailer ABV X2-Black Tests”...
  • Page 35 3 Diagnostics, Troubleshooting and Testing Figure 3.25 Figure 3.27 4010621a Figure 3.25 Figure 3.26 4010623a WABCO Toolbox – Pneumatic ABS Diagnostics Figure 3.27 Figure 3.28 WABCO Toolbox - Activate Valves 4010622a Figure 3.26 The valve selection screen will appear where you can choose to cycle Front Axle ABV, Rear Axle ABV or Trailer ABV individually.
  • Page 36: Brake Pressure Sensor Testing

    Tests” drop-down menu. Listen to ensure the correct valve is Ground cycling. If you are unsure which test option to choose, please Pressure Signal contact WABCO North America at 855-228-3203 and have your ECU part number available. Pressure Sensor Testing Available in WABCO TOOLBOX™ Software...
  • Page 37: Esc Can Network Testing

    NOTE: Do not load test across power and ground at the ESC Figure 3.34 and Figure 3.35. Module. Measure voltage supply Key ON. Measure CAN High voltage Key ON. Measure CAN Low voltage Key ON. WABCO Maintenance Manual MM-0112 (Revised 07-18)
  • Page 38 ESC Information Available in WABCO TOOLBOX™ ESC CAN-Low X4-18 pin Software 11 or Higher ESC CAN-High X4-18 pin ESC Information can be accessed through WABCO TOOLBOX™ Frame-Mounted Power Supply X2-Green Software 11 or higher under Components, ESC. With ESC Ground...
  • Page 39: Steering Angle Sensor (Sas) Testing

    Steering Angle Sensor (SAS) Testing Figure 3.37 Electrical Checks The following tests are for WABCO SAS Only. Disconnect SAS and check terminating resistance across Pin 1 and Pin 2 of the SAS. Figure 3.39 and Figure 3.40. For the following checks, all the ECU and ESC module connectors must be plugged in as the ECU provides all voltage, ground and CAN communications.
  • Page 40: Cab Mount Ecu: Looking Into Wire Harness Connector

    Figure 3.41 CAN-Low STEERING ANGLE SENSOR CONNECTOR Figure 3.43 CAB MOUNT ECU: FRAME MOUNT ECU LOOKING INTO WIRE WITH ESC: HARNESS CONNECTOR LOOKING INTO WIRE HARNESS CONNECTOR X2-GREEN 4007216a Figure 3.41 4007215a Figure 3.43 WABCO Maintenance Manual MM-0112 (Revised 07-18)
  • Page 41: Ecu Circuit Testing

    Electrical Checks Figure 3.44 CAB MOUNT ECU’S: If the ABS ECU is the only ECU on the J1939 datalink which LOOKING INTO WIRE HARNESS CONNECTOR cannot communicate, then take measurements at the ABS ECU connector. If other ECUs are not communicating, then troubleshoot the vehicle datalink backbone and contact the vehicle OEM for technical assistance if required.
  • Page 42 Without ESC J1939 Low X1-Gray Frame-Mounted J1939 High X1-Black With ESC J1939 Low X1-Black J1587 Datalink Circuit Connector Pins Cab-Mounted ECU J1939 High J1939 Low Frame-Mounted J1939 High X1-Gray ECU without ESC J1939 Low WABCO Maintenance Manual MM-0112 (Revised 07-18)
  • Page 43: Section 4: Component Replacement

    If necessary, raise the tires off the ground. Place safety stands −40° to 300°F (−40° to 150°C). under the axle. Lubricants approved for use on WABCO sensors and spring clips are Depending on the axle, wheel hub and brake configurations, as follows. Figure 4.1.
  • Page 44: Modulator Valves

    Connect the sensor cable to the chassis harness. Install the fasteners used to hold the sensor cable in place. Apply a WABCO recommended lubricant to the sensor spring clip and sensor. Install the sensor spring clip. Make sure the spring clip tabs are on the inboard side of the vehicle.
  • Page 45: Active Braking Valves (Abv)

    Pressurized air can cause serious personal injury. recommendation. Connect the line to the brake chambers to Port 2 of the ABS Disconnect the wiring from the valve. valve. Connect the air supply line to Port 1 of the ABS valve.
  • Page 46: Abs Valve Packages

    Stability Control lamp operates correctly. Drain the air from all system air tanks. Start the vehicle. Remove all the air lines and connections from the ABS valve Fully charge the reservoirs with air. Shut off the vehicle. package. Figure 4.6 and Figure 4.7.
  • Page 47 Plug any unused ports on the replacement valve(s). ABS RELAY VALVE PACKAGE 4007848a Attach the ABS modulator valve(s) to the relay or quick release Figure 4.7 valve. Use a 6 mm Allen wrench to tighten the Allen-head bolts to 13-15 lb-ft (18-20 N m).
  • Page 48: Active Braking Valve On The Abs Valve Package

    SEAL active braking valve (solenoid valve). If the valve package must be ADAPTER removed, follow the instructions for removing and replacing the ABS O-RINGS Valve Package that appear in this section of the manual. WARNING Relieve line pressure by bleeding air from the appropriate supply tank.
  • Page 49: Electronic Control Unit (Ecu)

    Figure 4.11 Start the vehicle. Fully charge the reservoirs with air. Shut off the vehicle. Apply the brakes. Listen for air leaks at all valves. Drive the vehicle. Verify that the ABS indicator lamp operates correctly. RELAY VALVE SUPPLY PORT 1002044a Electronic Control Unit (ECU) Figure 4.11...
  • Page 50: Steering Angle Sensor (Sas) - Wabco Only

    To test the ECU installation: steering wheel near the top of the column. Turn the ignition ON and verify that the ABS self test and ABS If the SAS is located at the top of the steering column, remove light comes on and goes off.
  • Page 51: Electronic Stability Control (Esc) Module

    When the ESC End of Line Calibration Procedure is completed, Figure 4.14 the ABS and ATC/ESC lamps should come on and go back off when ignition power is turned on. The ATC/ESC lamp may remain on briefly after the ABS lamp goes off.
  • Page 52: Brake Pressure Sensor

    -5° When the ESC End of Line Calibration Procedure is completed, the ABS and ATC/ESC lamps should come on and go back off when ignition power is turned on. The ATC/ESC lamp may remain on briefly after the ABS lamp goes off.
  • Page 53 Start the vehicle and fully charge the reservoirs with air. Shut off the vehicle. Apply the brakes and check for air leaks at the brake pressure sensor. There should not be any active faults displayed in the ECU memory. WABCO Maintenance Manual MM-0112 (Revised 07-18)
  • Page 54: Section 5: System Configurations
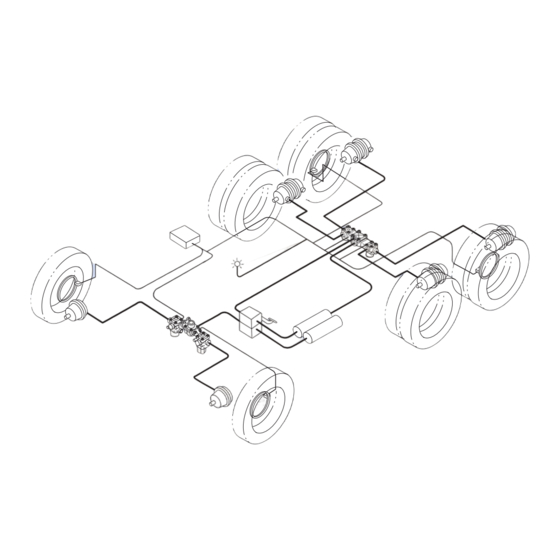
    OEM for the correct configuration of your vehicle. Refer to Figure 5.1, Figure 5.2, Figure 5.3, Figure 5.4, Figure 5.5, LAMPS Figure 5.6 and Figure 5.7 for system configuration layouts. Figure 5.1 STANDARD OR BASIC 4S/4M ABS VALVE PACKAGE INSTALLATION (REAR) LAMPS VALVE PACKAGE INSTALLATION (FRONT)
  • Page 55 PROTECTION CONTROL INSTALLATION VALVE (REAR) MODULATOR (OPTIONAL) TRAILER ACTIVE BRAKING VALVE LAMPS ATC VALVE FRONT AXLE ACTIVE BRAKING VALVE PACKAGE VALVE INSTALLATION (OPTIONAL) (FRONT) AIR LINES PRESSURE SENSOR ELECTRICAL LINES (OPTIONAL) 4007813b Figure 5.6 WABCO Maintenance Manual MM-0112 (Revised 07-18)
  • Page 56: Section 6: Wiring Diagrams And Connectors

    Figure 6.1 BASIC 4004024b BASIC ECU (CAB-MOUNTED) Figure 6.1 Figure 6.2 UNIVERSAL 4004025b UNIVERSAL ECU (CAB-MOUNTED) Figure 6.2 Figure 6.3 UNIVERSAL ECU (CAB-MOUNTED) WITH 4 CONNECTORS 4007395b UNIVERSAL ECU (CAB-MOUNTED) WITH 4 CONNECTORS Figure 6.3 WABCO Maintenance Manual MM-0112 (Revised 07-18)
  • Page 57: X2-Green

    (ONLY FOR 6 CHANNEL) 4004026a FRAME-MOUNTED ECU Figure 6.4 ECU (Frame-mounted) with ESC and/or HSA Figure 6.5 FRAME MOUNT ECU WITH ESC AND/OR HSA X1-BLACK X2-GREEN X4-BROWN X3-GREEN (ONLY FOR 6 CHANNEL) 4007396b Figure 6.5 WABCO Maintenance Manual MM-0112 (Revised 07-18)
  • Page 58 6 Wiring Diagrams and Connectors Basic ECU ABS Only with Optional Automatic Traction Control (ATC) (Cab-mounted) Figure 6.6 INLET RIGHT FRONT INLET INLET INLET VALVE 16 AWG ABS VALVE VALVE VALVE VALVE OUTLET VALVE INLET LEFT FRONT VALVE 16 AWG...
  • Page 59 6 Wiring Diagrams and Connectors 6S/6M Universal ECU ABS Only with Optional Automatic Traction Control (ATC) (6S/4M and 4S/4M Configurations are also available) Figure 6.7 J1587 B J1587 B J1587 A J1587 A J1939 L J1939 L TR-WL J1939 J1939...
  • Page 60 GND* Momentary Switch Optional Equipment Twisted Pair = TP All unmarked wires should be 16 or 18 AWG. All fuses should be blade type. 4004030j *All connected to a common star ground. Figure 6.8 WABCO Maintenance Manual MM-0112 (Revised 07-18)
  • Page 61 GND* Momentary Switch Optional Equipment Twisted Pair = TP All unmarked wires should be 16 or 18 AWG. All fuses should be blade type. *All connected to a common star ground. 4004030k Figure 6.9 WABCO Maintenance Manual MM-0112 (Revised 07-18)
  • Page 62 GND* Momentary Switch Optional Equipment Twisted Pair = TP All unmarked wires should be 16 or 18 AWG. All fuses should be blade type. *All connected to a common star ground. 4007397b Figure 6.10 WABCO Maintenance Manual MM-0112 (Revised 07-18)
  • Page 63 GND* Momentary Switch Optional Equipment Twisted Pair = TP All unmarked wires should be 16 or 18 AWG. All fuses should be blade type. *All connected to a common star ground. 4008457b Figure 6.11 WABCO Maintenance Manual MM-0112 (Revised 07-18)
  • Page 64 GND* Momentary Switch Optional Equipment Twisted Pair = TP All unmarked wires should be 16 or 18 AWG. All fuses should be blade type. *All connected to a common star ground. 4012621a Figure 6.12 WABCO Maintenance Manual MM-0112 (Revised 07-18)
  • Page 65 6 Wiring Diagrams and Connectors 6S/6M Frame-mounted ECU ABS or RSC (6S/4M and 4S/4M Configurations are also available) Figure 6.13 *4 VALVES – 5 AMP +12V IGN *6 VALVES – 10 AMP OR BATTERY 15AMP +12V 14 AWG SENSOR 14 AWG...
  • Page 66: X2-Green

    ABS VALVE COMMON 16 AWG RIGHT FRONT OUTLET INLET ABS VALVE 16 AWG COMMON LEFT REAR FRONT AXLE LD-GND INLET SENSOR LEFT FRONT SENSOR SENSOR LEFT REAR RIGHT FRONT X3-GREEN X2-GREEN 4010642a Figure 6.14 WABCO Maintenance Manual MM-0112 (Revised 07-18)
  • Page 67 OUTLET RIGHT REAR ABS VALVE COMMON 16 AWG RIGHT FRONT OUTLET INLET ABS VALVE 16 AWG COMMON LEFT REAR INLET SENSOR LEFT FRONT SENSOR SENSOR LEFT REAR RIGHT FRONT X3-GREEN X2-BLACK 4012053a Figure 6.15 WABCO Maintenance Manual MM-0112 (Revised 07-18)
  • Page 68: X2-Green

    ABS VALVE COMMON 16 AWG RIGHT FRONT OUTLET INLET ABS VALVE 16 AWG COMMON LEFT REAR FRONT AXLE LD-GND INLET SENSOR LEFT FRONT SENSOR SENSOR LEFT REAR RIGHT FRONT X3-GREEN X2-GREEN 4010643a Figure 6.16 WABCO Maintenance Manual MM-0112 (Revised 07-18)
  • Page 69: Section 7: Spn, Sid, Fmi Fault Codes

    7 SPN, SID, FMI Fault Codes SPN, SID, FMI Diagnostic Trouble Code List 7 SPN, SID, FMI Fault Codes Figure 7.1 4010644a Figure 7.1 WABCO Maintenance Manual MM-0112 (Revised 07-18)
  • Page 70 7 SPN, SID, FMI Fault Codes Figure 7.2 4010645a Figure 7.2 WABCO Maintenance Manual MM-0112 (Revised 07-18)
  • Page 71 7 SPN, SID, FMI Fault Codes Figure 7.3 4010646a Figure 7.3 WABCO Maintenance Manual MM-0112 (Revised 07-18)
  • Page 72 7 SPN, SID, FMI Fault Codes Figure 7.4 4010647a Figure 7.4 WABCO Maintenance Manual MM-0112 (Revised 07-18)
  • Page 73 7 SPN, SID, FMI Fault Codes Figure 7.5 4010648a Figure 7.5 WABCO Maintenance Manual MM-0112 (Revised 07-18)
  • Page 74 7 SPN, SID, FMI Fault Codes Figure 7.6 4010649a Figure 7.6 WABCO Maintenance Manual MM-0112 (Revised 07-18)
  • Page 75 7 SPN, SID, FMI Fault Codes Figure 7.7 4010650a Figure 7.7 WABCO Maintenance Manual MM-0112 (Revised 07-18)
  • Page 76 7 SPN, SID, FMI Fault Codes Figure 7.8 4010651a Figure 7.8 WABCO Maintenance Manual MM-0112 (Revised 07-18)
  • Page 77 7 SPN, SID, FMI Fault Codes Figure 7.9 4010652a Figure 7.9 WABCO Maintenance Manual MM-0112 (Revised 07-18)
  • Page 78 7 SPN, SID, FMI Fault Codes Figure 7.10 4010653a Figure 7.10 WABCO Maintenance Manual MM-0112 (Revised 07-18)
  • Page 79 7 SPN, SID, FMI Fault Codes Figure 7.11 4010654a Figure 7.11 WABCO Maintenance Manual MM-0112 (Revised 07-18)
  • Page 80 7 SPN, SID, FMI Fault Codes Figure 7.12 4010655a Figure 7.12 WABCO Maintenance Manual MM-0112 (Revised 07-18)
  • Page 81 7 SPN, SID, FMI Fault Codes Figure 7.13 4010656a Figure 7.13 WABCO Maintenance Manual MM-0112 (Revised 07-18)
  • Page 82 7 SPN, SID, FMI Fault Codes Figure 7.14 4010657a Figure 7.14 WABCO Maintenance Manual MM-0112 (Revised 07-18)
  • Page 83 7 SPN, SID, FMI Fault Codes Figure 7.15 4010658a Figure 7.15 WABCO Maintenance Manual MM-0112 (Revised 07-18)
  • Page 84 7 SPN, SID, FMI Fault Codes Figure 7.16 4010659a Figure 7.16 WABCO Maintenance Manual MM-0112 (Revised 07-18)
  • Page 85 7 SPN, SID, FMI Fault Codes Figure 7.17 4010660a Figure 7.17 WABCO Maintenance Manual MM-0112 (Revised 07-18)
  • Page 86 7 SPN, SID, FMI Fault Codes Figure 7.18 4010661a Figure 7.18 WABCO Maintenance Manual MM-0112 (Revised 07-18)
  • Page 87 7 SPN, SID, FMI Fault Codes Figure 7.19 4010662a Figure 7.19 WABCO Maintenance Manual MM-0112 (Revised 07-18)
  • Page 88 7 SPN, SID, FMI Fault Codes Figure 7.20 4010663a Figure 7.20 WABCO Maintenance Manual MM-0112 (Revised 07-18)
  • Page 89 7 SPN, SID, FMI Fault Codes Figure 7.21 4010664a Figure 7.21 WABCO Maintenance Manual MM-0112 (Revised 07-18)
  • Page 90 7 SPN, SID, FMI Fault Codes Figure 7.22 4010665a Figure 7.22 WABCO Maintenance Manual MM-0112 (Revised 07-18)
  • Page 91 7 SPN, SID, FMI Fault Codes Figure 7.23 4010666a Figure 7.23 WABCO Maintenance Manual MM-0112 (Revised 07-18)
  • Page 92 7 SPN, SID, FMI Fault Codes Figure 7.24 4010667a Figure 7.24 WABCO Maintenance Manual MM-0112 (Revised 07-18)
  • Page 93 7 SPN, SID, FMI Fault Codes Figure 7.25 4010668a Figure 7.25 WABCO Maintenance Manual MM-0112 (Revised 07-18)
  • Page 94 7 SPN, SID, FMI Fault Codes Figure 7.26 4012655a Figure 7.26 WABCO Maintenance Manual MM-0112 (Revised 07-18)
  • Page 95 7 SPN, SID, FMI Fault Codes Figure 7.27 4012656a Figure 7.27 WABCO Maintenance Manual MM-0112 (Revised 07-18)
  • Page 96 7 SPN, SID, FMI Fault Codes Figure 7.28 4012657a Figure 7.28 WABCO Maintenance Manual MM-0112 (Revised 07-18)
  • Page 97 7 SPN, SID, FMI Fault Codes Figure 7.29 4012658a Figure 7.29 WABCO Maintenance Manual MM-0112 (Revised 07-18)
  • Page 98: Section 8: Appendix I Reconfiguration Procedure

    Figure 8.1 WABCO ABS How to Reconfigure an ECU (E Version) Before reconfiguring the ECU, contact WABCO North America at 855-228-3203 for additional information. E version ECUs will automatically learn and memorize the following components if they are connected at start up:...
  • Page 99: Manual Reconfiguration

    Four blinks: 6S/4M present. These must be repaired before longer than seven seconds. proceeding with the reconfiguration. Five blinks: 6S/6M 6X4 NOTE: The ABS lamp may display eight quick flashes before the system configuration code begins. WABCO Maintenance Manual MM-0112 (Revised 07-18)
  • Page 100 A complete ATC system — including an ATC lamp — is installed. If not, the ATC lamp will not come on. The ABS lamp will continuously blink the system ECU reconfiguring the system. configuration code. The ECU checks the following components...
  • Page 101: Section 9: Appendix

    Figure 9.2 SAS Calibration In the Main Menu, select J1939 Tractor ABS or J1708 TOOLBOX™, then Tractor ABS. The ABS Main Screen will appear. Figure 9.3 and NOTE: The SAS Calibration must be done after a front wheel Figure 9.4.
  • Page 102: Section 10: Appendix

    9 Appendix II Figure 9.3 Figure 9.5 WABCO Toolbox – Pneumatic ABS Diagnostics WABCO ABS 4010689a Figure 9.5 If you are using TOOLBOX™ Software version 11 or higher, click 4010672a on “Components” button. A drop box will appear, Select “ESC”...
  • Page 103 9 Appendix II Figure 9.7 Figure 9.9 WABCO Toolbox – Components – ESC 4010677a Figure 9.9 NOTE: Depending on your version of TOOLBOX™ Software, the message in Figure 9.9 may appear. If it does, always click “Yes” to recalibrate the Steering Angle Sensor in order to complete the ESC 4010675a Initialization.
  • Page 104 Initialization procedure requires the vehicle to be driven. NOTE: If SAS calibration was completed before ESC initialization, the Figure 9.12 ATC lamp will be continuously blinking before ESC initialization begins. Figure 9.14. 4010680a Figure 9.12 WABCO Maintenance Manual MM-0112 (Revised 07-18)
  • Page 105 ATC lamp will go out. Follow the instructions on The screen will automatically change to the next portion of the the screen. procedure. Figure 9.16. The screen will automatically change to the next portion of the procedure. Figure 9.15. WABCO Maintenance Manual MM-0112 (Revised 07-18)
  • Page 106 ECU will accumulate the information until the desired distance is reached, but must be done within the same ignition cycle. The calibration requires driving in both directions with the steering wheel rotated 360 degrees. WABCO Maintenance Manual MM-0112 (Revised 07-18)
  • Page 107 4010688a When the ignition is turned back ON, check that no active or stored faults are logged in the ECU and that the ABS and ATC/ESC warning Figure 9.20 lamps are OFF. Figure 9.19 and Figure 9.20.
  • Page 108: E8 Esc End Of Line Calibration Procedure

    “Components” button. A drop-down menu will appear. Select the must be used to complete the end of line procedure. option “ESC.” Figure 10.3. In the Main Menu, select Pneumatic ABS (J1939), the ABS Main Screen will appear. Figure 10.1 and Figure 10.2. WABCO Maintenance Manual MM-0112 (Revised 07-18)
  • Page 109 NOTE: The vehicle needs to be sitting still during SAS calibration. To complete the SAS Calibration, position the steer axle tires straight ahead and click “SAS Calibration”. Upon successful calibration, the status box will display “SAS Calibration message sent successfully”. Figure 10.5. WABCO Maintenance Manual MM-0112 (Revised 07-18)
  • Page 110 When the ignition is turned back ON, check that no active or stored faults are logged in the ECU and that the ABS and ATC/ESC warning lamps are OFF. To check ESC system status, open the ESC menu and click the “ESC Info”...
  • Page 111 SPN 520210 88 FMI 14 will be active. Follow the ESC initialization again and make sure each portion is successfully completed. Make sure ignition power down is completed for the ECU to successfully save data. WABCO Maintenance Manual MM-0112 (Revised 07-18)
  • Page 112 Aftermarket programming is a method of servicing most pneumatic purchased at https://wabco-na.snapon.com. ABS ECUs. Instead of swapping one fully programmed ECU for If you do not meet any of the above requirements, a fully another, programmable ECUs can be stocked at the point of service programmed ECU can be purchased from Meritor Aftermarket by and programmed using a purchased configuration file.
  • Page 113 11 Appendix IV When the replacement ECU is installed, the ABS lamp will be lit due Figure 11.3 to an active DTC: Description Calibration Memory – Wheel Parameter Incorrect NOTE: This DTC will clear after a configuration file has been successfully loaded into the ECU.
  • Page 114 The first step in the checkout process is to verify contact information. The information will automatically populate based on login information; all fields can be edited. When the correct contact details are displayed, click Bill to this address. Figure 11.7. 4012636a Figure 11.8 WABCO Maintenance Manual MM-0112 (Revised 07-18)
  • Page 115 Begin by verifying you have the correct version of TOOLBOX™ recommended file storage location. Press OK to continue with Software. First locate the software version on the WABCO label on saving the file. Figure 11.11. the ECU. An example of the cab ECU label is shown, and the ECU software version is circled.
  • Page 116: Section 11: Appendix

    4012641a Figure 11.13 The programmable ECU label will read E4F, E4C, or E8C. Determine the ABS ECU baud rate (specified by the vehicle manufacturer) and match it with the stated software to determine the minimum 4012642a TOOLBOX™ version required to complete programming using Table Figure 11.14...
  • Page 117 Aftermarket Programming Figure 11.17 application window. Within the text box, an error code will be displayed with instructions. If the programming operation cannot be completed, record the error code and contact WABCO North America at 855-228-3203. Figure 11.19. Figure 11.19 4012645a Figure 11.17...
  • Page 118: Aftermarket Programming Failure Codes List

    11 Appendix IV Aftermarket Programming Failure Codes List Figure 11.20 4012092a Figure 11.20 WABCO Maintenance Manual MM-0112 (Revised 07-18)
  • Page 119 11 Appendix IV Figure 11.21 4012093a Figure 11.21 WABCO Maintenance Manual MM-0112 (Revised 07-18)
  • Page 120 11 Appendix IV Figure 11.22 4012094a Figure 11.22 WABCO Maintenance Manual MM-0112 (Revised 07-18)
  • Page 121 11 Appendix IV Figure 11.23 4012095a Figure 11.23 WABCO Maintenance Manual MM-0112 (Revised 07-18)
  • Page 122 Partnering with the transportation industry as it maps a route toward autonomous driving, WABCO also uniquely connects trucks, trailers, © 2018 WABCO North America – All rights reserved – MM-0112 / 07.2018...

This manual is also suitable for:

RscEscHsa

Table of Contents

Save PDF