Table of Contents
Advertisement
PENfriend2 labelling PEN
DL110
Please retain these instructions for future reference.
General description
Record information onto a self-adhesive voice label and attach to a wide range of
items in and around the home, at school and at work, with this simple and easy-to-use
labelling PEN. Store up to 1 hour of recording on any label, 125 hours of recording
time on the 4GB internal memory.
Items supplied with the PENfriend2
1 x PENfriend2 labelling PEN
127 x mixed sized labels (small round, large round, large square in yellow and orange)
3 x magnetic recordable badges (1 hour recording per badge) for cans
1 x lanyard
1 x storage box
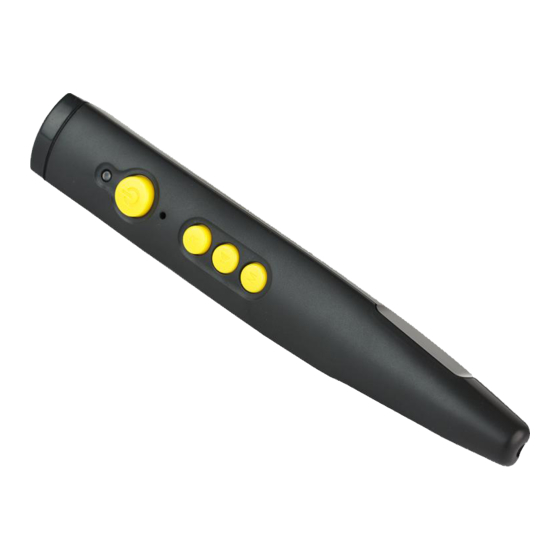
Orientation
Position the PENfriend2 so that the thin end (tip) is facing downwards and the buttons
are facing you.
The blunt top end is where the lanyard fits and contains the loudspeaker. (See
Lanyard attachment section for details).
On the front of PENfriend2 are 4 buttons. For ease of use the buttons are of different
heights with the power button protruding the most and the mode button the least.
Starting from the top, they are as follows: the larger round power on/off button; the
record button; the volume button, and finally there is the mode button.
With PENfriend2 still facing you on the left side there are two ports (holes). The top
circular port is for your headphones and the bottom rectangular port is for the USB
cable (not included). Please note that you will need a USB cable to access the Label
Manager. This can be purchased from the RNIB (Product code: HT263).
On the back of PENfriend2 is the battery compartment (see the Battery insertion and
replacement section for details.)
1
Advertisement
Table of Contents

Related Manuals for RNIB PenFriend 2


Summary of Contents for RNIB PenFriend 2
-
Page 1: General Description
(not included). Please note that you will need a USB cable to access the Label Manager. This can be purchased from the RNIB (Product code: HT263). On the back of PENfriend2 is the battery compartment (see the Battery insertion and... -
Page 2: Getting Started
PENfriend 2. Everything then is kept safely in one place. The flap in the packaging has eight embossed sound spots which play back audio descriptions of how PENfriend2 works. - Page 3 Using PENfriend2 There are four buttons of reducing height on your PENfriend2. The most important buttons, the power and record buttons, stand out proud over the body of the pen for easy detection. The volume button only slightly protrudes and the mode button remains flush with the body of the pen.
- Page 4 Volume The third button from the top is both volume up/down. It is nearly flush with the body of the PEN. Click quickly to scroll up and down the volume levels. If you are using headphones, remember that the volume level might need changing. NB: The volume level you set will become the default when you next switch on the PEN.
- Page 5 Listening to a recorded label Each time you switch on PENfriend2 it automatically starts in the correct mode for finding or recording labels. Touch the recorded label with the thin end of the PENfriend2 to hear your recording. Reusing labels You can record onto a label as many times as you like since all the labels are reusable.
-
Page 6: Battery Replacement
If you have any issues with the product and you did not purchase directly from RNIB then please contact your retailer in the first instance. For all returns and repairs contact RNIB first to get a returns authorisation number to help us deal efficiently with your product return. - Page 7 At the end of the product’s life you can return it to the supplier or manufacturer for free of charge disposal. This is to comply with ‘The Waste Electrical and Electronic Equipment Directive’ (WEEE). Revised: November 2014 © RNIB...
Need help?
Do you have a question about the PenFriend 2 and is the answer not in the manual?
Questions and answers
Hello I would like to understand wich technology is used for the communication between the penfriend and the Labels (optic/ QR or barre code) ? Best rgds