Advertisement
Network Address Settings (S3 - S8 in Switch Bank 3)
Addr
S3
S4
S5
S6
S7
1
OFF
OFF
OFF
OFF
OFF
2
OFF
OFF
OFF
OFF
ON
3
OFF
OFF
OFF
OFF
ON
4
OFF
OFF
OFF
ON
OFF
5
OFF
OFF
OFF
ON
OFF
6
OFF
OFF
OFF
ON
ON
7
OFF
OFF
OFF
ON
ON
8
OFF
OFF
ON
OFF
OFF
9
OFF
OFF
ON
OFF
OFF
10
OFF
OFF
ON
OFF
ON
11
OFF
OFF
ON
OFF
ON
12
OFF
OFF
ON
ON
OFF
13
OFF
OFF
ON
ON
OFF
14
OFF
OFF
ON
ON
ON
15
OFF
OFF
ON
ON
ON
16
OFF
ON
OFF
OFF
OFF
17
OFF
ON
OFF
OFF
OFF
18
OFF
ON
OFF
OFF
ON
19
OFF
ON
OFF
OFF
ON
20
OFF
ON
OFF
ON
OFF
21
OFF
ON
OFF
ON
OFF
22
OFF
ON
OFF
ON
ON
23
OFF
ON
OFF
ON
ON
24
OFF
ON
ON
OFF
OFF
25
OFF
ON
ON
OFF
OFF
26
OFF
ON
ON
OFF
ON
27
OFF
ON
ON
OFF
ON
28
OFF
ON
ON
ON
OFF
29
OFF
ON
ON
ON
OFF
30
OFF
ON
ON
ON
ON
31
OFF
ON
ON
ON
ON
32
ON
OFF
OFF
OFF
OFF
Installations with NET*MUX4s support up to 63 controllers. Installations without NET*MUX4s are
limited to 16 controllers, which can have any address in the range 1-63. Where possible, limit your
multi-drops to 16 units for optimum speed and performance. Even at 9600 bps, two 16-unit
configurations outperform one 32-unit configuration.
For more information, see the
SNIB3 topics in the DIGI*TRAC
Design and Installation Guide.
S8
Addr
S3
S4
S5
S6
ON
33
ON
OFF
OFF
OFF
34
ON
OFF
OFF
OFF
OFF
35
ON
OFF
OFF
OFF
ON
36
ON
OFF
OFF
ON
OFF
37
ON
OFF
OFF
ON
ON
OFF
38
ON
OFF
OFF
ON
ON
39
ON
OFF
OFF
ON
40
ON
OFF
ON
OFF
OFF
ON
41
ON
OFF
ON
OFF
OFF
42
ON
OFF
ON
OFF
43
ON
OFF
ON
OFF
ON
44
ON
OFF
ON
ON
OFF
45
ON
OFF
ON
ON
ON
46
ON
OFF
ON
ON
OFF
47
ON
OFF
ON
ON
ON
48
ON
ON
OFF
OFF
OFF
ON
49
ON
ON
OFF
OFF
OFF
50
ON
ON
OFF
OFF
51
ON
ON
OFF
OFF
ON
OFF
52
ON
ON
OFF
ON
ON
53
ON
ON
OFF
ON
OFF
54
ON
ON
OFF
ON
ON
55
ON
ON
OFF
ON
OFF
56
ON
ON
ON
OFF
ON
57
ON
ON
ON
OFF
OFF
58
ON
ON
ON
OFF
ON
59
ON
ON
ON
OFF
OFF
60
ON
ON
ON
ON
ON
61
ON
ON
ON
ON
62
ON
ON
ON
ON
OFF
63
ON
ON
ON
ON
ON
OFF
1900 Carnegie Ave., Bldg. B
Santa Ana, CA 92705-5520
(949) 250-8888
www.identiv.com
4
SNIB3 Quick Installation Guide
S7
S8
OFF
ON
ON
OFF
ON
ON
OFF
OFF
OFF
ON
ON
OFF
ON
ON
OFF
OFF
OFF
ON
ON
OFF
ON
ON
OFF
OFF
OFF
ON
ON
OFF
ON
ON
OFF
OFF
OFF
ON
ON
OFF
ON
ON
OFF
OFF
OFF
ON
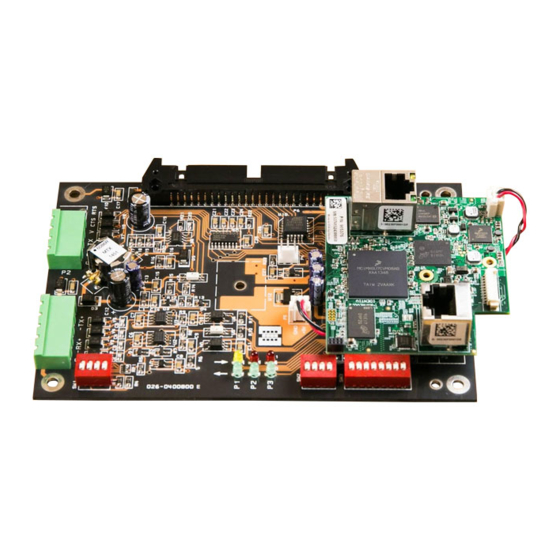
Mounting the Board
ON
OFF
To mount the SNIB3 expansion board:
ON
ON
1.
Turn all system power off: remove the connector for the standby battery, disconnect the AC
OFF
OFF
power connector or the power supply fuse.
OFF
ON
2.
Install the new SNIB3 board into the upper left corner of the enclosure using the supplied
screws. If there are additional expansion boards to install, install them first using the supplied
ON
OFF
standoffs. Install the SNIB3 board last so that it is at the top of the stack.
ON
ON
3.
Connect the EBIC5 connector. Reconnect the AC power connector (or power supply fuse), then
OFF
OFF
reconnect the standby battery connector. The controller board's yellow test LED should light;
OFF
ON
the other lights go through a start up sequence. When the sequence is complete, the yellow test
LED goes out and the other lights stabilize.
ON
OFF
4.
If required, connect an RJ-45 network cable to the SNIB3 Ethernet connector.
ON
ON
If a MEB/BE, MEB/CE, or MEB/CB board is installed, do
!
not remove it. Removing any of these boards will cause
the controller to malfunction and requires a system
cold start. This will erase all additional information in
their memory and requires complete system download.
If you stack boards, make sure the
Connect
SNIB3 is on top of the stack, so you
screws to
can wire the board, configure its DIP
1
the board.
switches, and view its status LEDs.
Revised 6/20/2016
Advertisement
Table of Contents

Summary of Contents for Identiv SNIB3
- Page 1 Turn all system power off: remove the connector for the standby battery, disconnect the AC power connector or the power supply fuse. Install the new SNIB3 board into the upper left corner of the enclosure using the supplied screws. If there are additional expansion boards to install, install them first using the supplied standoffs.
- Page 2 9600 bps. Installations with 4,000 feet can be achieved with the RS-485 · Do not download CCM or SNIB3 firmware to the master SNIB3 at the same time as downstream NET*MUX4s are limited to 9600 bps.
Need help?
Do you have a question about the SNIB3 and is the answer not in the manual?
Questions and answers